
1. Important Safety Information
Always prioritize safety when operating power tools. This section outlines critical precautions to prevent injury and damage.
- Wear Eye Protection: Always wear appropriate eye protection, such as safety glasses or goggles, to shield against flying debris.
- Use Other Safety Gear: Utilize additional safety equipment as needed, including gloves, long pants, and sturdy footwear.
- Be Aware of Flying Debris: Maintain a safe distance from others and objects that could be struck by the trimmer line. Clear the work area of any loose items.
- Guard Against Cut Hazards: The trimmer line can cause cuts. Avoid contact with the rotating line and ensure the guard is properly installed.
- Follow Manufacturer's Instructions: Adhere strictly to all instructions provided in this manual for safe operation, assembly, and maintenance.
- Battery Safety: Only use the specified RYOBI 40-Volt Lithium-Ion battery and charger. Do not expose batteries to water or extreme temperatures.
2. Product Overview and Components
The RYOBI 40-Volt Cordless String Trimmer is designed for efficient lawn and garden maintenance. It features a powerful motor, attachment capability, and a user-friendly design.
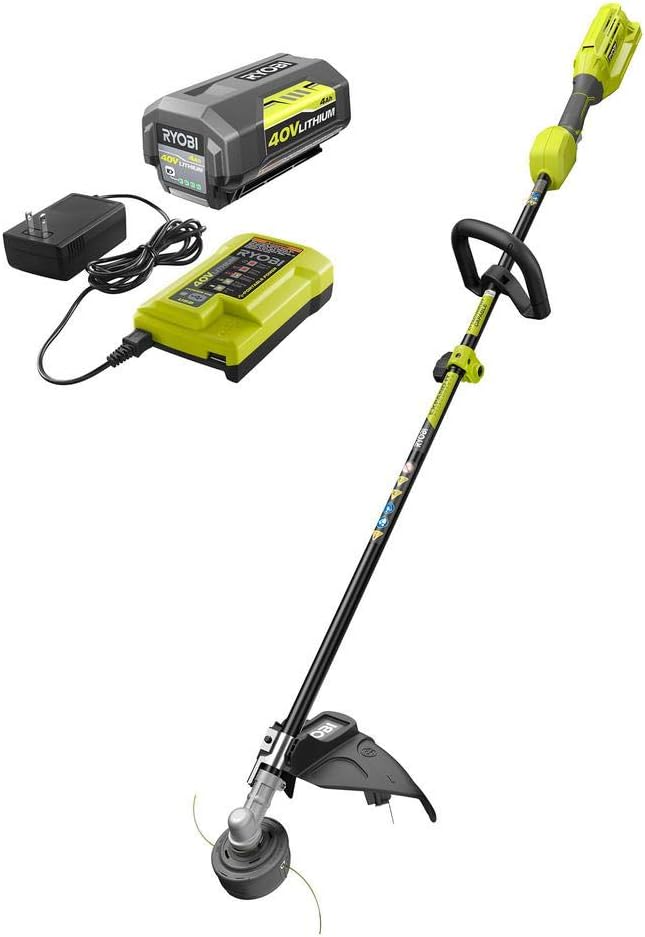
Figure 1: RYOBI 40-Volt Cordless String Trimmer, 4.0 Ah Battery, and Charger. This image displays the complete kit, including the main trimmer unit, the 40V lithium-ion battery, and the battery charger.
Key Components:
- Trimmer Head: Houses the cutting line and features a REEL-EASY bump-feed system.
- Guard: Protects the user from debris and the cutting line.
- Shaft: The main body of the trimmer, designed for attachment capability.
- Auxiliary Handle: Provides additional grip and control during operation.
- Trigger and Variable Speed Control: Activates the trimmer and allows for speed adjustment.
- Battery Compartment: Secures the 40-Volt Lithium-Ion battery.
- 40-Volt Lithium-Ion Battery: Provides power to the trimmer.
- Battery Charger: Used to recharge the 40-Volt battery.
3. Assembly Instructions
Before first use, some assembly is required. Ensure the battery is removed before beginning assembly.
- Attach the Guard:
- Align the guard with the mounting holes on the trimmer head.
- Secure the guard using the provided screws and a screwdriver. Ensure it is firmly attached to prevent movement during operation.
- Install the Auxiliary Handle:
- Slide the auxiliary handle onto the trimmer shaft.
- Adjust the handle to a comfortable operating position.
- Tighten the handle clamp securely to prevent rotation.
- Connect Shaft Sections (if applicable):
- If your model has two shaft sections, align the arrows on both sections.
- Push the sections together until the locking button snaps into place.
- Tighten the coupling knob to secure the connection.
4. Battery Charging and Installation
4.1 Charging the Battery
The RYOBI 40-Volt Lithium-Ion battery requires charging before first use and after each period of operation.
- Plug the charger into a standard 120V AC outlet. The charger indicator light will illuminate.
- Slide the 40-Volt battery onto the charger base, ensuring it clicks into place.
- The charger indicator light will change to indicate charging status (refer to charger manual for specific light patterns). A full charge typically takes approximately 90 minutes for a 4.0 Ah battery.
- Once charging is complete, remove the battery from the charger.
4.2 Installing the Battery
Always ensure the trimmer is turned off before installing or removing the battery.
- Locate the battery compartment on the trimmer.
- Align the battery with the battery port and slide it in until it clicks securely into place.
- To remove the battery, press the release latch and slide the battery out.
5. Operating Instructions
5.1 Starting and Stopping the Trimmer
- To Start:
- Ensure the battery is fully charged and securely installed.
- Press and hold the safety lock-out button.
- Squeeze the variable speed trigger. The trimmer will start.
- To Stop:
- Release the variable speed trigger. The trimmer will stop.
5.2 Adjusting Cutting Width
The trimmer allows for adjustment of the cutting width between 13 inches and 15 inches. A wider cutting path covers more area, while a narrower path can extend battery run time. Refer to the trimmer head for instructions on how to adjust the cutting width. This typically involves repositioning a blade on the guard.
5.3 Using Expand-It Attachments
This trimmer is attachment-capable, allowing it to accept RYOBI Expand-It attachments and other universal gas attachments.
- To Attach:
- Ensure the trimmer is off and the battery is removed.
- Loosen the coupling knob on the trimmer shaft.
- Press the release button on the trimmer shaft.
- Insert the attachment shaft into the trimmer's coupling, aligning the button with the hole.
- Rotate the attachment until the button locks into place.
- Tighten the coupling knob securely.
- To Remove:
- Ensure the trimmer is off and the battery is removed.
- Loosen the coupling knob.
- Press the release button and pull the attachment shaft out.
6. Line Replacement (REEL-EASY Bump-Feed Head)
The REEL-EASY bump-feed string head allows for quick and easy line reloading without disassembling the head.
- Prepare for Reloading:
- Ensure the trimmer is off and the battery is removed.
- Cut a new length of 0.080 inch twisted trimmer line (approximately 20 feet).
- Align the Head:
- Rotate the trimmer head until the arrow on the bump knob aligns with the arrow on the trimmer head housing.
- Insert the Line:
- Feed one end of the new trimmer line into one of the eyelets on the trimmer head.
- Push the line straight through the head until it exits the opposite eyelet.
- Pull the line through until an equal amount of line extends from both sides of the head.
- Wind the Line:
- While holding the line ends, rotate the bump knob clockwise to wind the line into the head.
- Continue winding until only 6-8 inches of line extend from each side.
- Advance Line During Operation:
- During operation, lightly tap the bump knob on the ground while the trimmer is running to advance more line. The line cut-off blade on the guard will trim excess line to the correct length.
7. Maintenance
Regular maintenance ensures optimal performance and extends the life of your trimmer. Always disconnect the battery before performing any maintenance.
- Cleaning: Keep the trimmer clean and free of debris. Use a damp cloth to wipe down exterior surfaces. Do not use harsh chemicals or abrasive cleaners.
- Guard Inspection: Regularly inspect the guard for damage or cracks. Replace if necessary. Ensure the line cut-off blade is sharp and clear of debris.
- Line Head Inspection: Check the trimmer head for wear and tear. Ensure the eyelets are clear and not excessively worn.
- Storage: Store the trimmer in a dry, secure location out of reach of children. Remove the battery before storing for extended periods.
- Battery Care: Store batteries in a cool, dry place. Do not store fully discharged batteries. Charge them periodically if not in use for a long time.
8. Troubleshooting
| Problem | Possible Cause | Solution |
|---|---|---|
| Trimmer does not start. | Battery not installed correctly or discharged. Safety lock-out not engaged. | Ensure battery is fully charged and securely installed. Press safety lock-out button before squeezing trigger. |
| Trimmer runs but cuts poorly. | Trimmer line too short or worn. Incorrect line type. | Advance more line by bumping the head. Replace line if worn. Use 0.080 inch twisted line. |
| Line does not advance when bumped. | Line tangled or fused inside head. Insufficient line remaining. | Remove battery, inspect head for tangles. Reload new line if necessary. |
| Excessive vibration. | Damaged trimmer head or unbalanced line. Loose components. | Inspect trimmer head for damage. Ensure line is evenly distributed. Check all fasteners for tightness. |
9. Specifications
- Model: RY40250
- Brand: RYOBI
- Power Source: 40-Volt Lithium-Ion Battery
- Battery Type: 4.0 Ah Lithium-Ion (included)
- Charger: 90-minute charger (included)
- Cutting Width: 13 in. to 15 in. (adjustable)
- Trimmer Line Diameter: 0.080 in. twisted line
- Trimmer Head Type: REEL-EASY Bump-Feed
- Attachment Capability: Yes (RYOBI Expand-It and universal gas attachments)
- Item Weight: 13.77 pounds
- Product Dimensions: 50.5 inches (L) x 11.7 inches (W)
10. Warranty and Support
For warranty information, technical support, or to purchase replacement parts, please refer to the official RYOBI website or contact RYOBI customer service directly. Keep your purchase receipt as proof of purchase for warranty claims.
Online Resources: Visit www.ryobitools.com for product registration, manuals, and support.


