
Introduction
This manual provides comprehensive instructions for the safe and efficient operation of your Kegland KL05838 Home Brewery. This all-in-one electric brewing system is designed for all-grain brewing, featuring built-in heating elements, a programmable control panel, a recirculation pump, and a removable grain basket. Please read this manual thoroughly before initial use to ensure proper setup and operation.
Safety Information
- Always ensure the unit is unplugged before cleaning or performing any maintenance.
- Do not immerse the main unit or electrical components in water.
- Use only with a grounded 110V power outlet.
- Exercise caution when handling hot liquids and components. Wear appropriate protective gear.
- Keep children and pets away from the brewing system during operation.
- Ensure adequate ventilation in the brewing area.
- Do not operate the unit if any part is damaged or malfunctioning. Contact support for assistance.
Product Overview and Components
The Kegland KL05838 Home Brewery is constructed from stainless steel and includes several key components for an integrated brewing experience.
- Main Kettle: Stainless steel vessel with volume markers.
- Digital Control Panel: Water-resistant panel for setting and monitoring temperature and time.
- Heating Elements: Dual elements (1000W and 500W) for precise temperature control.
- Magnetic Drive Pump: Integrated pump for wort recirculation.
- Malt Pipe: Removable stainless steel basket with false bottom for grain.
- Recirculation Arm: Connects to the pump for wort recirculation.
- Ball Valve: 1/2 inch stainless steel valve for draining.
- Immersion Wort Chiller: Included for cooling wort post-boil.
- Glass Lid: For covering the kettle during heating and mashing.

Figure 1: The Kegland KL05838 Home Brewery with the malt pipe inserted and the recirculation arm in place. This image shows the overall assembly of the brewing system.

Figure 2: The Kegland KL05838 Home Brewery with the immersion wort chiller positioned inside the kettle. This configuration is used for cooling wort after the boil.
Setup
- Unpacking: Carefully remove all components from the packaging. Inspect for any damage.
- Initial Cleaning: Before first use, clean all components that will come into contact with wort using a suitable brewing cleaner and rinse thoroughly.
- Assemble Malt Pipe: Insert the false bottom into the malt pipe. The malt pipe has feet at its base to raise it slightly off the main kettle's bottom.
- Install Malt Pipe: Place the assembled malt pipe into the main kettle.
- Connect Recirculation Arm: Attach the recirculation arm to the pump outlet. Silicone tubing (not included) is recommended for more controlled recirculation.
- Power Connection: Ensure the unit is placed on a stable, level surface. Plug the 110V power cord into a grounded outlet.

Figure 3: Close-up view of the stainless steel malt pipe, showing the integrated feet at its base. These feet ensure proper spacing from the kettle bottom for efficient liquid flow.

Figure 4: A hand stirring grain inside the malt pipe, illustrating the false bottom. This component supports the grain bed during mashing and filtration.
Operating Instructions
Digital Control Panel
The water-resistant digital control panel allows for precise temperature and time management. Press and hold the temperature button for several seconds to switch between °F and °C.
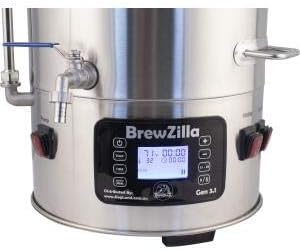
Figure 5: A close-up of the digital control panel, displaying temperature and time settings. The panel features buttons for power, pump, temperature, and time adjustments.
Heating Elements
The unit features dual heating elements: one 1000W and one 500W, totaling 1500W. Individual switches allow for control over the heating process.
- Use both elements (1000W + 500W) to rapidly increase temperature, such as reaching mash temperature or bringing wort to a boil.
- Use only one element (e.g., 500W) to maintain a set temperature during mashing or a gentle boil.

Figure 6: The two rocker switches for controlling the 1000W and 500W heating elements. These allow for flexible power management during brewing.
Automatic Step Mashing & Delayed Start
The BrewZilla V3.1.1 allows programming of up to 6 individual temperature and duration steps for precise step mashing. The timer for each step begins only when the programmed temperature is reached.
- Press the "S1-S6" button to select the desired stage.
- Use the temperature and time buttons (+/-) to program the target temperature and duration for each step.
- To skip a stage, program its duration as 00:00. The controller will automatically advance to the next step.
- Upon completion of all stages, an alarm will sound, and the unit will hold the last set temperature.
Delayed Start: To set a delayed start (up to 23 hours), program two steps:
- Step 1: Set a temperature lower than the unheated strike water and a duration equal to your desired delay time.
- Step 2: Set your desired strike water temperature and a duration of 1-2 hours. This allows the unit ample time to heat up.
Wort Recirculation
The built-in magnetic drive pump facilitates wort recirculation during mashing. Ensure the recirculation arm is properly connected. Stir the grain thoroughly after mashing-in to achieve an even temperature throughout the grain bed.
Draining and Transfer
The unit includes a 1/2 inch stainless steel ball valve for draining wort. The internal pump can also be used to transfer wort to a fermenter, especially when using silicone tubing with the recirculation arm.

Figure 7: A close-up of the stainless steel 1/2 inch ball valve, used for draining wort from the kettle. The blue handle indicates the valve's open or closed position.
Wort Chiller Connection
The included stainless steel immersion wort chiller is shipped with bare ends. To connect it for use, common setups include:
- 20 feet of 1/2 inch ID tubing.
- 3 small hose clamps.
- 1 brass hose thread by 1/2 inch barb adapter for connecting to a standard garden hose or faucet.
Maintenance
- Cleaning: After each use, thoroughly clean all components that contacted wort. Use a non-abrasive cleaner suitable for stainless steel. Rinse thoroughly to remove all cleaning solution residue.
- Storage: Store the unit in a clean, dry place. Ensure all components are completely dry before storage to prevent corrosion.
- Inspection: Periodically inspect the power cord, heating elements, and pump for any signs of wear or damage.
Troubleshooting
| Problem | Possible Cause | Solution |
|---|---|---|
| Unit does not power on. | Not plugged in; power outlet issue; damaged power cord. | Check power connection; test outlet with another device; inspect power cord for damage. |
| Temperature not reaching set point. | Only one heating element active; insufficient power; lid not on. | Ensure both 1000W and 500W elements are switched on; verify 110V power supply; ensure glass lid is in place to retain heat. |
| Pump not recirculating wort. | Pump switch off; blockage in recirculation arm; pump malfunction. | Check pump switch on control panel; inspect recirculation arm for clogs; contact support if pump is faulty. |
| Malt pipe clogging. | Fine grain particles; insufficient stirring during mash-in. | Ensure proper grain crush; stir grain thoroughly after mashing-in to prevent channeling and clogs. |
Specifications
- Model: KL05838
- Capacity: 9 gallons (35 liters) total, 5-6 gallons finished beer output
- Construction: Stainless steel
- Power: 110V
- Heating Elements: Dual (1000W and 500W), 1500W total
- Control: Digital temperature controller with automatic step mashing (6 stages)
- Pump: Magnetic drive for recirculation
- Dimensions (with recirculation arm): 32.75 inches H x 12.5 inches D
- Recommended Max. Grain Bill: 18 lbs
- Recommended Min. Grain Bill: 8 lbs
- Weight: 35 pounds
Warranty and Support
For warranty information or technical support, please refer to the manufacturer's official website or contact your retailer. Keep your purchase receipt as proof of purchase.


