
Phoncoo TS-FT002
User Manual
Phoncoo TS-FT002 Ultrasonic Level Flow Meter
Model: TS-FT002
Introduction
The Phoncoo TS-FT002 Ultrasonic Level Flow Meter is designed to monitor the liquid depth level of your outdoor water tank from the comfort of your indoor living space. This device provides real-time data on water level, indoor temperature, and tank temperature, ensuring you are always informed about your water supply.
The system consists of an indoor receiver unit with an LCD display and an outdoor transmitter unit that uses ultrasonic technology to measure the water level. It also features alarm functions for high/low water levels and an empty tank alert, along with min/max record keeping for both liquid level and temperature.
Product Overview
The TS-FT002 system comprises two main components:
- Indoor Receiver Unit: Displays all measurement data, including water level, indoor temperature, tank temperature, and time. It features control buttons for settings and alarms.
- Outdoor Transmitter Unit: Equipped with an ultrasonic sensor to measure the water level in the tank and a temperature sensor for the tank's environment. It wirelessly transmits data to the receiver.
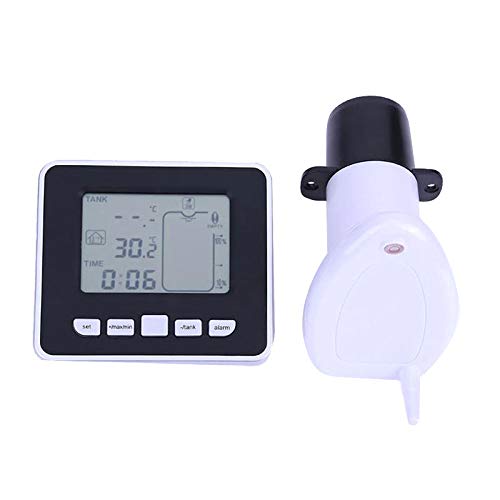
Figure 1: Indoor Receiver Unit and Outdoor Transmitter Unit.
This image displays the complete TS-FT002 system, featuring the rectangular indoor receiver with its LCD screen and control buttons, alongside the white, teardrop-shaped outdoor transmitter unit with its black base.
Setup
1. Battery Installation
Ensure you have the correct batteries before proceeding. Batteries are not included with the product.
- Receiver Unit: Requires 2 x AA 1.5V LR3 Alkaline batteries. Open the battery compartment on the back of the receiver and insert the batteries, observing polarity.
- Transmitter Unit: Requires 6 x AAA 1.5V LR6 Alkaline or lithium batteries. Open the battery compartment on the transmitter and insert the batteries, observing polarity.

Figure 2: Rear view of the Receiver Unit.
This image shows the back of the indoor receiver unit, highlighting the battery compartment cover and the keyholes for wall mounting.
2. Transmitter Installation
The transmitter unit should be installed on top of your water tank. Ensure the tank opening is suitable for the transmitter's dimensions (typically >20cm diameter for optimal performance).
- Identify a suitable location on the top of your water tank, ensuring the ultrasonic sensor has a clear path to the water surface without obstructions.
- Mount the transmitter securely using the provided bracket and screws. Ensure the unit is level using the built-in balance bubble.
- The antenna should be positioned vertically for optimal signal transmission.
- Avoid installing the transmitter in locations where it might be submerged or exposed to extreme weather conditions beyond its operating range.
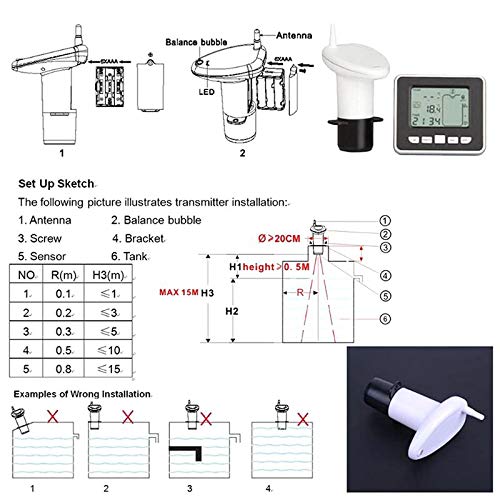
Figure 3: Transmitter Setup Sketch and Installation Examples.
This diagram provides a visual guide for installing the outdoor transmitter unit on a water tank, showing correct placement and common incorrect installation scenarios to avoid.
3. Receiver Placement
Place the receiver unit indoors, within 100 meters (300 feet) of the transmitter in an open area. The receiver can be free-standing on a table or desk using its pull-out stand, or wall-mounted using the keyholes on its back.
- For optimal signal reception, avoid placing the receiver near large metal objects or other electronic devices that may cause interference.
Operating Instructions
LCD Display Overview
The receiver's LCD display provides comprehensive information at a glance. Refer to the diagram below for a detailed explanation of each display element.
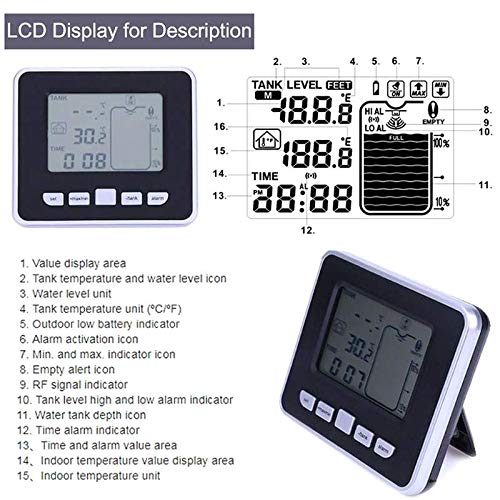
Figure 4: LCD Display Description.
This image provides a comprehensive guide to the TS-FT002's LCD screen, detailing the meaning of each segment, including water level, temperature readings, and various indicators.
- Value display area (for tank level, temperature, time)
- Tank temperature and water level icon
- Water level unit (M/Feet)
- Tank temperature unit (°C/°F)
- Outdoor low battery indicator
- Alarm activation icon
- Min. and max. indicator icon
- Empty alert icon
- RF signal indicator
- Tank level high and low alarm indicator
- Water tank depth icon
- Time alarm indicator
- Time and alarm value area
- Indoor temperature value display area
- Indoor temperature unit (°C/°F)
Basic Operation
- Power On: Once batteries are inserted, the unit will power on automatically.
- Initial Sync: The receiver will attempt to connect with the transmitter. This may take a few minutes. Ensure both units are within range.
- Unit Selection: Use the "set" button to cycle through settings. You can switch between Celsius (°C) and Fahrenheit (°F) for temperature, and meters (M) or feet (FT) for water level.
Setting Alarms
The TS-FT002 allows you to set high/low water level alarms and an empty tank alert.
- Press the "alarm" button to enter alarm setting mode.
- Use the "set" or "+/max/min" buttons to adjust the desired high or low water level thresholds.
- Confirm your settings by pressing the "alarm" button again or waiting for the display to revert.
- An audible alarm will sound and the alarm icon will flash when a set threshold is reached.
Viewing Min/Max Records
The unit stores minimum and maximum records for tank liquid level and temperature.
- Press the "+/max/min" button to cycle through the current, maximum, and minimum readings for water level and temperature.
- To clear the min/max records, press and hold the "+/max/min" button for a few seconds until the values reset.
Maintenance
- Cleaning: Wipe the units with a soft, damp cloth. Do not use abrasive cleaners or immerse the receiver unit in water.
- Battery Replacement: Replace batteries in both units when the low battery indicator appears on the receiver's display. Ensure proper battery type and polarity.
- Transmitter Check: Periodically inspect the outdoor transmitter for any debris or obstructions around the ultrasonic sensor that might affect readings.
Troubleshooting
| Problem | Possible Cause | Solution |
|---|---|---|
| No display on receiver. | Dead or incorrectly installed batteries. | Check battery polarity. Replace with new batteries. |
| No water level reading / "---" displayed. |
|
|
| Inaccurate readings. |
|
|
| Alarm not sounding. | Alarm settings incorrect or disabled. | Review and adjust alarm settings as per "Setting Alarms" section. |
Specifications
| Material | Plastic |
| Receiver Size | 10.5 x 9.3 x 2.5 cm |
| Transmitter Size | 15.5 x 6.5 x 9.5 cm |
| Indoor Temperature Range | 0°C ~ 60°C (32°F ~ 140°F) |
| Outdoor Temperature Range | -40°C ~ 60°C (-40°F ~ 140°F) |
| Temperature Accuracy | ±1°C |
| Water Level Measure Range | 0 ~ 15 meters |
| Water Level Resolution | 0.01 meters |
| Water Level Accuracy | ±0.03 meters |
| Transmission Frequency | 433 MHz |
| Transmission Range | 100 meters (300 feet) in open area |
| Transmission Interval | 30s when level changes or 3 minutes when level does not change |
| Receiver Battery | 2 x AA 1.5V LR3 Alkaline batteries (Not included) |
| Transmitter Battery | 6 x AAA 1.5V LR6 Alkaline or lithium batteries (Not included) |
| Display Type | LCD |
| Power Source | Battery Powered |
Warranty and Support
For warranty information, please refer to the documentation included with your purchase or contact Phoncoo customer support directly. Keep your proof of purchase for any warranty claims.
If you encounter any issues not covered in this manual or require further assistance, please contact Phoncoo customer service. Contact details are typically available on the product packaging or the official Phoncoo website.
Ask a question about this manual
Ask about setup, troubleshooting, compatibility, parts, safety, or missing instructions. Manuals+ will review the question and use this page’s manual context to help answer it.