1. Introduction
This manual provides essential information for the safe and efficient operation of your De'Longhi DEX212F Tasciugo AriaDry Dehumidifier. Please read these instructions carefully before using the appliance and keep them for future reference.
Product Overview
The De'Longhi DEX212F is a portable dehumidifier designed to remove excess moisture from the air in your home, creating a healthier and more comfortable environment. It features a 12-liter per day dehumidification capacity and includes a laundry function for drying clothes.

Figure 1: Front view of the De'Longhi DEX212F Dehumidifier.
2. Safety Information
Always observe the following safety precautions to reduce the risk of electric shock, injury, or fire.
- Read all instructions before using the appliance.
- Ensure the power supply voltage matches the rating label on the appliance.
- Do not operate the appliance with a damaged cord or plug.
- Do not block air inlets or outlets.
- Keep the appliance away from heat sources and direct sunlight.
- Do not use the appliance in wet areas like bathrooms without proper ventilation.
- Always unplug the appliance before cleaning or maintenance.
- Do not attempt to repair or modify the appliance yourself. Contact qualified service personnel.
- This appliance uses R290 refrigerant. Be aware that R290 is odorless and flammable.
3. Product Components
Familiarize yourself with the main parts of your dehumidifier.

Figure 2: Control panel with power button, humidity indicators, laundry function, and antifreeze indicator.

Figure 3: Side view showing access to the washable air filter.
- Control Panel: Located on the top, for setting functions and monitoring status.
- Air Inlet Grille: Where air enters the unit for dehumidification.
- Air Outlet Grille: Where dry air is expelled.
- Water Tank: Removable tank for collecting condensed water (2.1 L capacity).
- Continuous Drain Outlet: Port for connecting a hose for continuous drainage.
- Washable Air Filter: Located behind a removable panel, filters dust and allergens.
- Integrated Handle: For easy transport of the unit.
4. Setup
Unpacking
- Carefully remove the dehumidifier from its packaging.
- Remove all packing materials and ensure no parts are missing or damaged.
- Keep packaging materials out of reach of children.
Placement
- Place the dehumidifier on a flat, stable surface.
- Ensure there is at least 20 cm (8 inches) of clear space around the unit for proper airflow.
- Do not place the unit near heat sources or in direct sunlight.
- For optimal performance, operate the unit in an enclosed area.
- The unit is suitable for rooms up to 55 m³.
Power Connection
- Ensure the power cord is fully extended and not tangled.
- Plug the power cord into a suitable grounded electrical outlet (220V).
Continuous Drainage (Optional)
For continuous operation without needing to empty the water tank, you can set up continuous drainage.
- Locate the continuous drain outlet on the back or side of the unit.
- Connect a suitable hose (not included) to this outlet.
- Ensure the hose is sloped downwards to allow water to drain by gravity into a floor drain or larger container.
- Make sure the hose is securely attached to prevent leaks.
5. Operating Instructions
Turning On/Off
- To turn on the unit, press the Power button () on the control panel.
- To turn off the unit, press the Power button again.
Setting Humidity Levels
The unit allows you to select desired humidity levels.
- Press the Humidity Selection button (often indicated by droplets or a percentage symbol) to cycle through available humidity settings (e.g., 3 levels mentioned in features).
- The unit will operate until the desired humidity level is reached, then cycle on and off to maintain it.
Laundry Function
The dedicated Laundry function helps to dry clothes faster.
- Press the Laundry button (often indicated by a shirt icon) to activate this mode.
- The unit will operate continuously at a high fan speed to maximize moisture removal, aiding in clothes drying.
Antifreeze Function
The electronic antifreeze device allows the unit to operate effectively even at low temperatures (down to 2°C).
- If the ambient temperature is too low, the unit will automatically activate the antifreeze function to prevent ice buildup on the evaporator coils.
- An indicator light on the control panel may illuminate when this function is active.
Water Tank Full Indicator
- When the water tank is full, the unit will automatically shut off, and a "Tank Full" indicator light will illuminate.
- Empty the water tank as described in the Maintenance section to resume operation.
6. Maintenance
Regular maintenance ensures optimal performance and extends the lifespan of your dehumidifier. Always unplug the unit before performing any maintenance.
Emptying the Water Tank
- Gently pull out the water tank from the front of the unit.
- Carefully empty the collected water.
- Rinse the tank with clean water if necessary.
- Slide the empty tank back into the unit until it clicks into place. Ensure it is properly seated to allow the unit to resume operation.
Cleaning the Air Filter
The dehumidifier is equipped with a washable anti-dust filter and an anti-allergen filter. Clean the filter regularly (e.g., every two weeks) to maintain air quality and unit efficiency.
- Locate the filter access panel, typically on the side or back of the unit (refer to Figure 3).
- Open the panel and carefully remove the air filter.
- Wash the filter under running water (not hot) or use a vacuum cleaner to remove dust.
- Allow the filter to dry completely before reinserting it. Do not expose it to direct sunlight.
- Place the dry filter back into its slot and close the access panel.
Cleaning the Unit Exterior
- Wipe the exterior of the unit with a soft, damp cloth.
- Do not use abrasive cleaners, solvents, or harsh chemicals, as these can damage the surface.
Storage
- If storing the unit for an extended period, ensure the water tank is empty and clean.
- Clean the air filter.
- Store the unit upright in a cool, dry place, away from direct sunlight and extreme temperatures.
7. Troubleshooting
Before contacting customer service, please refer to the following common issues and solutions.
| Problem | Possible Cause | Solution |
|---|---|---|
| Unit does not turn on. | No power supply; Power cord not plugged in; Water tank full or not correctly inserted. | Check power connection; Ensure water tank is empty and correctly seated. |
| No water is collected. | Ambient humidity is too low; Room temperature is too low; Air filter is clogged; Continuous drainage hose is connected. | Increase desired humidity setting; Ensure room temperature is above 2°C; Clean the air filter; Disconnect continuous drainage hose if collecting water in the tank. |
| Unit runs continuously. | Desired humidity setting is too low; Room size is larger than recommended; Air filter is clogged. | Increase desired humidity setting; Ensure unit is suitable for room size (up to 55 m³); Clean the air filter. |
| Unusual noise during operation. | Unit not on a flat surface; Air filter clogged; Internal component issue. | Place unit on a flat, stable surface; Clean the air filter; If noise persists, contact customer support. |
8. Specifications
Technical data for the De'Longhi DEX212F Tasciugo AriaDry Dehumidifier.
| Brand | De'Longhi |
| Model Number | 0148512202 (DEX212F) |
| Dehumidification Capacity | 12 Liters/day |
| Water Tank Volume | 2.1 Liters |
| Power Consumption | 300 Watts |
| Voltage | 220V |
| Noise Level | 40 Decibels |
| Dimensions (L x W x H) | 22 cm x 33.4 cm x 50.8 cm (8.66 x 13.15 x 20 inches) |
| Weight | 9 Kilograms |
| Refrigerant | R290 (Ecological) |
| Recommended Room Size | Up to 55 m³ (approx. 592 sq ft) |
| Special Features | Antifreeze function, Humidistat, Laundry function, Washable anti-dust filter, Anti-allergen filter. |
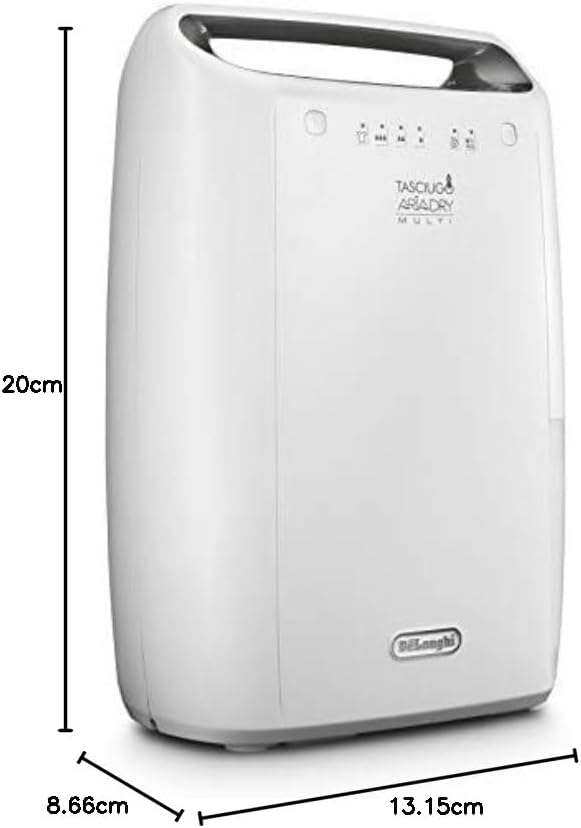
Figure 4: Product dimensions for placement reference.
9. Warranty and Support
Warranty Information
Your De'Longhi DEX212F Dehumidifier comes with a standard manufacturer's warranty. Please refer to the warranty card included in your product packaging for specific terms, conditions, and duration. Keep your proof of purchase for warranty claims.
Customer Support
For technical assistance, spare parts, or any questions not covered in this manual, please contact De'Longhi customer support. Contact details can typically be found on the official De'Longhi website or in the warranty documentation.
Online Resources: Visit the official De'Longhi website for FAQs, product registration, and service center locations.


