
1. Introduction
The JVC GY-HM250 is a professional camcorder designed for high-quality video production, offering UHD 4K recording, live streaming capabilities, and integrated lower-thirds graphics. Its compact design and advanced features make it suitable for various professional applications, including news gathering, event coverage, and corporate video production.

Figure 1.1: Front view of the JVC GY-HM250 camcorder.
2. Package Contents
Verify that all items listed below are included in your package:
- JVC GY-HM250 UHD 4K Streaming Camcorder
- Handle Unit
- SSL-JVC50 7.4V IDX Lithium-Ion Battery
- AC Adapter
- Carrying Case
- 128GB SDXC Memory Card (Bundle Item)
- Professional UV Filter (Bundle Item)
- 5 Piece Lens Cleaning Kit (Bundle Item)
- Microfiber Cleaning Cloth (Bundle Item)
3. Setup
3.1 Battery Installation
Locate the battery compartment at the rear of the camcorder. Insert the SSL-JVC50 battery, ensuring the contacts align correctly, and push until it clicks securely into place. To remove, slide the battery release latch and pull the battery out.
3.2 Memory Card Insertion
Open the SD card slot cover, typically located on the side of the camcorder. Insert an SDXC Class 3 or Class 10 memory card with the label facing the correct direction (refer to the diagram near the slot) until it locks. Close the cover firmly to protect the card.
3.3 Attaching the Handle Unit
Align the handle unit with the mounting points on the top of the camcorder body. Secure it using the provided screws or locking mechanism. Ensure all electrical connections are firm for proper audio input and control functionality.
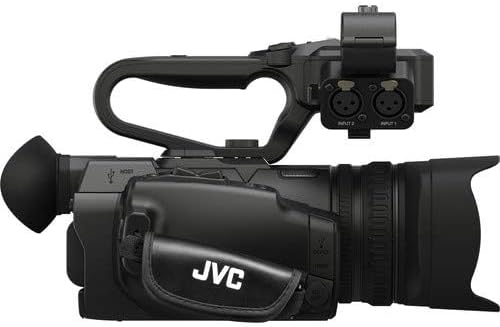
Figure 3.1: Side view showing the attached handle unit and XLR audio inputs.
3.4 Powering On/Off
Connect the AC adapter to a power outlet and the camcorder, or ensure the battery is sufficiently charged. Press and hold the POWER button, usually located near the display, to turn the camcorder on or off. The power indicator light will illuminate when the unit is active.
4. Operating
4.1 Basic Recording
Navigate through the menu to select your desired recording format (e.g., UHD 4K at 24/30p or HD) and quality settings. Press the large, red RECORD button, typically located on the handle or side grip, to start recording. Press it again to stop. A recording indicator will usually flash on the display.
4.2 Zoom and Focus Control
Use the zoom rocker switch on the handle or the zoom ring on the lens to adjust the 12x optical zoom. For focusing, switch between auto-focus (AF) and manual focus (MF) modes using the dedicated switch. In MF mode, rotate the focus ring on the lens for precise adjustment.
4.3 Audio Input and Levels
The GY-HM250 features two 2-channel XLR audio inputs on the handle unit. Connect professional microphones or line-level audio sources here. Use the audio level dials and switches on the handle to adjust input levels and select input types (MIC/LINE/PHANTOM power).
4.4 Live Streaming and Lower-Thirds Graphics
To utilize live streaming, connect the camcorder to a network via Ethernet or an optional Wi-Fi adapter. Access the streaming settings in the menu to configure your streaming destination and parameters. The camcorder also supports built-in lower-thirds and title graphics, which can be customized and applied directly during recording or streaming via the menu interface.
5. Maintenance
5.1 Cleaning the Camcorder
Regularly clean the camcorder body with a soft, dry, lint-free cloth. For the lens, use a specialized lens cleaning solution and a microfiber cloth. Avoid using abrasive materials, solvents, or harsh chemicals, as these can damage the camcorder's finish and optical elements.
5.2 Battery Care and Storage
To prolong battery life, store batteries in a cool, dry place when not in use. Fully charge batteries before extended storage and periodically recharge them every few months to prevent deep discharge. Avoid exposing batteries to extreme temperatures.
5.3 Proper Storage
When not in use, store the camcorder in its protective carrying case. Keep it away from direct sunlight, high humidity, dust, and strong magnetic fields. Ensure all covers and caps are in place to protect the lens and ports.
6. Troubleshooting
6.1 No Power
- Check if the battery is properly inserted and charged.
- Ensure the AC adapter is securely connected to both the camcorder and a working power outlet.
6.2 Recording Issues
- Verify that a compatible memory card is inserted correctly and has sufficient free space.
- Check the recording format and resolution settings in the menu.
- Ensure the camcorder is not in playback mode.
6.3 No Audio Input
- Confirm external microphones or audio sources are properly connected to the XLR inputs.
- Check audio input levels and ensure phantom power is enabled if required for your microphone.
- Verify that the audio input selection in the menu is set correctly (e.g., XLR 1/2).
6.4 Image is Blurry
- Ensure the lens is clean and free from smudges.
- Check focus settings; switch to auto-focus or manually adjust the focus ring.
- Verify that the anti-shake feature is enabled if shooting handheld.
7. Specifications
| Feature | Detail |
|---|---|
| Brand | JVC |
| Model Number | GY-HM250U |
| Sensor | 1/2.3" CMOS |
| Video Capture Resolution | UHD 4K |
| Recording Formats | UHD 4K 24/30p (70/150 Mb/s), 4:2:2 4K 24/30p |
| Optical Zoom | 12x |
| Audio Inputs | 2-Channel XLR |
| Special Features | Anti-Shake, Low Light, Time Lapse, Built-in Lower-Thirds, Live Streaming |
| Connectivity Technology | XLR |
| Screen Size | 3.2 Inches |
| Item Weight | 9.35 pounds |
| Product Dimensions | 24 x 18 x 16 inches |
| Flash Memory Type | SD |
| Maximum Aperture | 2 f |
8. Warranty Information
The JVC GY-HM250 camcorder comes with a limited 1-year warranty from the date of purchase. This warranty covers manufacturing defects under normal use. Please retain your proof of purchase for any warranty claims. For detailed terms, conditions, and exclusions, refer to the warranty card included with your product or visit the official JVC website.
9. Support
For technical assistance, service, or further inquiries regarding your JVC GY-HM250 camcorder, please visit the official JVC support website or contact their customer service department. Online resources often include FAQs, driver downloads, and service center locators.
Official JVC Global Support: https://www.jvc.com/global/support/


