1. Introduction
This user manual provides essential information for the safe and effective operation, maintenance, and troubleshooting of your Total Demolition Hammer 1500W, Model TH215002. This powerful tool is designed for heavy-duty demolition tasks, including breaking rock, concrete, flooring, and walls. Please read this manual thoroughly before using the tool and keep it for future reference.
2. Safety Instructions
WARNING: Read all safety warnings and instructions. Failure to follow the warnings and instructions may result in electric shock, fire, and/or serious injury.
- Always wear appropriate personal protective equipment (PPE) including safety glasses, hearing protection, gloves, and a dust mask.
- Ensure the work area is well-lit and clear of obstructions. Keep bystanders and children away.
- Before connecting the tool to a power source, ensure the voltage matches the rating plate on the tool.
- Inspect the power cord for damage before each use. Do not use if the cord is damaged.
- Always unplug the tool before making any adjustments, changing accessories, or performing maintenance.
- Maintain a firm grip on the tool with both hands during operation.
- Avoid accidental starting. Ensure the switch is in the off position before plugging in.
- Do not overreach. Maintain proper footing and balance at all times.
- Do not operate the tool in explosive atmospheres, such as in the presence of flammable liquids, gases, or dust.
- If the tool experiences excessive vibration, stop immediately and inspect for damage or loose parts.
3. Product Overview
The Total Demolition Hammer 1500W is equipped with features designed for efficient and comfortable operation. Familiarize yourself with the components below.

Figure 1: Total Demolition Hammer 1500W, including the main unit, carrying case, and two chisels (pointed and flat).
Key Features:
- 1500W Motor: Provides ample power for demanding demolition tasks.
- 25J Impact Force: Delivers strong blows for effective material removal.
- SDS-MAX Chuck System: Allows for quick and secure chisel changes.
- Anti-Vibration System: Reduces user fatigue during extended operation.
- Impact Rate Adjustment: Variable speed control for different applications (1000-1900 bpm).
- Constant Electronic Power: Maintains consistent power under load.
- Automatic Stop Carbon Brushes: Indicates when brushes need replacement, protecting the motor.
Component Identification:

Figure 2: The SDS-MAX chuck system, designed for quick and secure insertion and removal of chisels.
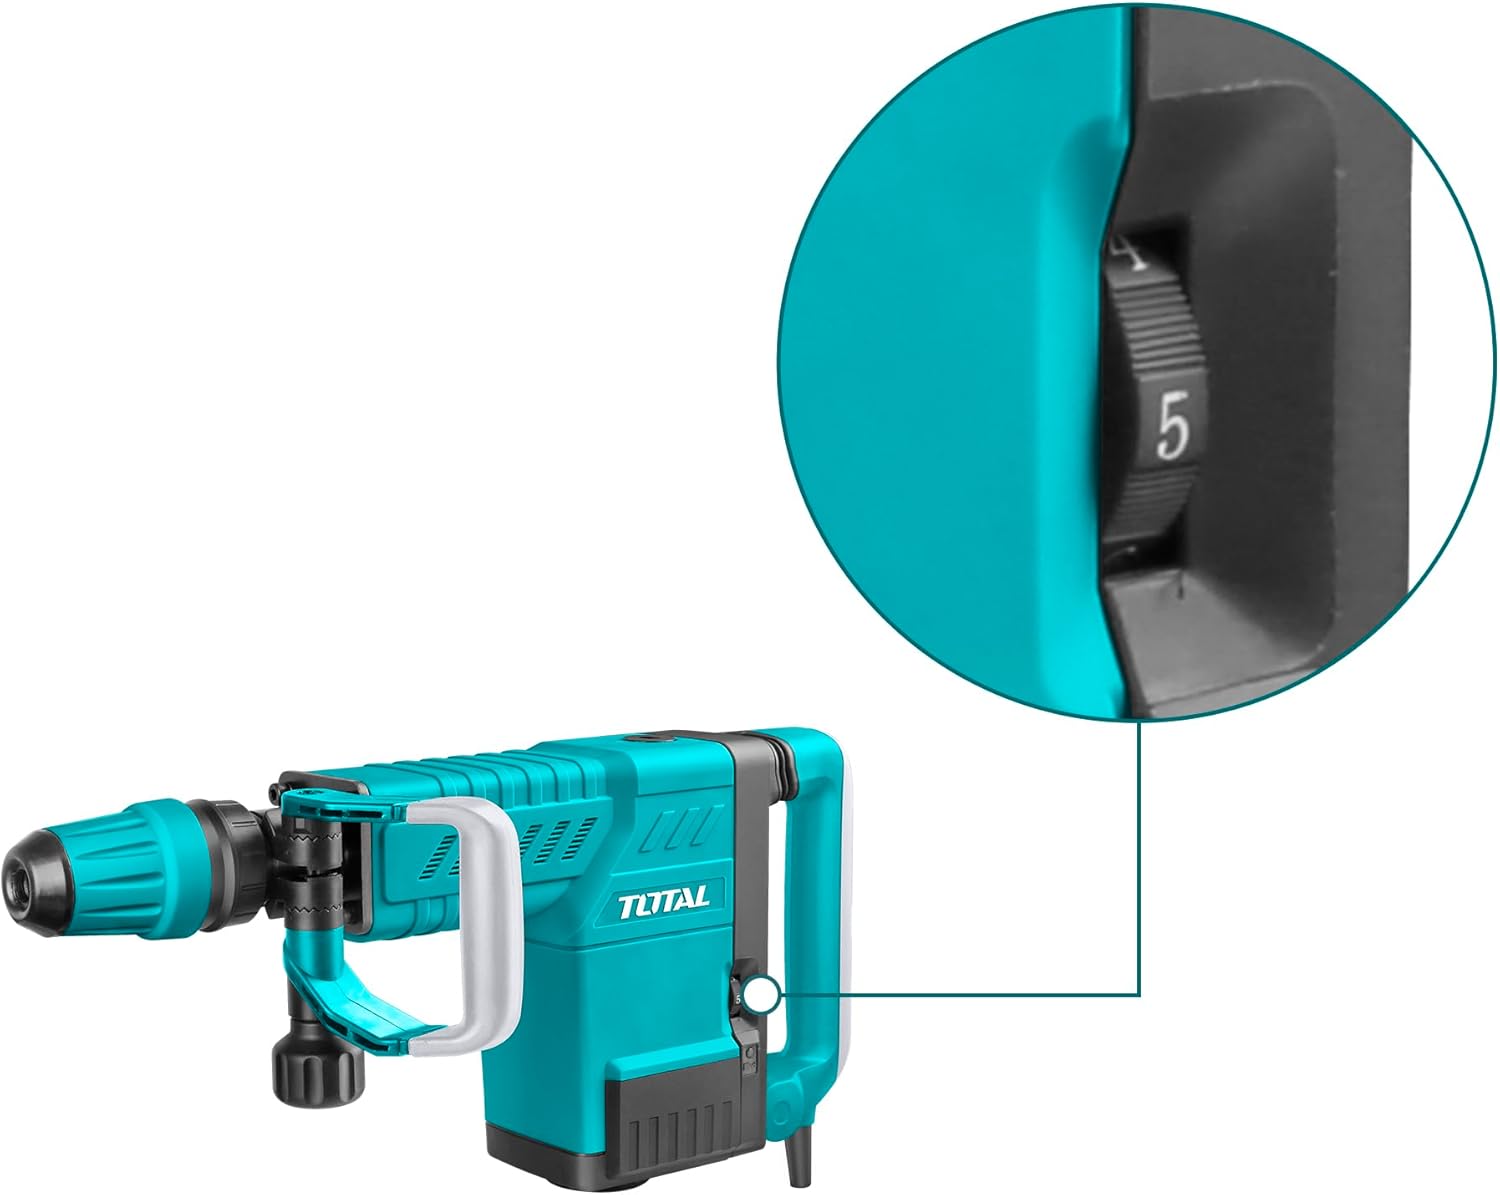
Figure 3: The impact rate adjustment dial, allowing users to select the desired impact frequency for various materials.

Figure 4: The power switch and lock button, enabling continuous operation without holding the trigger.

Figure 5: The integrated anti-vibration system in the handle, designed to reduce user fatigue and improve comfort.
4. Technical Specifications
Refer to the following specifications for detailed information about your demolition hammer.
| Specification | Value |
|---|---|
| Model Number | TH215002 |
| Input Power | 1500W |
| Voltage | 220-240 V ~ 50/60 Hz |
| Impact Rate | 1000-1900 bpm |
| Impact Force | 6-25J |
| Tool Weight | 10 kg |
| Chuck System | SDS-MAX |
| Special Features | Anti-vibration system, Carbon brushes with automatic stop, Constant electronic power, Chisel locking system, Vibration Control Handle |
| Included Components | 2 Chisels (pointed and flat), Chuck Keys |
| Product Dimensions | 37 x 18 x 63 cm |
5. Setup
5.1 Attaching the Chisel:
- Ensure the demolition hammer is unplugged from the power source.
- Clean the shank of the chisel and apply a thin layer of grease (not included) to prevent wear.
- Pull back the SDS-MAX chuck collar (refer to Figure 2).
- Insert the chisel into the chuck until it clicks into place. Release the collar.
- Pull on the chisel to ensure it is securely locked. There will be a slight axial play, which is normal for SDS-MAX systems.
5.2 Connecting to Power:
- Verify that the power switch is in the "OFF" position.
- Plug the power cord into a suitable 220-240V, 50/60Hz electrical outlet. Ensure the outlet is properly grounded.
6. Operating Instructions
6.1 Starting and Stopping:
- To start the tool, press the power switch (refer to Figure 4).
- For continuous operation, press the lock button while the power switch is depressed. Release the power switch, and the tool will continue to run.
- To stop the tool from continuous operation, press the power switch again. To stop from momentary operation, release the power switch.
6.2 Adjusting Impact Rate:
- The impact rate can be adjusted using the dial located on the side of the tool (refer to Figure 3).
- Turn the dial to select the desired impact frequency. Lower settings are suitable for softer materials or more controlled demolition, while higher settings provide maximum impact for harder materials.
6.3 Demolition Technique:
- Hold the tool firmly with both hands, utilizing the main handle and the auxiliary handle.
- Position the chisel tip against the material to be demolished.
- Apply moderate pressure and allow the tool to do the work. Excessive force can reduce efficiency and damage the tool.
- Move the tool systematically across the work surface to break up material.
- The anti-vibration system (Figure 5) helps to reduce the impact transferred to your hands, improving comfort during prolonged use.
7. Maintenance
Regular maintenance ensures the longevity and optimal performance of your demolition hammer.
- Cleaning: After each use, clean the tool with a dry cloth. Remove any dust or debris from ventilation openings. Do not use water or chemical cleaners.
- Chuck Maintenance: Keep the SDS-MAX chuck clean and lightly greased to ensure smooth chisel changes and prevent wear.
- Carbon Brushes: The tool features carbon brushes with an automatic stop function. When the brushes wear down, the tool will automatically stop to prevent motor damage. Replace both carbon brushes simultaneously with genuine Total replacement parts. This procedure should ideally be performed by a qualified service technician.
- Power Cord: Regularly inspect the power cord for cuts, abrasions, or other damage. If damaged, have it replaced by a qualified electrician.
- Storage: Store the tool in its original carrying case in a dry, secure location, out of reach of children.
8. Troubleshooting
If you encounter issues with your demolition hammer, refer to the following common problems and solutions:
| Problem | Possible Cause | Solution |
|---|---|---|
| Tool does not start. | No power supply; faulty power cord; worn carbon brushes; faulty switch. | Check power outlet and cord. Replace carbon brushes. Contact service center if switch or cord is faulty. |
| Reduced impact force. | Worn chisel; worn carbon brushes; internal mechanical issue. | Replace chisel. Replace carbon brushes. Contact service center. |
| Excessive vibration. | Loose parts; damaged chisel; internal issue. | Check for loose screws. Replace damaged chisel. Contact service center. |
| Chisel not locking in chuck. | Chuck is dirty or damaged; chisel shank is damaged. | Clean and grease chuck. Inspect chisel shank. Contact service center if chuck is damaged. |
For problems not listed here or if solutions do not resolve the issue, please contact Total customer support or an authorized service center.
9. Warranty and Support
Total products are manufactured to high-quality standards. For information regarding warranty coverage, terms, and conditions, please refer to the warranty card included with your product or visit the official Total website. For technical assistance, spare parts, or service inquiries, please contact your local Total dealer or authorized service center.
Manufacturer: Total
Model: TH215002
ASIN: B07N1Y38ZG


