
Nisorpa IB01
Nisorpa Wall Mounted Swivel Ironing Board (Model IB01) - User Manual
This manual provides instructions for the safe and efficient use of your Nisorpa Wall Mounted Swivel Ironing Board.
Important Safety Instructions
- Read all instructions before using the ironing board.
- Install the ironing board on a solid wall capable of supporting its weight (approximately 17 pounds / 7.7 kg). Do not install on drywall without proper reinforcement (e.g., into wood or steel studs, or with a backing plate).
- Ensure all screws are securely tightened after installation.
- Keep children and pets away from the ironing board during use and when folding/unfolding.
- Do not overload the ironing board. The maximum load capacity is approximately 35 lbs.
- Always unplug the iron and allow it to cool before folding the ironing board or storing the iron.
- Use the ironing board on a stable, level surface when extended.
- Do not leave a hot iron unattended on the ironing board.
- Regularly inspect the ironing board for any signs of damage or wear. Discontinue use if damaged.
Package Contents
- Nisorpa Wall Mounted Ironing Board (Model IB01)
- Metal Mounting Plate
- Heat Resistant Washable Ironing Board Cover
- Installation Hardware (screws, wall anchors)
- English User Manual
Product Specifications
| Feature | Detail |
|---|---|
| Material | Alloy Steel, Metal |
| Brand | Nisorpa |
| Color | White |
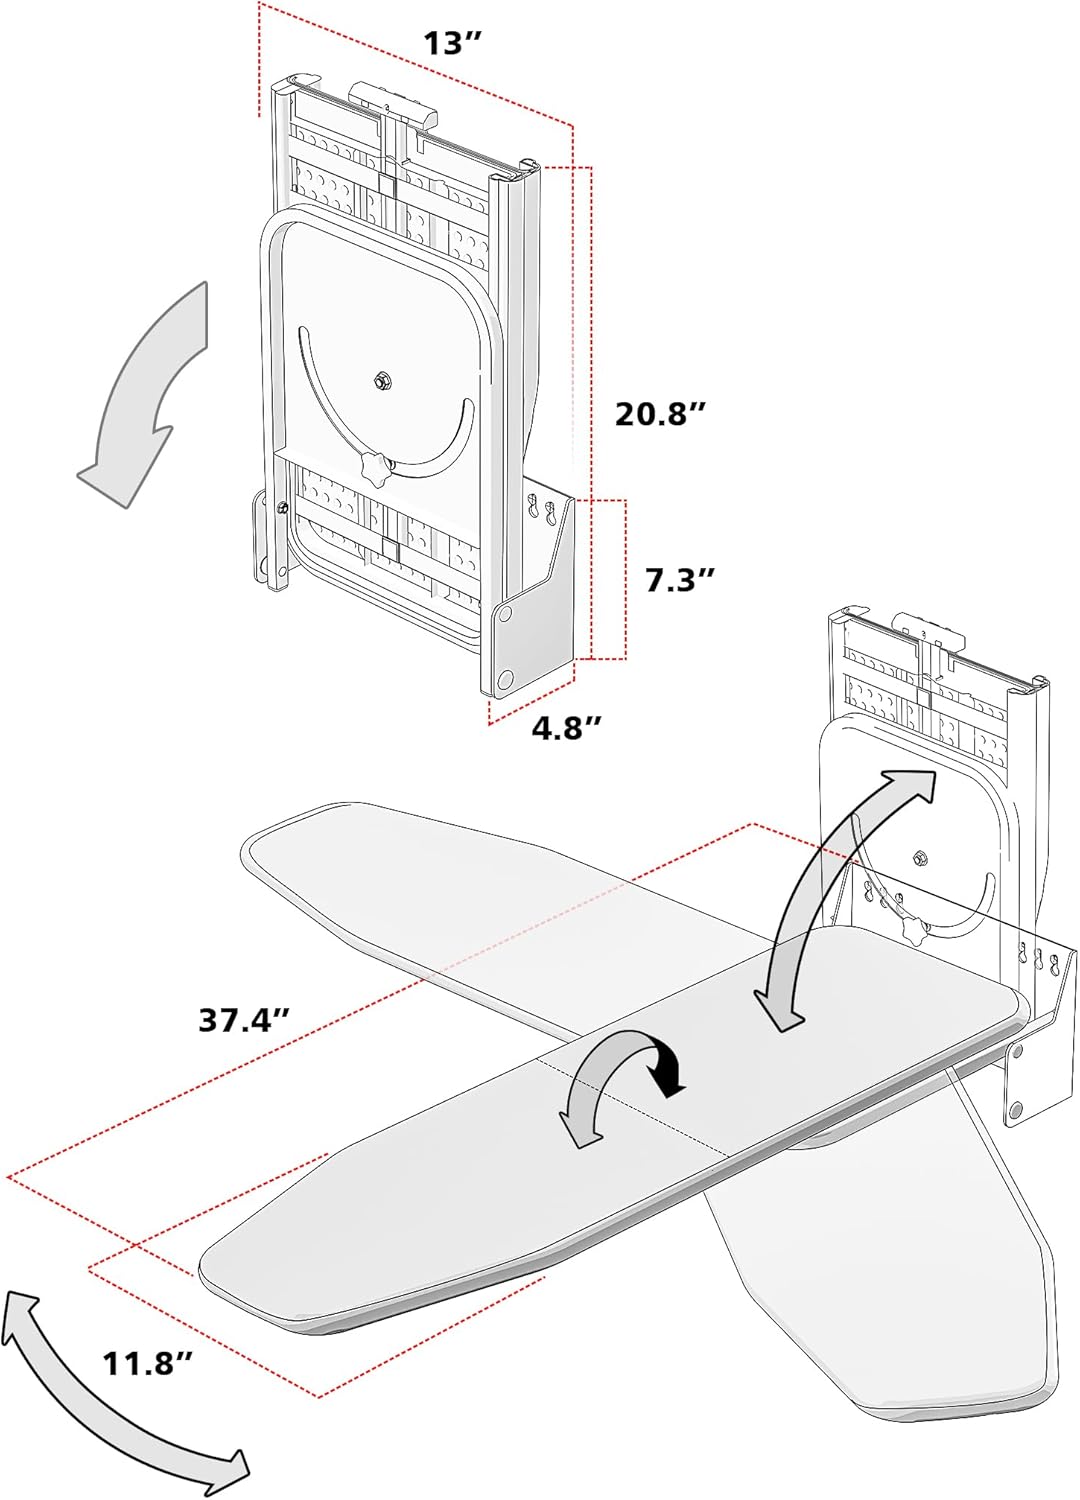
| Product Dimensions (Opened) | 37.4"L x 11.8"W x 7.3"H |
| Product Dimensions (Folded) | 13"L x 4.8"W x 20.8"H |
| Item Weight | 17 Pounds (7.7 kg) |
| Pattern | Solid |
| Frame Material | Alloy Steel |
| Mounting Type | Wall Mount |
| Is Foldable | Yes |
| Swivel Range | 180 degrees |
| Load Capacity | 35 lbs |
Setup and Installation
The Nisorpa Wall Mounted Ironing Board is designed for easy installation. Follow these steps carefully.
Step 1: Choose Installation Location
Select a solid wall surface. It is crucial to install the ironing board into wood or steel studs for maximum stability. If studs are not available, a sturdy wood backing plate anchored into studs is recommended.
Note: The package does not include a wood plate for mounting. You may need to acquire one if direct stud mounting is not possible at your desired location.
Step 2: Mark Drilling Positions
Use the provided metal mounting plate as a template. Mark the locations for drilling holes on the wall. Ensure the plate is level.
Step 3: Drill Holes
Using a drill, create holes at the marked positions. If using wall anchors, ensure the drill bit size matches the anchor specifications.
Step 4: Insert Screws and Mount Plate
Insert the provided wall anchors (if necessary) into the drilled holes. Secure the metal mounting plate to the wall using the screws. Ensure the plate is firmly attached.

Step 5: Attach Ironing Board
Align the ironing board with the mounted plate and hang it securely. The board should fit snugly onto the hooks or attachment points of the plate.
Operation
Unfolding the Ironing Board
To unfold, gently pull the board downwards from its folded position. It will extend horizontally.
Folding the Ironing Board
To fold, lift the board upwards until it locks into its vertical, space-saving position.
Swivel Mechanism
The ironing board features a 180-degree swivel mechanism. When folded or unfolded, it can be rotated and locked into left, right, or inclined positions to suit your ironing needs and room layout.

Maintenance
Cleaning the Cover
The ironing board comes with a detachable, washable ironing board cover. Simply remove the cover and wash it according to its care instructions. Ensure it is completely dry before reattaching.

General Care
- Wipe the metal parts of the ironing board with a damp cloth as needed.
- Avoid using abrasive cleaners that could damage the finish.
- Store the ironing board in its folded position when not in use to save space and protect it.
Troubleshooting
Board feels unstable after installation.
- Solution: Recheck all mounting screws to ensure they are fully tightened. Verify that the board is installed into solid studs or a properly reinforced wall.
Board does not fold or unfold smoothly.
- Solution: Check for any obstructions in the folding mechanism. Ensure the swivel lock is disengaged if attempting to fold/unfold.
Ironing surface is uneven.
- Solution: Ensure the ironing board cover is properly fitted and smooth. Check if the board itself is securely attached to the mounting plate.
Warranty and Support
For warranty information or technical support, please refer to the contact details provided on the product packaging or visit the official Nisorpa website.
Ask a question about this manual
Ask about setup, troubleshooting, compatibility, parts, safety, or missing instructions. Manuals+ will review the question and use this page’s manual context to help answer it.