
1. Introduction
This manual provides comprehensive instructions for the installation, operation, and maintenance of your MSI H310M PRO-VDH PLUS Micro ATX Motherboard. Designed for reliability and performance, this motherboard supports 9th/8th Gen Intel Core/Pentium Gold/Celeron Processors for the LGA 1151 socket and DDR4 memory up to 2666MHz.
Key features include Audio Boost for high-quality sound, EZ Debug LED for simplified troubleshooting, and X-boost software for optimizing storage and USB device performance.
2. Package Contents
Upon opening the package, ensure all components are present and undamaged. The standard package for the MSI H310M PRO-VDH PLUS Motherboard typically includes:
- MSI H310M PRO-VDH PLUS Motherboard
- I/O Shield
- SATA Cables
- Driver CD/DVD
- Quick Installation Guide

Figure 2.1: MSI H310M PRO-VDH PLUS Motherboard with its retail packaging, illustrating the product as it appears when unboxed.
3. Setup and Installation
Before beginning installation, ensure your system is powered off and disconnected from the power source. Handle the motherboard by its edges to avoid static discharge.
3.1 Motherboard Layout

Figure 3.1: Top-down view of the MSI H310M PRO-VDH PLUS Motherboard, showing the CPU socket, RAM slots, PCIe slots, and various headers.

Figure 3.2: Angled view of the MSI H310M PRO-VDH PLUS Motherboard, providing a clearer perspective of component height and layout.
3.2 Rear I/O Panel
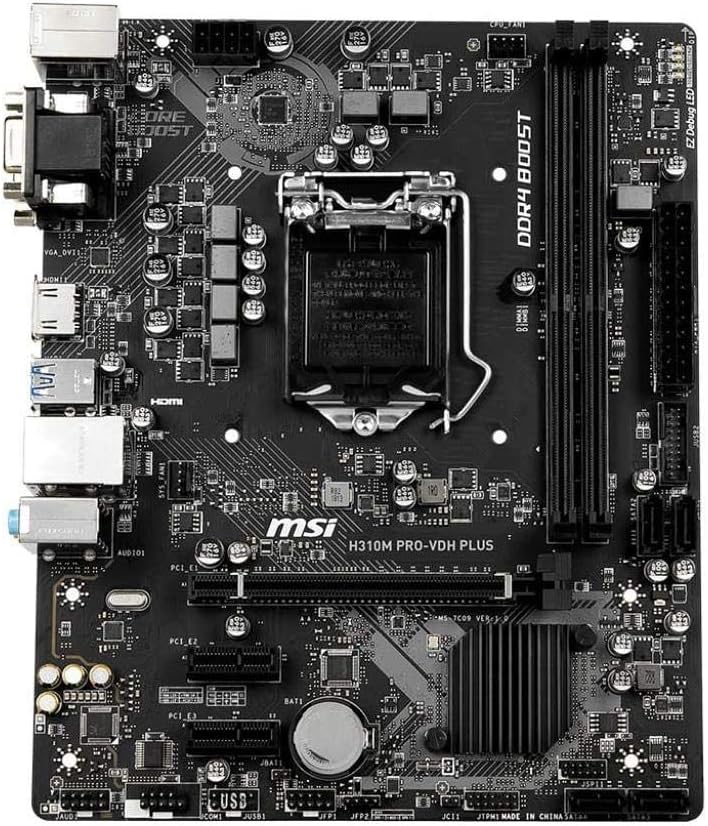
Figure 3.3: Detailed view of the rear I/O panel on the MSI H310M PRO-VDH PLUS Motherboard, highlighting the D-Sub, DVI, HDMI, USB, and audio ports.
3.3 Component Installation
- CPU Installation: Carefully align your Intel LGA 1151 processor with the socket. Ensure the triangle on the CPU matches the triangle on the socket. Gently lower the CPU into place and secure the retention arm.
- RAM Installation: This motherboard features two DDR4 DIMM slots. Open the clips on both ends of the RAM slot. Align the RAM module with the notch in the slot and press firmly until both clips snap into place. Ensure the RAM is fully seated to avoid boot issues (e.g., 3 beeps).
- Graphics Card Installation: Insert your PCIe graphics card into the primary PCIe x16 slot. Ensure it is fully seated and secured with the case's retention mechanism.
- Storage Devices: Connect SATA storage drives (HDDs/SSDs) to the SATA ports on the motherboard using SATA data cables. Connect power from your power supply unit.
- Power Connections: Connect the 24-pin ATX power connector and the 8-pin CPU power connector from your power supply to the corresponding ports on the motherboard.
- Front Panel Connectors: Connect your case's front panel headers (Power Switch, Reset Switch, HDD LED, Power LED, USB, Audio) to the appropriate pins on the motherboard. Refer to the detailed motherboard diagram in the quick installation guide for exact pin locations.
4. Operating the Motherboard
Once all components are installed and connected, you can power on your system.
4.1 BIOS/UEFI Setup
Upon initial boot, you may need to enter the BIOS/UEFI setup to configure settings such as boot order, date/time, and enable features like XMP for optimal RAM performance. Typically, you can access the BIOS by pressing the DEL key during startup.
4.2 Software Utilities
MSI provides various software utilities to enhance your experience. The X-boost software, for example, can automatically detect and optimize the performance of your storage and USB devices.
5. Maintenance
Regular maintenance helps ensure the longevity and stable operation of your motherboard.
- Dust Removal: Periodically clean dust from the motherboard and components using compressed air. Ensure the system is powered off and unplugged before cleaning.
- BIOS Updates: Check the official MSI website for the latest BIOS updates. Updating the BIOS can improve compatibility, stability, and performance. Follow the instructions provided by MSI carefully when performing a BIOS update.
- Driver Updates: Keep your drivers for chipset, audio, and network up to date by downloading them from the MSI support website.
6. Troubleshooting
This section addresses common issues you might encounter.
6.1 EZ Debug LED
The MSI H310M PRO-VDH PLUS features EZ Debug LEDs. These LEDs indicate the status of key components (CPU, DRAM, VGA, BOOT) during startup. If an LED remains lit, it indicates a problem with the corresponding component.
- CPU LED: Check CPU installation, power connection, and ensure the CPU is compatible.
- DRAM LED: Re-seat RAM modules, try one module at a time, or test with known-good RAM. Ensure RAM is fully clicked into place.
- VGA LED: Check graphics card installation, power connection, and monitor cable.
- BOOT LED: Check storage device connections and boot order in BIOS.
6.2 General Troubleshooting Tips
- No Power: Verify all power cables (24-pin ATX, 8-pin CPU) are securely connected. Check power supply functionality.
- No Display: Ensure monitor is connected and powered on. Try a different display output or graphics card if available.
- System Instability: Check component temperatures. Ensure all drivers are installed correctly.
7. Specifications
Below are the detailed specifications for the MSI H310M PRO-VDH PLUS Motherboard:
| Feature | Specification |
|---|---|
| Brand | MSI |
| Model Name | H310M PRO-VDH PLUS |
| CPU Socket | LGA 1151 |
| Compatible Processors | 9th / 8th Gen Intel Core / Pentium Gold / Celeron processors |
| Chipset Type | Intel H310 |
| RAM Memory Technology | DDR4 |
| Memory Speed | Up to 2666MHz |
| Product Dimensions | 8.9 x 7.3 x 1 inches (Micro ATX) |
| Item Weight | 1 pounds |
| Onboard Graphics | D-Sub, DVI, HDMI |
| Audio | Audio Boost |
| Date First Available | January 11, 2019 |
8. Warranty Information
For detailed warranty terms and conditions, please refer to the official MSI website or the warranty card included with your product. Warranty coverage typically varies by region and purchase date.
9. Support
For further assistance, technical support, or driver downloads, please visit the official MSI support website:
Visit the MSI Store and Support Page
You can also find FAQs and community forums on the MSI website for additional resources.


