
1. Introduction
This manual provides detailed instructions for the installation, operation, and maintenance of your TMEZON 1080P 5-in-1 16-Channel Digital Video Recorder (DVR). This DVR supports multiple camera types, including Analog, AHD (1MP, 1.3MP, 2MP), CVI, TVI, CVBS 1080P, and IP cameras, offering versatile surveillance solutions. It features H.265 video compression for efficient storage, motion detection with email alerts, and remote viewing capabilities via smartphones and web browsers.
2. Setup
2.1 Package Contents
Verify that all items are present in your package:
- TMEZON 16-Channel DVR Unit
- Power Adapter
- USB Mouse
- Remote Control
- Screws for HDD Installation
- Quick Start Guide (English)
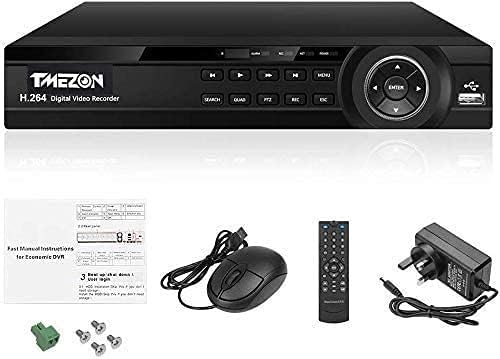
Image: TMEZON 16-Channel DVR unit and its accessories, including the power adapter, USB mouse, remote control, and screws for hard drive installation.
2.2 Hardware Connections
Connect all necessary peripherals to the DVR unit as illustrated below:

Image: Rear panel of the TMEZON DVR, detailing connections for analog cameras, HDMI, Ethernet, microphone, VGA, audio out, USB, RS485 for PTZ control, and DC power input.
- Analog Ports (CH1-CH16): Connect your analog, AHD, CVI, TVI, or CVBS 1080P cameras.
- HDMI Output: Connect to an HD monitor for high-definition video display.
- VGA Output: Connect to a VGA monitor for video display.
- Ethernet Port: Connect to your router using an Ethernet cable for network access and remote viewing.
- Audio In: Connect a microphone for audio input.
- Audio Out: Connect a speaker for audio output.
- USB 2.0 Ports: Connect the included USB mouse for navigation and a USB disk for data backup.
- RS485: For PTZ (Pan-Tilt-Zoom) camera control.
- DC 12V Power Input: Connect the provided power adapter.
2.3 Hard Drive (HDD) Installation
The DVR supports one internal SATA 3.5-inch HDD up to 6TB. If your DVR did not come with a pre-installed HDD, you will need to install one for recording functionality. For detailed instructions on HDD installation and playback, please refer to the following external resource: HDD Installation and Playback Guide.
3. Operating Instructions
3.1 Initial Power On and System Access
- After connecting all hardware, plug in the power adapter. The DVR will power on automatically.
- Connect a monitor to the HDMI or VGA port.
- Use the USB mouse to navigate the on-screen menu. Follow the on-screen prompts for initial setup, including setting the date, time, and administrator password.
3.2 Channel Type Configuration
The DVR supports various camera types. You can configure each channel to match your connected cameras:

Image: DVR menu displaying options to configure local channels (1080N, 1080P, 960P) and IP channels (3M, 5M), allowing users to select the appropriate resolution and camera type for each of the 16 channels.
- Navigate to the 'Channel Type' or 'System Settings' menu.
- Select the appropriate video input type (Analog, AHD, CVI, TVI, CVBS, IP) and resolution for each channel.
- Save your settings and restart the DVR if prompted.
3.3 Video Compression
The DVR utilizes H.265 video compression technology, which provides high-resolution imaging while optimizing storage space and bandwidth. This allows for longer recording times compared to older compression standards.
3.4 Motion Detection and Email Alerts
Configure motion detection to trigger recording and send email alerts when activity is detected in specified areas.

Image: A visual representation of the motion detection feature, showing how movement in a monitored area triggers an email alert and allows for real-time viewing on a smartphone after scanning a QR code and downloading the app.
- Access the 'Alarm' or 'Motion Detection' settings in the DVR menu.
- Define motion detection zones and sensitivity levels for each camera.
- Configure email settings to receive alerts.
3.5 Remote Viewing
Monitor your premises remotely using a smartphone or web browser.

Image: A smartphone displaying a live security camera feed, illustrating the remote viewing capability. Icons above indicate compatibility with smartphones, tablets, and PCs for quick remote surveillance.
- Smartphone App: Scan the QR code provided in the DVR interface or quick start guide to download the official app (compatible with iPhone, Android, Windows Mobile). Follow the app instructions to add your DVR.
- Web Browser: Access the DVR via a web browser (IE, Chrome, Firefox, Safari) by entering its IP address. Ensure the DVR is connected to your network.
3.6 Day and Night Vision
The system provides clear night vision and colorful day vision, ensuring continuous monitoring in various lighting conditions.

Image: A split image demonstrating the camera's capabilities, with one side showing a clear monochrome image under low-light conditions (Clear Night Vision) and the other side showing a vibrant, full-color image during daylight (Colorful Day Vision).
4. Maintenance
4.1 Hard Drive Management
- Regularly check the HDD status in the DVR settings to ensure proper functioning.
- Backup important recordings to a USB disk or network storage periodically.
- Configure the DVR to overwrite old footage automatically when the HDD is full, or set up scheduled deletion.
4.2 Cleaning
- Ensure the DVR unit is powered off and unplugged before cleaning.
- Use a soft, dry cloth to wipe the exterior of the DVR. Do not use liquid cleaners or aerosols.
- Keep ventilation openings clear of dust and obstructions to prevent overheating.
4.3 Firmware Updates
Check the manufacturer's website periodically for firmware updates. Firmware updates can improve performance, add new features, or fix bugs. Follow the provided instructions carefully when performing an update.
5. Troubleshooting
5.1 No Video Display
- Check all video cable connections (HDMI/VGA) to the monitor and DVR.
- Ensure the monitor is powered on and set to the correct input source.
- Verify that cameras are properly connected and powered.
- Confirm that the channel type configuration matches your cameras.
5.2 Network Connection Issues
- Ensure the Ethernet cable is securely connected to both the DVR and the router.
- Check if your router is functioning correctly and has internet access.
- Verify network settings (IP address, gateway, DNS) in the DVR's network configuration menu.
- Restart the DVR and your router.
5.3 HDD Not Recording
- Check if an HDD is installed and properly connected inside the DVR.
- Verify the HDD status in the DVR's storage settings. It may need to be formatted.
- Ensure recording schedules are properly configured.
- Check if the HDD has sufficient free space.
5.4 ONVIF Camera Compatibility
While the DVR supports ONVIF IP cameras, not all ONVIF camera models are guaranteed to be compatible. If you experience issues with an ONVIF camera, please contact customer support for assistance or recommendations on compatible cameras.
6. Specifications
| Feature | Specification |
|---|---|
| Brand | TMEZON |
| Model | 16CH NO HDD |
| Channels | 16 |
| Video Input Compatibility | 5-in-1 (Analog, AHD 100/130/200MP, CVI, TVI, CVBS 1080P, IP Cameras) |
| Video Compression | H.265 |
| HDD Support | Max 6TB (Internal SATA 3.5-inch) |
| Remote Access | Smartphone (iPhone, Android, Windows Mobile), Web Browsers (IE, Chrome, Firefox, Safari) |
| Features | Motion Detection, Email Alerts |
| Dimensions | 35.2 x 28.2 x 13.2 cm |
| Weight | 2.1 kg |
7. Warranty and Support
7.1 Warranty Period
This product comes with a 1-year warranty from the date of purchase. If you encounter any quality issues within this period, please contact our support team.
7.2 Customer Support
For technical assistance, troubleshooting, or warranty claims, please contact us via email:
Email: tmezoncctvsystem@yahoo.com
If you require two or more units, please contact us directly for special discount offers.