
1. Introduction
This manual provides essential information for the installation, operation, and maintenance of your UPBRIGHT 250W Power Supply Unit (PSU). This PSU is designed as a compatible replacement or upgrade component for various Dell slim desktop systems. Please read this manual thoroughly before proceeding with installation to ensure proper function and safety.
2. Safety Information
Always observe the following safety precautions when handling and installing electronic components:
- Disconnect Power: Always unplug the computer from the wall outlet before opening the case or performing any installation.
- Static Discharge: Wear an anti-static wrist strap or frequently touch a grounded metal object (like the unpainted metal chassis of the computer) to discharge static electricity. Static discharge can damage sensitive electronic components.
- Ventilation: Ensure adequate ventilation around the computer. Do not block the PSU's fan or vents.
- Correct Voltage: Verify that the voltage selector switch (if present) on the PSU is set to the correct voltage for your region (e.g., 115V for North America, 230V for Europe). This PSU is auto-sensing for 100-240V.
- Professional Installation: If you are unsure about any step, consult a qualified technician.
3. Compatibility
This UPBRIGHT 250W PSU is compatible with a range of Dell slim desktop systems and replaces various Dell PSU models. Verify your system's requirements and existing PSU model number before installation.
3.1. Compatible Dell System Models:
- Optiplex Series: 390, 790, 990, 3010, 7010
- Inspiron Series: 530s, 537s, 540s, 545s, 546s, 560s, 570s, 580s, 620s
- Vostro Series: 200s, 220s, 230s, 260s, 400s
- Studio Series: 540s, 537s, 560s
3.2. Compatible Dell PSU Part Numbers (P/N) and Model Numbers:
This PSU is designed to replace or be compatible with the following Dell part numbers and model numbers:
- Dell Model Numbers: L250NS-00, PS-5251-08D, D250AD-00, PS-5251-5, H250AD-00, D250A1005L, D250ED-00, DPS-250AB-67 A, F250ED-00, D-0250ADU00-101, D250ND-00, DPS-250AB-73A, AC250NS-00, PCA038, TFX0250D5WB, D250AD-01, DPS-250AB-79 A, DPS-250AB-68 A, D250ED-01, F250AD-00, D-0250ADU00-201, PC7068, HP-D2506R0, DPS-250AB-36, H250ED-00, D250E006L, PS-5251-06, L250AD-00, PS-5251-01DI, PS-00-5251DA, HU11AD-250, HK00-350FP S71, PS-00AB-250 A
- Dell P/N Models: CYY97, 7GC81, HY6D2, WX9P8, 6MVJH, YJ1JT, 3MV8H, 3WFNF, 5FFR5, 76VCK, MPX3V, PWJ55, T498G, W208D, W209D, W210D, X3KJ8, XFWXR, 0HY6D2, CN-0HY6D2, 77GHN, 077GHN, CN-077GHN, 03MV8H, CN-03MV8H, 06MVJH, CN-06MVJH, 076VCK, CN-076VCK, 0CYY97, FY9H3, 0FY9H3, CN-FY9H3, DY72N, 0DY72N, CN-0DY72N, 07GC81, CN-076VCK, 0YJ1JT, CN-0YJ1JT, 0MPX3V, CN-0MPX3V, 0X3KJ8, CN-0X3KJ8, K2H58, 0K2H58, CN-0K2H58, PS-5251-03, P164N, 0P164N, HP-D2503R001, H058N, H7NF9, PS-5251-08D
4. Installation Instructions
Replacing a power supply unit requires careful handling of internal computer components. Follow these steps precisely:
- Prepare the Work Area:
Ensure your workspace is clean, well-lit, and free of static-generating materials. Gather necessary tools, such as a Phillips head screwdriver.
- Power Down and Disconnect:
Shut down your computer completely. Unplug the power cord from the wall outlet and from the back of the computer. Disconnect all other peripherals (monitor, keyboard, mouse, etc.).
- Open the Computer Case:
Remove the side panel(s) of your computer case to access the internal components. Refer to your computer's specific manual for instructions on opening the case.
- Discharge Static Electricity:
Before touching any internal components, ground yourself by touching an unpainted metal part of the computer chassis. Maintain grounding throughout the process.
- Disconnect Existing PSU Cables:
Carefully disconnect all power cables from the motherboard, hard drives, optical drives, and any other components. Note the routing of these cables for easier reinstallation.

Image: View of the power supply unit with its various cables disconnected, showing the main 24-pin connector, 4-pin CPU connector, and SATA power connectors.
- Remove the Old PSU:
Unscrew the mounting screws that secure the old PSU to the computer chassis. Typically, these are located at the back of the computer. Carefully slide the old PSU out of its bay.

Image: The UPBRIGHT 250W Power Supply Unit, showing its compact form factor and integrated cables. This unit is ready for installation.
- Install the New UPBRIGHT PSU:
Slide the new UPBRIGHT 250W PSU into the empty PSU bay. Align the screw holes and secure the PSU with the mounting screws. Ensure it is firmly seated.
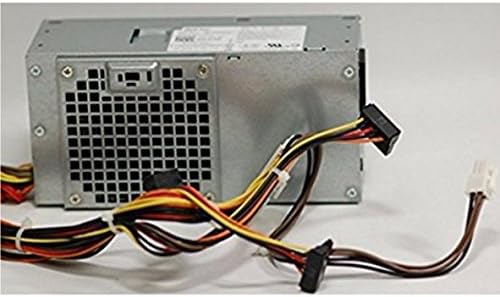
Image: Rear view of the power supply unit, highlighting the AC power input and the exhaust fan grill. This perspective shows how the unit fits into a computer chassis.
- Connect PSU Cables:
Connect the new PSU cables to the motherboard (main 24-pin connector, 4-pin or 8-pin CPU connector), hard drives, optical drives, and any other components that require power. Ensure all connections are secure and correctly oriented. Do not force connectors.

Image: Close-up view of the various power connectors, including the main 24-pin ATX connector, 4-pin CPU connector, and SATA power connectors, ready for connection to computer components.
- Cable Management:
Route cables neatly to improve airflow and prevent interference with other components. Use cable ties if necessary.
- Close the Computer Case:
Replace the side panel(s) of your computer case and secure them.
- Reconnect Peripherals and Power:
Reconnect all external peripherals and the power cord to the computer and the wall outlet.
5. Operation
Once installed, the UPBRIGHT 250W PSU operates automatically to provide stable power to your computer's components. The PSU is designed for continuous operation within its specified wattage limits.
- Power On: Press the power button on your computer. The PSU will initiate power delivery to the motherboard and connected devices.
- Monitoring: Modern operating systems and BIOS/UEFI interfaces may provide basic power monitoring. Ensure your system boots normally and operates without unexpected shutdowns or errors.
6. Maintenance
Proper maintenance helps extend the lifespan of your PSU and computer system:
- Dust Removal: Periodically (every 6-12 months, depending on environment) open your computer case and use compressed air to gently remove dust buildup from the PSU's fan and vents. Ensure the computer is powered off and unplugged before cleaning.
- Airflow: Ensure the computer's ventilation openings are not obstructed. Maintain adequate space around the computer for proper airflow.
- Cable Management: Regularly check that internal cables are neatly routed and not obstructing airflow or fan operation.
7. Troubleshooting
If you encounter issues after installing your new PSU, consider the following common troubleshooting steps:
- Computer Does Not Power On:
- Verify the power cord is securely plugged into both the wall outlet and the PSU.
- Ensure the power switch on the back of the PSU (if present) is in the "On" position.
- Check all internal power connections (24-pin motherboard, CPU, SATA, etc.) to ensure they are firmly seated.
- Confirm the wall outlet is functional by plugging in another device.
- System Powers On but No Display:
- Ensure the monitor is connected and powered on.
- Reseat RAM modules and graphics card (if applicable).
- Verify the CPU power connector is securely attached.
- Intermittent Shutdowns or Instability:
- Check for overheating. Ensure PSU and case fans are spinning freely and not obstructed by dust.
- Verify that the total power draw of your components does not exceed the PSU's 250W capacity.
- Ensure all power connections are stable and not loose.
- Unusual Noises:
- A grinding or rattling noise may indicate a faulty fan. If the noise is coming from the PSU, contact support.
If these steps do not resolve the issue, contact UPBRIGHT customer support or a qualified technician.
8. Specifications
| Brand | UPBRIGHT |
| Output Wattage | 250 Watts |
| Compatible Devices | Personal Computer (Dell Optiplex, Inspiron, Vostro, Studio Slim Desktop Systems) |
| Cooling Method | Air |
| Input Voltage | 100-240V AC (Auto-sensing) |
| Output Voltage/Current | +5V / 15A MAX, +12V / 18A MAX, +3.3V / 14A MAX |
| Model Numbers (UPBRIGHT) | D250AD-00, H250AD-00, F250ED-00 (and compatible with many Dell models/P/Ns) |
Note: Specifications are subject to change without notice. Refer to the product label for the most accurate information.
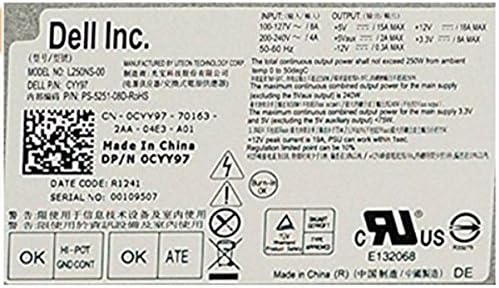
Image: Close-up of the specification label on the power supply unit, detailing input/output voltages, currents, and various certifications.
9. Warranty and Support
UPBRIGHT stands behind the quality of its products. This power supply unit comes with the following coverage:
- Refund Policy: 30 days refund period from the date of purchase.
- Exchange Policy: 24 months exchange period for defective units.
For technical support, warranty claims, or further assistance, please contact UPBRIGHT customer service through your point of purchase or the official UPBRIGHT website.