1. Introduction
Thank you for choosing the USPEEDA Carburetor. This manual provides essential information for the proper installation, operation, and maintenance of your new carburetor. Please read this manual thoroughly before attempting any installation or service to ensure safe and efficient performance. This carburetor is designed for specific engine models to restore optimal fuel delivery and engine function.
2. Product Overview
2.1 What's Included
- 1 Carburetor with Gasket
- 1 Air Filter
- 1 Pre-filter
- 1 Spark Plug
- 1 Primer Bulb
- 1 Fuel Filter
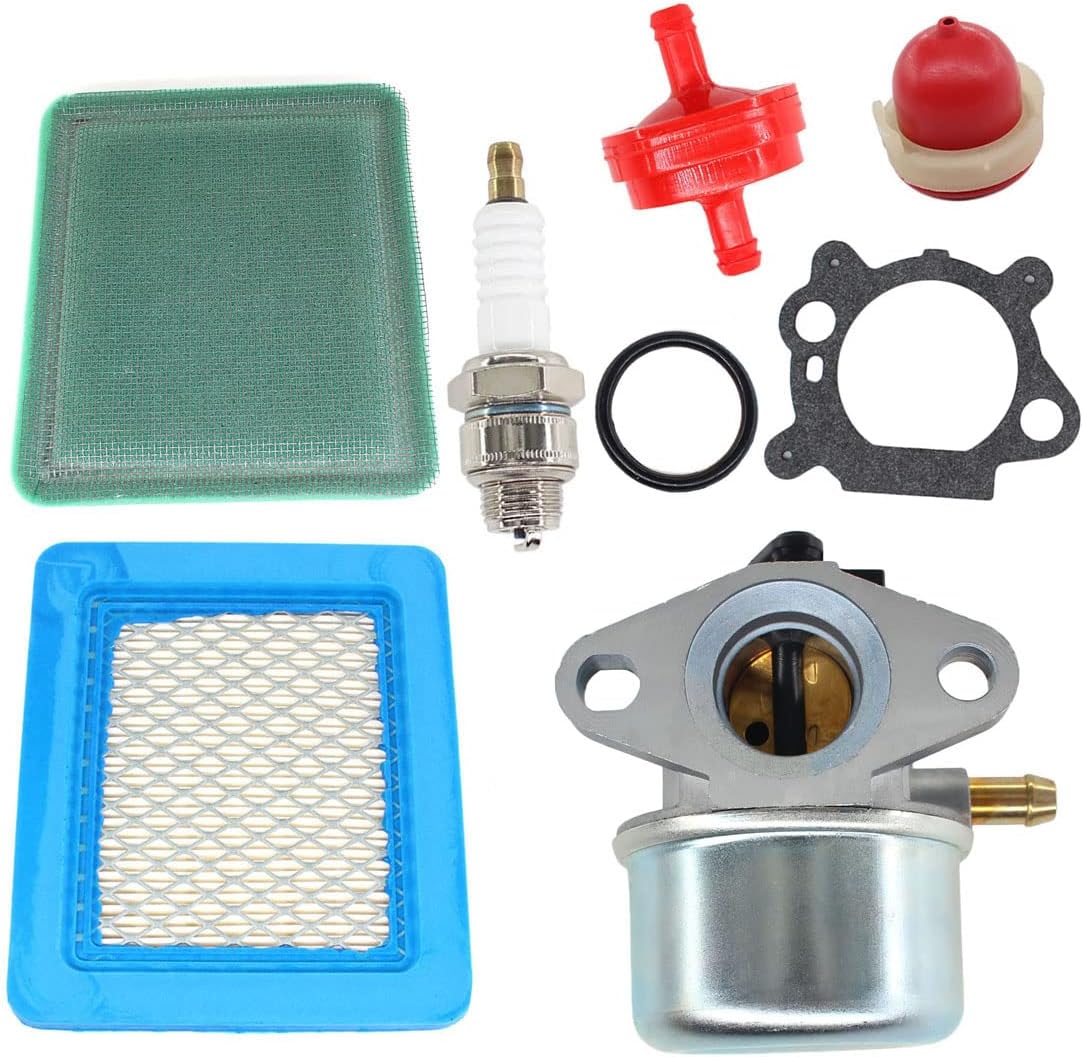
Image 2.1: Complete USPEEDA Carburetor Kit showing all included components: carburetor, gaskets, air filter, pre-filter, spark plug, primer bulb, and fuel filter.
2.2 Compatibility
This carburetor is designed to fit 6150 4-7 HP engines and is compatible with various models, including but not limited to:
- Craftsman 917.388660 6.5 hp 21 inch blade push mower
- Craftsman 625 series lawnmower
- Craftsman 917376742
- 6.5hp Craftsman mower
- Craftsman mower model 917.378644 model 128602-0259-E1
- Craftsman 22" weed trimmer
- Craftsman 22" Weedeater Quantum 122H00 Series Engine
- Craftsman 22" wheeled trimmer
- 6.5HP Troy Bilt push mower
- 650 series motor (799866)
- Murray push mower
- 1999 Snapper 6 hp
3. Setup and Installation
Before beginning installation, ensure the engine is cool and disconnected from any power source (e.g., spark plug wire removed). It is recommended to drain the fuel tank before replacing the carburetor.
- Preparation: Gather necessary tools (wrenches, screwdrivers, pliers). Ensure you have a clean workspace.
- Remove Old Components: Carefully disconnect the fuel line, throttle linkage, and choke linkage from the old carburetor. Remove the mounting bolts and detach the old carburetor.
- Clean Mounting Surface: Thoroughly clean the engine's mounting surface to ensure a proper seal with the new gasket.
- Install New Carburetor: Place the new gasket (included) onto the mounting studs. Position the new USPEEDA carburetor onto the studs, ensuring it aligns correctly. Secure with mounting bolts, tightening them evenly.
- Connect Linkages and Fuel Line: Reattach the throttle and choke linkages to the new carburetor. Connect the fuel line, ensuring a secure fit to prevent leaks. Install the new fuel filter in the fuel line if replacing.
- Replace Air Filter and Spark Plug: Install the new air filter and pre-filter into the air filter housing. Replace the old spark plug with the new one provided.
- Primer Bulb: If applicable, replace the primer bulb.
- Refuel and Test: Refill the fuel tank. Reconnect the spark plug wire. Prime the carburetor if necessary (refer to your engine's specific priming instructions). Start the engine and check for proper operation and any fuel leaks.

Image 3.1: Side view of the carburetor, showing the fuel inlet and mounting points. Ensure these are properly connected during installation.

Image 3.2: Front view of the carburetor, highlighting the air intake and throttle linkage connection points.
4. Operating Principles
The carburetor's primary function is to mix air and fuel in the correct ratio for combustion. Once installed, the carburetor automatically adjusts this mixture based on engine speed and load, ensuring efficient engine operation. No manual adjustments are typically required for this replacement unit under normal operating conditions.
Ensure the fuel tank contains fresh, clean fuel appropriate for your engine type. Stale or contaminated fuel can lead to poor performance and carburetor issues.
5. Maintenance
Regular maintenance of your engine's fuel and air systems is crucial for the longevity and performance of your carburetor and engine.
5.1 Regular Checks and Replacements
- Air Filter: Inspect the air filter regularly (e.g., every 25 hours of operation or annually). Clean or replace if dirty to ensure proper airflow to the carburetor. A clogged air filter can cause rich fuel mixture and poor performance.
- Fuel Filter: Replace the fuel filter annually or if signs of clogging are present (e.g., engine sputtering, loss of power). This prevents contaminants from reaching the carburetor.
- Spark Plug: Inspect the spark plug annually or every 100 hours. Replace if electrodes are worn or fouled to ensure reliable ignition.
- Fuel Quality: Always use fresh, clean fuel. Store fuel in approved containers and consider using a fuel stabilizer if storing fuel for extended periods.
5.2 Carburetor Cleaning (Advanced)
While this carburetor is designed for reliability, prolonged use with stale fuel or contaminants may necessitate cleaning. This procedure is for experienced users. If unsure, consult a qualified technician.
- Disassembly: Carefully remove the carburetor from the engine. Disassemble the float bowl (bottom part) and remove the float and needle valve. Note the position of all small parts.
- Cleaning: Use a carburetor cleaner spray to clean all passages, jets, and the float bowl. Ensure all small holes are clear. Do not use wire or hard objects that could damage precision orifices.
- Inspection: Inspect the float, needle valve, and seat for wear or damage. Replace if necessary.
- Reassembly: Reassemble the carburetor carefully, ensuring all parts are correctly seated. Use new gaskets if available.
- Reinstallation: Reinstall the carburetor onto the engine as described in the Setup section.

Image 5.1: Bottom view of the carburetor, showing the float bowl and drain plug (if present). This section is accessed for cleaning.

Image 5.2: Top view of the carburetor, showing the air intake and choke mechanism. Keep this area clear of debris.
6. Troubleshooting
This section provides solutions to common issues you might encounter. If the problem persists, consult a qualified service technician.
| Problem | Possible Cause | Solution |
|---|---|---|
| Engine will not start or starts hard | No fuel, stale fuel, clogged fuel filter, clogged air filter, fouled spark plug, incorrect priming. | Check fuel level and quality. Replace fuel filter. Clean/replace air filter. Replace spark plug. Ensure proper priming procedure is followed. |
| Engine runs rough or stalls | Clogged fuel filter, dirty air filter, stale fuel, carburetor jets partially clogged. | Replace fuel filter. Clean/replace air filter. Drain old fuel and refill with fresh fuel. Consider carburetor cleaning (Section 5.2). |
| Loss of power during operation | Clogged air filter, restricted fuel flow, worn spark plug. | Clean/replace air filter. Check fuel line for kinks or blockages. Replace fuel filter. Replace spark plug. |
| Fuel leaks from carburetor | Loose connections, damaged gasket, faulty float needle. | Check all fuel line connections for tightness. Inspect and replace carburetor gasket if damaged. Inspect float and needle valve for proper seating. |
7. Specifications
| Attribute | Detail |
|---|---|
| Brand | USPEEDA |
| Product Dimensions | 3.94 x 3.54 x 2.76 inches |
| Recommended Uses | Lawn Mower Engines (6150 4-7 HP) |
| Manufacturer | USPEEDA |
| ASIN | B07MC7JRXM |
| UPC | 673400021700 |
8. Warranty and Support
Specific warranty information for this product is not provided in this manual. Please refer to the product packaging or contact USPEEDA customer support directly for warranty details and technical assistance.
For further support or inquiries, please visit the official USPEEDA website or contact their customer service department.


