1. Introduction
The Teltonika TRB140 is a compact, fast, and powerful industrial LTE Cat 4 gateway. It is designed for industrial applications where robust and reliable connectivity is essential. This device provides Ethernet connectivity with 4G LTE backup, making it suitable for various IoT solutions, remote monitoring, and industrial automation.
2. Safety Information
- Always disconnect power before performing any maintenance or installation procedures.
- Ensure proper ventilation to prevent overheating.
- Do not expose the device to moisture, extreme temperatures, or direct sunlight.
- Use only the power adapter provided or specified by Teltonika.
- Installation should be performed by qualified personnel in accordance with local regulations.
3. Package Contents
Verify that your package contains the following items:
- Teltonika TRB140 Gateway
- 1 x LTE antenna (magnetic mount, SMA male)
- Power supply unit
- Ethernet cable
- SIM ejector pin or Hex key (for SIM card access)
- Quick Start Guide
4. Device Overview
The TRB140 features a robust design with essential ports and indicators for industrial deployment.

Figure 4.1: Front view of the Teltonika TRB140 showing power input, Ethernet port, and device information.

Figure 4.2: Rear view of the Teltonika TRB140 showing the USB port, mobile antenna connector, reset button, and SIM card access panel.
4.1. Front Panel

Figure 4.3: Detailed view of the power input and Ethernet port on the TRB140.
- Power Input (9-30V): Connects to the power supply.
- Ethernet Port: Standard RJ45 port for wired network connection.
4.2. Rear Panel
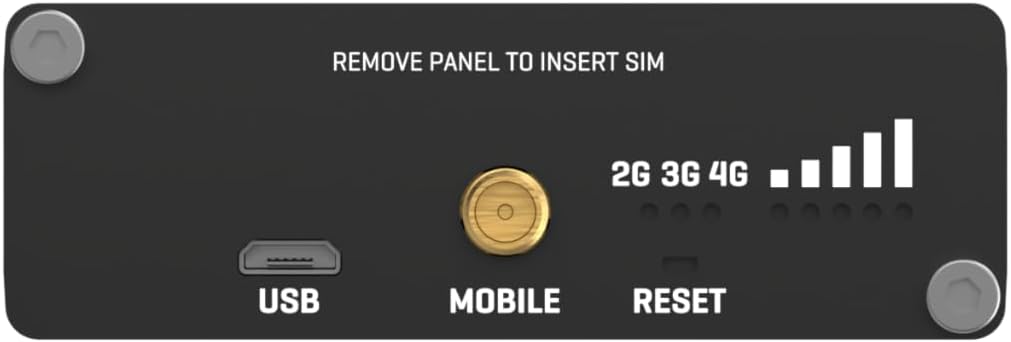
Figure 4.4: Detailed view of the USB port, mobile antenna connector, reset button, and SIM card access panel on the TRB140.
- USB Port: For future functionality or specific configurations.
- Mobile Antenna Connector: SMA connector for the 4G LTE antenna.
- Reset Button: Used to restore factory defaults or reboot the device.
- SIM Card Slot: Located behind a removable panel, for inserting a Nano-SIM card.
- LED Indicators: Signal strength and network status indicators.
5. Setup
5.1. SIM Card Installation
- Using the provided hex key, unscrew the two hex bolts on the rear panel to remove the SIM card access panel.
- Insert your Nano-SIM card into the SIM slot. Ensure the SIM card is correctly oriented as indicated on the device.
- Reattach the SIM card access panel and secure it with the hex bolts.
5.2. Antenna Connection
- Connect the supplied LTE antenna to the Mobile antenna connector on the rear panel.
- Position the antenna for optimal signal reception. The magnetic base allows for flexible placement.
5.3. Power Connection
- Connect the power adapter to the power input terminal on the front panel of the TRB140.
- Plug the power adapter into a suitable power outlet. The device will power on automatically.
5.4. Ethernet Connection
- Connect one end of the Ethernet cable to the Ethernet port on the TRB140.
- Connect the other end of the Ethernet cable to your computer or network switch.
5.5. Initial Access
Once powered on and connected via Ethernet, you can access the device's WebUI (Web User Interface) for configuration:
- Open a web browser on your connected computer.
- Enter the default IP address: 192.168.2.1
- Use the default login credentials: Username: admin, Password: admin01
- You will be prompted to change the password upon first login for security reasons.
6. Operating
6.1. WebUI Navigation
The WebUI provides comprehensive control over the TRB140's functions. Key sections include:
- Status: Overview of device status, network connection, and signal strength.
- Network: Configure WAN (Mobile), LAN, VPN, Firewall settings.
- Services: Manage various services like SMS utilities, DDNS, etc.
- System: Device administration, firmware updates, backup/restore, user management.
6.2. Mobile Connection Setup
To establish a 4G LTE connection:
- Navigate to the Network > Mobile section in the WebUI.
- Ensure the mobile data is enabled.
- Configure the APN (Access Point Name) settings according to your mobile operator's requirements. This is often auto-detected but may need manual entry.
- Save changes and wait for the device to connect to the mobile network. Monitor the signal strength LEDs and the status page.
6.3. LED Indicators
The LEDs on the device provide visual feedback on its operational status:
- Power LED: Indicates power status (On: device powered, Off: no power).
- Signal Strength LEDs: Multiple LEDs indicate the strength of the mobile signal. More LEDs lit means stronger signal.
- Network Type LEDs (2G/3G/4G): Indicates the current mobile network technology in use.
- Ethernet Link/Activity LEDs: On the Ethernet port, indicate link status and data activity.
7. Maintenance
7.1. Firmware Updates
Regularly check for and apply firmware updates to ensure optimal performance, security, and access to new features. Firmware can be updated via the WebUI under System > Firmware.
7.2. Cleaning
Clean the device periodically with a soft, dry cloth. Do not use liquid cleaners or solvents.
7.3. Environmental Considerations
Ensure the device operates within its specified temperature and humidity ranges to maintain reliability and longevity.
8. Troubleshooting
8.1. No Internet Connection
- Verify SIM card is correctly inserted and active.
- Check APN settings in the WebUI (Network > Mobile).
- Ensure the antenna is properly connected and positioned for good signal strength.
- Check mobile signal strength LEDs. If signal is weak, try repositioning the antenna.
- Confirm your mobile data plan is active and has available data.
8.2. Cannot Access WebUI
- Ensure your computer is directly connected to the TRB140 via Ethernet.
- Verify your computer's IP settings are set to obtain an IP address automatically (DHCP).
- Confirm you are using the correct default IP address (192.168.2.1).
- Try clearing your browser's cache or using a different browser.
- If the password was changed and forgotten, a factory reset may be necessary.
8.3. Factory Reset
To restore the device to factory default settings:
- Ensure the device is powered on.
- Locate the Reset button on the rear panel.
- Press and hold the Reset button for approximately 10 seconds until all LEDs start blinking.
- Release the button. The device will reboot with factory default settings.
9. Specifications
| Feature | Specification |
|---|---|
| Model Name | TRB140 |
| Item Model Number | TRB140003000 |
| Brand | Teltonika |
| Product Dimensions | 10 x 2 x 2.7 inches |
| Item Weight | 4.7 ounces (134 Grams) |
| Connectivity Technology | Wired (4G LTE via SIM) |
| Operating System | RouterOS (Teltonika RutOS based on OpenWrt) |
| Power Input | 9-30V DC |
| Mobile Module | 4G (LTE Cat 4) / 3G / 2G |
| Ethernet | 1 x 10/100 Mbps Ethernet port |
| SIM Slots | 1 x Nano-SIM |
| Antenna Connectors | 1 x SMA for LTE |
| Operating Temperature | -40 °C to 75 °C |
| Housing | Aluminum |
10. Warranty
Teltonika Networks products are covered by a manufacturer's warranty. The specific terms and duration of the warranty may vary by region and product. For detailed warranty information, please refer to the official Teltonika Networks website or contact your local distributor.
11. Support
For further assistance, technical documentation, firmware downloads, and support resources, please visit the official Teltonika Networks Wiki and support portal:
You may also contact your product reseller or Teltonika Networks customer support directly for specific inquiries.


