1. Introduction
This manual provides detailed instructions for the installation, operation, and maintenance of your CarBest Radar-Based Blind Spot Detection (BSD) and Rear Cross Traffic Alert (RCTA) System. This advanced system utilizes 24GHZ microwave radar technology to enhance driving safety by detecting objects in your vehicle's blind spots and alerting you to potential hazards during lane changes and reversing maneuvers. Please read this manual thoroughly before installation and use to ensure proper functionality and safety.
2. Product Features
- Equipped with a multi-angle adjustable 24GHZ microwave radar sensor mounting bracket.
- Detects objects in the blind area behind the vehicle up to 15 meters when the system is active.
- Provides alerts when moving objects are approaching and their speed is faster than your vehicle.
- Detection Capability: Can detect up to 5 objects simultaneously.
- Long detecting distance for comprehensive coverage.
3. Package Contents
The CarBest BSD-H-New system includes the following components:
- Main Control Unit
- 24GHZ Microwave Radar Sensors (2 units)
- LED Indicator Lights (2 units)
- Buzzer/Alarm Unit
- Wiring Harness
- Mounting Brackets and Screws
- Cable Ties
- Angle Calibration Cardboard Tool


4. Installation Guide
Proper installation is crucial for the optimal performance of the CarBest Blind Spot Detection System. It is recommended that installation be performed by a qualified professional. The following steps outline the general installation process.
4.1. Preparation
- Ensure the vehicle is turned off and the battery is disconnected before starting any electrical work.
- Remove the rear bumper to access the vehicle's internal structure for sensor mounting.
4.2. Radar Sensor Mounting
Select a suitable location on the vehicle body for attaching the provided mounting brackets. The radar's black surface must be perpendicular to the ground and adjustable to a 20-degree angle using the protractor tool. Ensure the installation location does not interfere with the bumper or other vehicle components. The wire heads of the radar should face inward.

Recommended Installation Height: The distance from the ground to the radar sensor should be approximately 55-90 cm (21.7-35.4 inches).
Video: How to install blind spot detection sensor system?
Video 4.1: This video demonstrates the general process of installing a blind spot detection sensor system, including mounting and wiring.
Video: 24Ghz Radar host installation video tutorial
Video 4.2: A tutorial detailing the installation of the 24GHz radar host unit.
4.3. Radar Angle Adjustment
After loosely securing the radar to the bracket, use the triangular cardboard tool to adjust the angle. The long side of the protractor should be flush against the radar's black surface and parallel to it. Adjust the protractor's long edge to be parallel to the vehicle's rear and the short edge to be parallel to the vehicle's side. Once the angle is correctly set, tighten the screws to secure the radar in place.
Video: Installation 3 how to adjust the radar angle
Video 4.3: This video illustrates the precise method for adjusting the radar sensor's angle using the provided calibration tool.
4.4. Wiring and Component Placement
- Route the wiring harness from the radar sensors to the main control unit, ensuring cables are secured and away from moving parts or heat sources.
- Connect the main control unit to the vehicle's power supply (DC 24 Volts) and other necessary electrical points as per the wiring diagram (not provided in this manual, refer to product packaging or manufacturer's website).
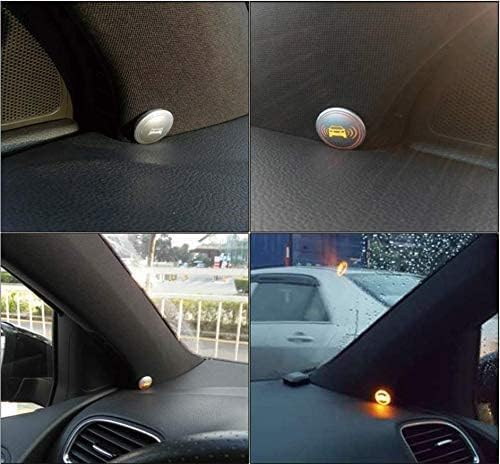
- Install the LED indicator lights in a visible location within the vehicle's cabin, typically near the side mirrors or A-pillars.
- Mount the buzzer unit in a location where its alerts can be clearly heard by the driver.

Video: Car Blind Spot Detection System Kit Installation
Video 4.4: This video provides a general overview of the installation process for a car blind spot detection system kit.
4.5. Final Steps
- Reinstall the rear bumper and any other removed vehicle panels.
- Reconnect the vehicle battery.
- Test the system thoroughly before driving.
5. Operating Instructions
The CarBest Blind Spot Detection (BSD) and Rear Cross Traffic Alert (RCTA) system operates automatically once installed and the vehicle is powered on. It provides visual and audible warnings to assist the driver in making safer lane changes and reversing maneuvers.
5.1. Blind Spot Detection (BSD)
When the system is active, the radar sensors continuously monitor the blind areas on both sides of your vehicle, extending up to 15 meters behind. If a moving object (another vehicle) enters these blind spots, the corresponding LED indicator light will illuminate. If you activate your turn signal while an object is detected in the blind spot, the LED indicator will flash, and the buzzer will emit an audible warning (typically three beeps) to alert you of the potential collision risk.
5.2. Rear Cross Traffic Alert (RCTA)
The RCTA function assists when reversing out of a parking space or driveway. The radar sensors detect moving objects approaching from the left or right rear of your vehicle, which may not be visible in your rearview mirrors. If a cross-traffic object is detected, the LED indicator lights will flash, and the buzzer will sound an alert, warning you of the approaching vehicle.
Video: LCA-RCTA-AOA-same speed car following Function display
Video 5.1: This video demonstrates the functionality of the Lane Change Assist (LCA), Rear Cross Traffic Alert (RCTA), and Active Overtaking Alert (AOA) systems, including scenarios with vehicles driving at the same speed.
Video: Video of EASYGUARD blind area detecting system
Video 5.2: A demonstration of a blind area detection system in various driving conditions, highlighting its warning capabilities.
6. Maintenance
To ensure the longevity and optimal performance of your CarBest Blind Spot Detection System, follow these maintenance guidelines:
- Keep Sensors Clean: Regularly clean the radar sensors, especially after driving in dirty or snowy conditions. Dirt, ice, or snow can obstruct the radar's signal and impair its detection capabilities.
- Inspect Wiring: Periodically check all visible wiring for any signs of wear, damage, or loose connections. Secure any loose wires to prevent interference or damage.
- Avoid High-Pressure Washing: When washing your vehicle, avoid directing high-pressure water jets directly at the radar sensors or wiring connections, as this could cause damage.
- System Checks: Occasionally perform a simple system check by driving in a controlled environment and observing if the LED indicators and buzzer activate correctly when another vehicle enters your blind spot.
7. Troubleshooting
If you experience issues with your CarBest Blind Spot Detection System, consider the following troubleshooting steps:
- No Power/System Not Activating:
- Check all power connections and ensure they are secure.
- Verify the vehicle battery is properly connected and charged.
- Inspect any inline fuses for the system and replace if blown.
- Inaccurate or Intermittent Alerts:
- Ensure radar sensors are clean and free from obstructions (dirt, ice, snow).
- Confirm that the radar sensor angles are correctly calibrated as per the installation guide. Incorrect angles can lead to false or missed detections.
- Check for any loose wiring connections to the sensors or main control unit.
- Environmental factors like heavy rain, fog, or snow can temporarily affect radar performance.
- LED Indicators Not Working:
- Check the connections to the LED indicator lights.
- Ensure the LED units themselves are not damaged.
- Buzzer Not Sounding:
- Verify the buzzer unit is properly connected.
- Ensure the buzzer is not obstructed or damaged.
- Rear Cross Traffic Alert (RCTA) Not Functioning During Reversing:
- Confirm that the system is receiving the reverse gear signal. This typically involves a connection to the reverse lamp circuit.
- Ensure the radar sensors are not obstructed by the bumper or other vehicle parts during reversing.
If these steps do not resolve the issue, it is recommended to consult a professional installer or contact CarBest customer support for further assistance.
8. Specifications
| Specification | Value |
|---|---|
| Item Weight | 1.76 pounds |
| Product Dimensions | 8.66 x 5.91 x 2.76 inches |
| Item Model Number | BSD-H-New |
| Display Type | LED |
| Frequency Bands Supported | 24 GHz |
| Power Source | DC power supply |
| Voltage | 24 Volts |
| UPC | 754914536642 |
9. Safety Information
- This system is an aid to safe driving and should not replace the driver's attention and judgment. Always check your mirrors and physically turn to check blind spots before changing lanes or reversing.
- Do not attempt to install or repair the system if you are not qualified. Improper installation can lead to vehicle damage or system malfunction.
- Ensure all wiring is properly insulated and secured to prevent short circuits or electrical hazards.
- Keep the radar sensors clear of any obstructions (e.g., mud, snow, stickers) that could interfere with their operation.
- The system may have limitations in extreme weather conditions (heavy rain, snow, fog) or when sensors are obstructed.
10. Warranty and Support
Specific warranty details for the CarBest BSD-H-New system are not provided in this manual. For information regarding warranty coverage, claims, or technical support, please refer to the product packaging, the seller's website, or contact CarBest customer service directly. Keep your proof of purchase for any warranty-related inquiries.


