
Evertech 3216558489
Evertech 1080p Hidden Security Camera (Model 3216558489) Instruction Manual
Indoor Covert Surveillance Camera with Night Vision
1. Introduction and Overview
This manual provides detailed instructions for the installation, operation, and maintenance of your Evertech 1080p Hidden Security Camera. This device is designed for indoor surveillance, discreetly housed within a non-functional motion detector style casing. It features 1080p HD resolution and night vision capabilities for effective monitoring in various lighting conditions.

Image 1.1: Front view of the Evertech hidden security camera, showing its motion detector style casing and connection cables.

Image 1.2: Promotional banner highlighting the camera's features: 1080p HD, motion sensor shape, and indoor discreet surveillance.
2. Safety Information
- Indoor Use Only: This camera is designed exclusively for indoor environments. Do not expose it to outdoor weather conditions, moisture, or extreme temperatures.
- Power Supply: Use only the specified 12V DC power supply. Using an incorrect power supply may damage the device and void the warranty.
- Installation: Ensure the camera is securely mounted to prevent accidental falls. Follow all local electrical codes and safety guidelines during installation.
- Disassembly: Do not attempt to disassemble or modify the camera. This may result in electric shock, damage to the device, and will void the warranty.
- Cleaning: Disconnect power before cleaning. Use a soft, dry cloth. Do not use liquid or aerosol cleaners.
3. Package Contents
Verify that all items listed below are included in your package:
- 1x Evertech 1080p Hidden Security Camera (Model 3216558489)
- 1x Technical Specification Sheet
- 4x Mounting Screws
- 4x Plastic Wall Anchors

Image 3.1: Contents of the product package, including the camera, technical sheet, screws, and wall anchors.
4. Product Features
- High Definition Video: 1080p resolution (1920x1080) for clear video surveillance.
- Discreet Design: Housed in a non-functional motion detector style casing for covert installation.
- Night Vision: Equipped with invisible SMD IR LEDs, providing up to 35 feet (10.6 meters) of night vision range.
- Wide Angle Lens: Features a 3.7mm pinhole lens for a broad field of view (approximately 85 degrees).
- Multi-Format Compatibility: Supports AHD, TVI, CVI, and Analog (CVBS) video output formats, compatible with various DVR systems (1080p, 4k, 5MP, 4MP, 2MP AHD/TVI/CVI and 960H Analog Digital Video Recorders). Not compatible with 720p & HD-SDI DVRs.
- Indoor Use: Specifically designed for indoor surveillance applications.
- Easy Mode Switching: Video output format can be easily changed using a DIP switch.

Image 4.1: Illustration of the camera's 85-degree field of view and a reminder for indoor use only.

Image 4.2: Detailed diagram outlining key features such as 1080p resolution, night vision range, and video output types.
5. Setup and Installation
5.1 Mounting the Camera
The camera is designed for wall mounting. Choose a location that provides the desired field of view and is within reach of a power outlet and your DVR system.
- Identify the optimal mounting position on a wall.
- Use the camera's bracket as a template to mark the screw holes on the wall.
- Drill pilot holes at the marked locations. Insert the plastic wall anchors if mounting into drywall.
- Secure the camera bracket to the wall using the provided screws.
- Attach the camera to the mounted bracket. The field of view can be adjusted by positioning the camera on its bracket.
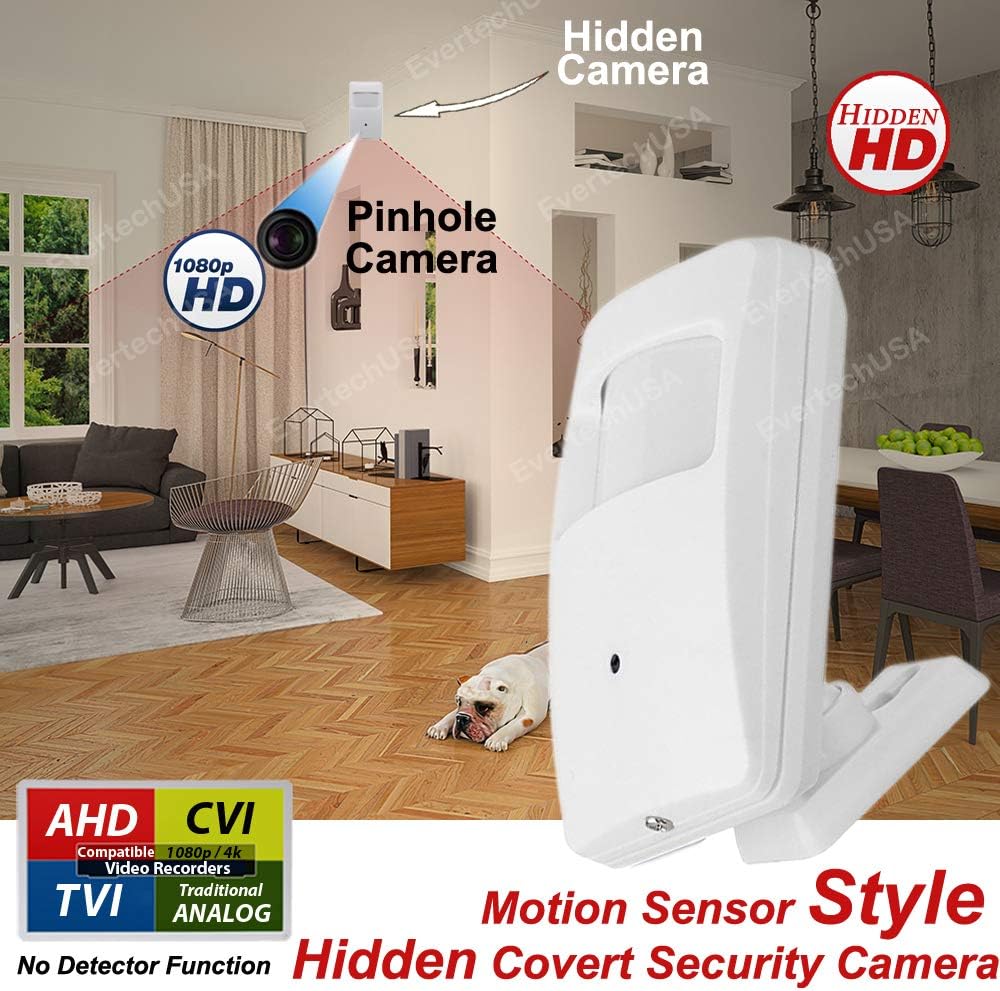
Image 5.1: Example of the hidden camera discreetly mounted on a wall, blending into the environment.
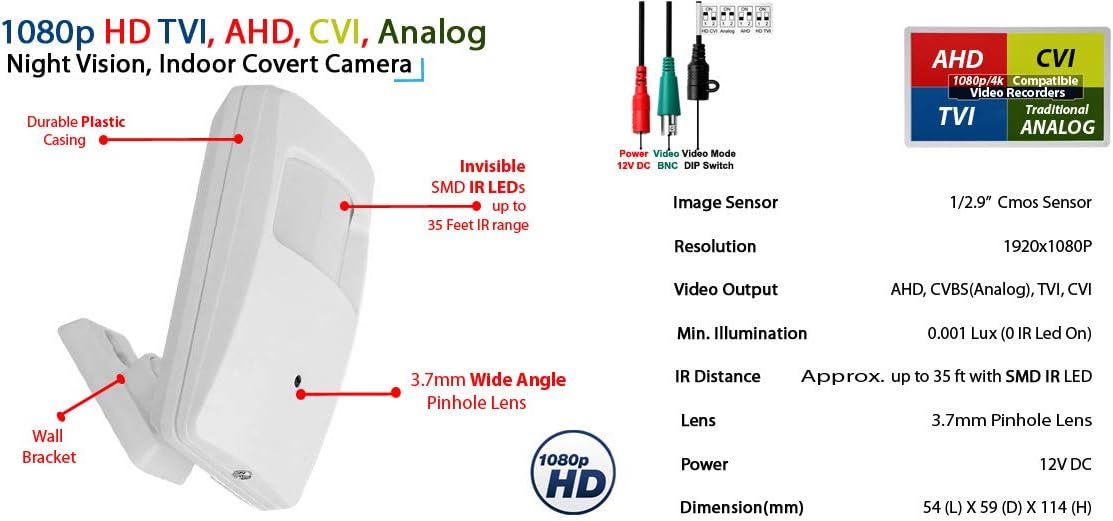
Image 5.2: Side view of the camera, illustrating how it can be angled on its wall bracket.
5.2 Connecting to a DVR
The camera requires connection to a compatible Digital Video Recorder (DVR) for video recording and display.
- Ensure your DVR is powered off before making connections.
- Connect the camera's BNC video output cable (green connector) to an available video input port on your DVR.
- Connect the camera's power input cable (red connector) to a 12V DC power adapter.
- Plug the 12V DC power adapter into a power outlet.
- Power on your DVR and monitor.
- Select the correct input channel on your DVR to view the camera feed.

Image 5.3: Connection diagram illustrating the wiring from the camera to a DVR, power adapter, and monitor.
6. Operating Instructions
Once properly installed and connected to a compatible DVR, the Evertech Hidden Security Camera operates continuously to provide video surveillance.
- Day/Night Operation: The camera automatically switches between day (color) and night (black and white, IR illuminated) modes based on ambient light conditions.
- Video Recording: All recording functions are managed through your connected DVR system. Refer to your DVR's instruction manual for details on recording schedules, motion detection recording, and playback.
- Remote Viewing: If your DVR supports remote access, you can view the camera feed from a connected device (e.g., smartphone, computer) via the DVR's application or web interface.
7. Video Mode Configuration (DIP Switch)
The camera supports multiple video output formats (AHD, TVI, CVI, Analog). The default video mode is 1080p AHD. If your DVR requires a different format, you can adjust it using the DIP switch located on the camera's cable.
To change the video mode:
- Locate the small DIP switch on the camera's cable, near the power and video connectors.
- Carefully use a small tool (e.g., a toothpick or small screwdriver) to adjust the switches according to the desired video format as shown in the diagram below.
- After changing the DIP switch settings, power cycle the camera (unplug and replug the power adapter) for the new setting to take effect.

Image 7.1: Diagram illustrating the DIP switch settings for selecting different video output formats (HD CVI, Analog, HD TVI, AHD).

Image 7.2: Further detail on DIP switch configuration, showing the 'ON' position for switches 1 and 2 to select the desired video mode.
8. Specifications
| Feature | Specification |
|---|---|
| Model Number | 3216558489 |
| Image Sensor | 1/2.9" CMOS Sensor |
| Video Resolution | 1080p (1920x1080) |
| Video Output | AHD, TVI, CVI, CVBS (Analog) |
| Minimum Illumination | 0.001 Lux (0 IR LED On) |
| Night Vision Range | Up to 35 feet (10.6 meters) with SMD IR LED |
| Lens | 3.7mm Pinhole Lens |
| Field of View | Approx. 85 degrees |
| Power Input | 12V DC |
| Material | Plastic |
| Dimensions (L x W x H) | 4.3 x 2.28 x 2 inches (105 x 58 x 51 mm) |
| Item Weight | 5.3 ounces |
| Indoor/Outdoor Usage | Indoor Only |
| Connectivity Protocol | Wired (BNC), Wi-Fi (for DVR system, not camera) |

Image 8.1: Front and side view dimensions of the camera.
9. Troubleshooting
- No Video Signal:
- Ensure the camera is receiving 12V DC power.
- Verify the BNC video cable is securely connected to both the camera and the DVR.
- Check the DIP switch settings on the camera cable to ensure the video output format matches your DVR's input (AHD, TVI, CVI, or Analog). Power cycle the camera after changing DIP switch settings.
- Confirm your DVR is compatible with 1080p AHD/TVI/CVI or 960H Analog signals. This camera is not compatible with 720p or HD-SDI DVRs.
- Try connecting the camera to a different DVR input port or a different compatible DVR if available, to isolate the issue.
- Poor Image Quality:
- Ensure the camera lens is clean and free from dust or smudges.
- Check the video cable for damage or loose connections.
- Verify that your DVR is set to record and display at 1080p resolution.
- In low light conditions, ensure the night vision (IR LEDs) is functioning.
- Night Vision Not Working:
- Ensure the camera is in a sufficiently dark environment for the IR LEDs to activate automatically.
- Check for any obstructions blocking the IR LEDs on the camera.
10. Maintenance
- Cleaning: Regularly clean the camera lens and casing with a soft, dry, lint-free cloth. Do not use harsh chemicals or abrasive materials.
- Cable Inspection: Periodically check all cables and connections for signs of wear or damage.
- Software Updates: Keep your connected DVR's firmware updated to ensure optimal compatibility and performance.
11. Warranty and Support
This Evertech camera comes with a 1-Year Warranty from the date of purchase, covering manufacturing defects. For warranty claims or technical assistance, please contact Evertech customer support.
For further support, you may contact the seller, EVERTECH USA CORP., through your purchase platform.
Please retain your proof of purchase for warranty purposes.
Ask a question about this manual
Ask about setup, troubleshooting, compatibility, parts, safety, or missing instructions. Manuals+ will review the question and use this page’s manual context to help answer it.