1. Introduction
The EVISTR V508 is a portable digital voice recorder designed for capturing high-quality audio in various settings such as lectures, meetings, and interviews. It features a dual enhanced dynamic noise-canceling microphone for clear stereo recordings at 1536kbps, one-button recording, voice-activated recording (AVR), password protection, and expandable storage. This manual provides detailed instructions for operating and maintaining your device.

Image 1.1: Front view of the EVISTR V508 Digital Voice Recorder, showing the display, control buttons, and microphone grille.
2. Getting Started
2.1 Package Contents
- EVISTR V508 Digital Voice Recorder
- USB Cable
- Earphones
- User Manual (this document)
2.2 Charging the Device
Before first use, fully charge the device. Connect the EVISTR V508 to a computer USB port or a USB wall adapter using the provided USB cable. The battery indicator on the display will show charging status. A full charge typically takes a few hours and provides up to 45 hours of recording time.
2.3 Powering On/Off
- To Power On: Slide the power switch to the 'ON' position. The device will boot up and display the main interface.
- To Power Off: Slide the power switch to the 'OFF' position. Ensure all recordings are saved before powering off.
2.4 Initial Setup (Date and Time)
Upon first use or after a factory reset, you may need to set the date and time. Navigate to the 'Settings' menu, select 'Date & Time', and adjust the year, month, day, hour, and minute using the navigation buttons. Confirm your selection to save.
3. Basic Operation
3.1 Recording Audio
The EVISTR V508 features a one-button recording function for ease of use.
- Ensure the device is powered on.
- To start recording, push the 'REC' button (usually a slider switch) upwards. The recording indicator will illuminate, and the display will show the recording time.
- To save the recording, push the 'REC' button downwards. The file will be saved automatically.

Image 3.1: Illustration of pushing the 'REC' button up to start recording and pushing it down to save the recording.
3.2 Playback
To play back recorded files:
- From the main menu, navigate to 'Recordings' or 'Files'.
- Use the navigation buttons to select the desired audio file.
- Press the 'Play/Pause' button to start playback.
- Press 'Play/Pause' again to pause.
- Use the 'Next/Previous' buttons to skip between files or fast forward/rewind within a file.
3.3 Adjusting Volume
During playback, use the dedicated volume buttons (usually '+' and '-') on the side of the device to increase or decrease the audio output level.
4. Advanced Features
4.1 Voice Activated Recording (AVR/VOR)
The Voice Activated Recording (AVR) mode allows the recorder to automatically start recording when sound is detected and pause when silence occurs, saving memory and battery life.
- Navigate to the 'Settings' menu.
- Select 'AVR Mode' or 'VOR Mode'.
- Choose the desired sensitivity level (e.g., high, medium, low).
- Activate AVR mode. When you start recording, the device will only capture audio when sound is present.
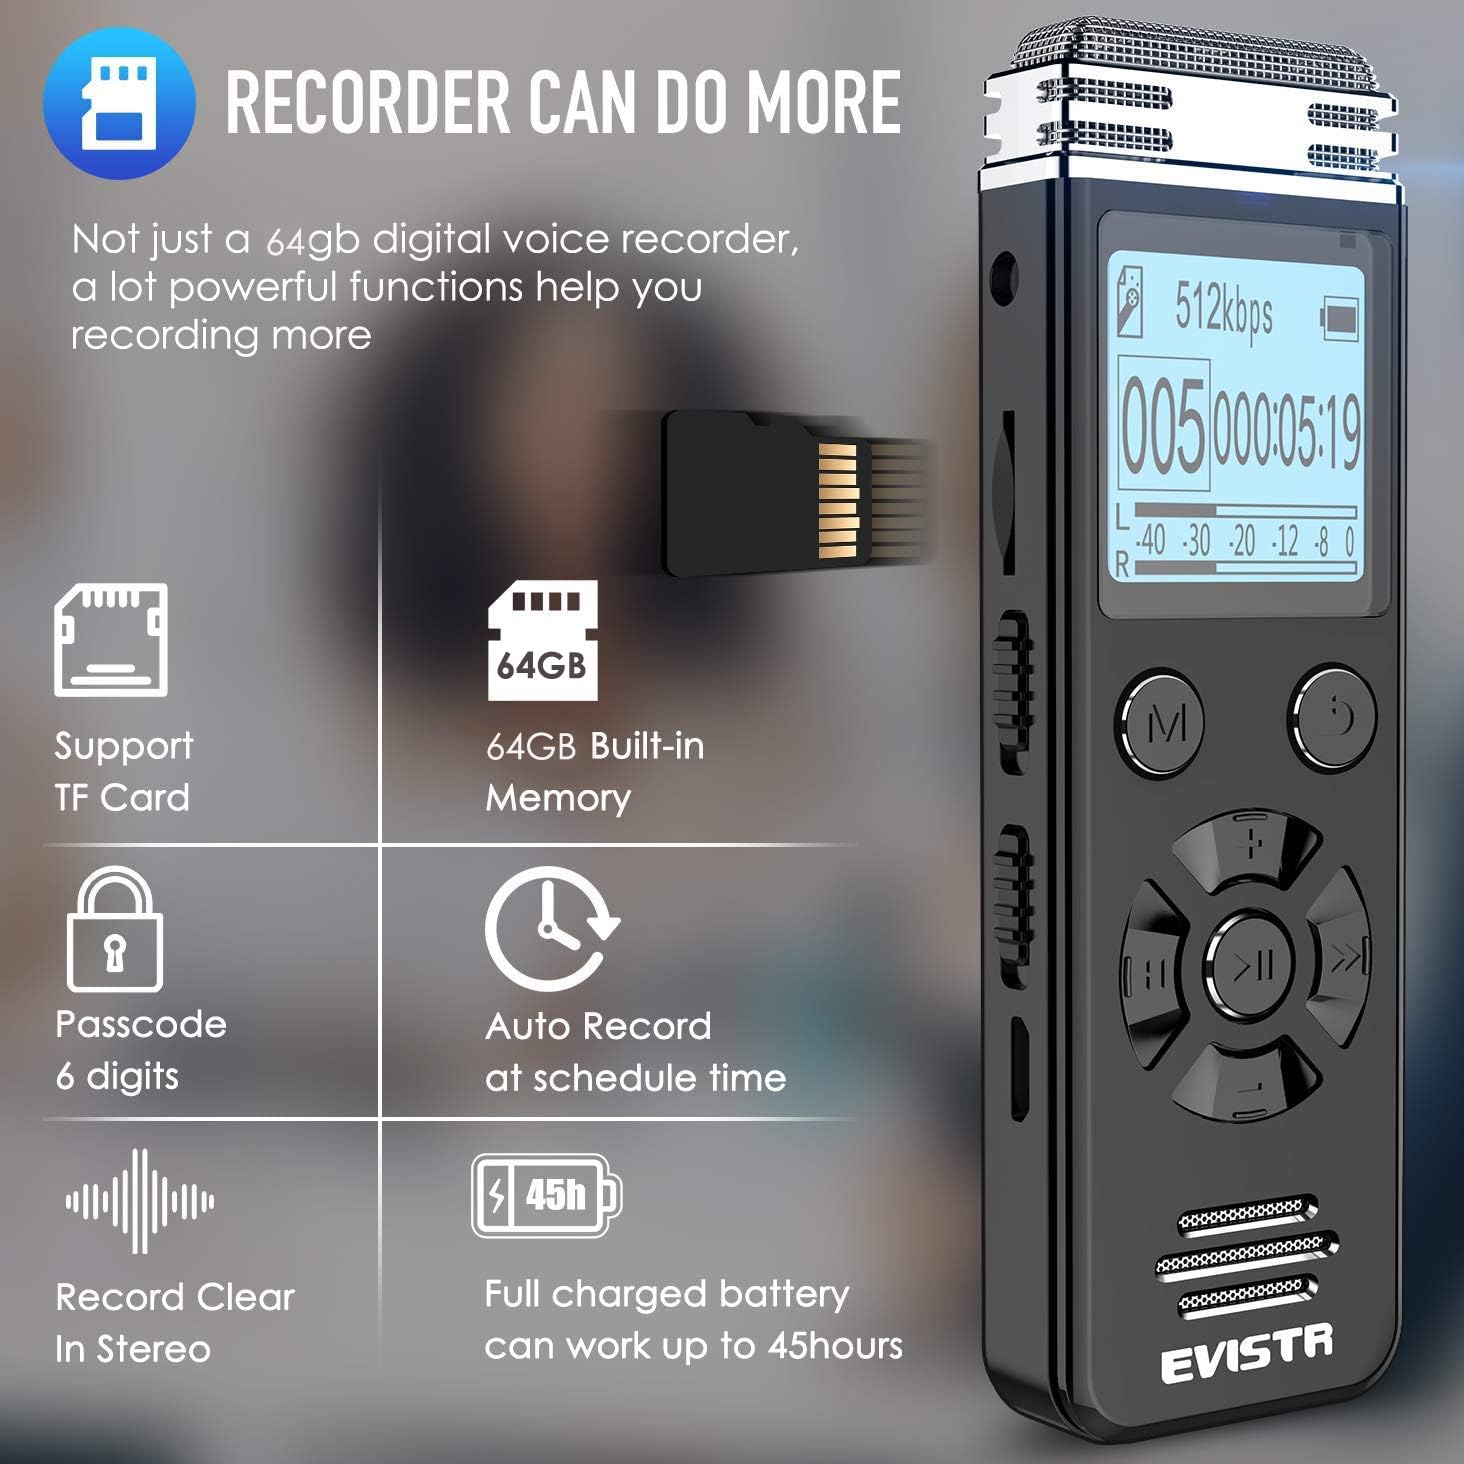
Image 4.1: Diagram illustrating how Voice Operated Recording (VOR) captures only the audible parts of a sound wave, reducing silent segments.
4.2 Password Protection
To protect your recordings, you can set a password for the device.
- Go to the 'Settings' menu.
- Select 'Password' or 'Security'.
- Choose 'Set Password' and follow the on-screen prompts to enter a 6-digit password using the navigation buttons.
- Confirm the password. The device will now require this password to access its contents.

Image 4.2: Display showing the password input screen on the EVISTR V508, indicating the device's privacy protection feature.
4.3 Line-in Recording
The line-in feature allows you to record audio directly from external sources such as another audio player or a microphone with a 3.5mm output.
- Connect the external audio source to the 'Line-in' port on the EVISTR V508 using an appropriate audio cable.
- Start recording as usual. The device will capture audio from the connected source.
4.4 MP3 Player Functionality
The EVISTR V508 can also function as an MP3 player. You can store music files (MP3/WAV/FLAC/APE/OGG/WMA formats) in a dedicated 'MUSIC' folder (or outside the 'RECORD' folder) on the device's internal memory or an inserted MicroSD card.
- Transfer music files from your computer to the device.
- Navigate to the 'Music' menu on the device.
- Select and play your desired music files.
4.5 External Storage (MicroSD Card)
The device supports MicroSD cards for expanded storage capacity, allowing you to record more audio or store additional media files.
- Locate the MicroSD card slot on the device.
- Gently insert a compatible MicroSD card (up to 64GB, though 32GB is mentioned in specs) until it clicks into place.
- The device will automatically detect the external storage. You can then select whether to save recordings to internal memory or the MicroSD card via the settings.
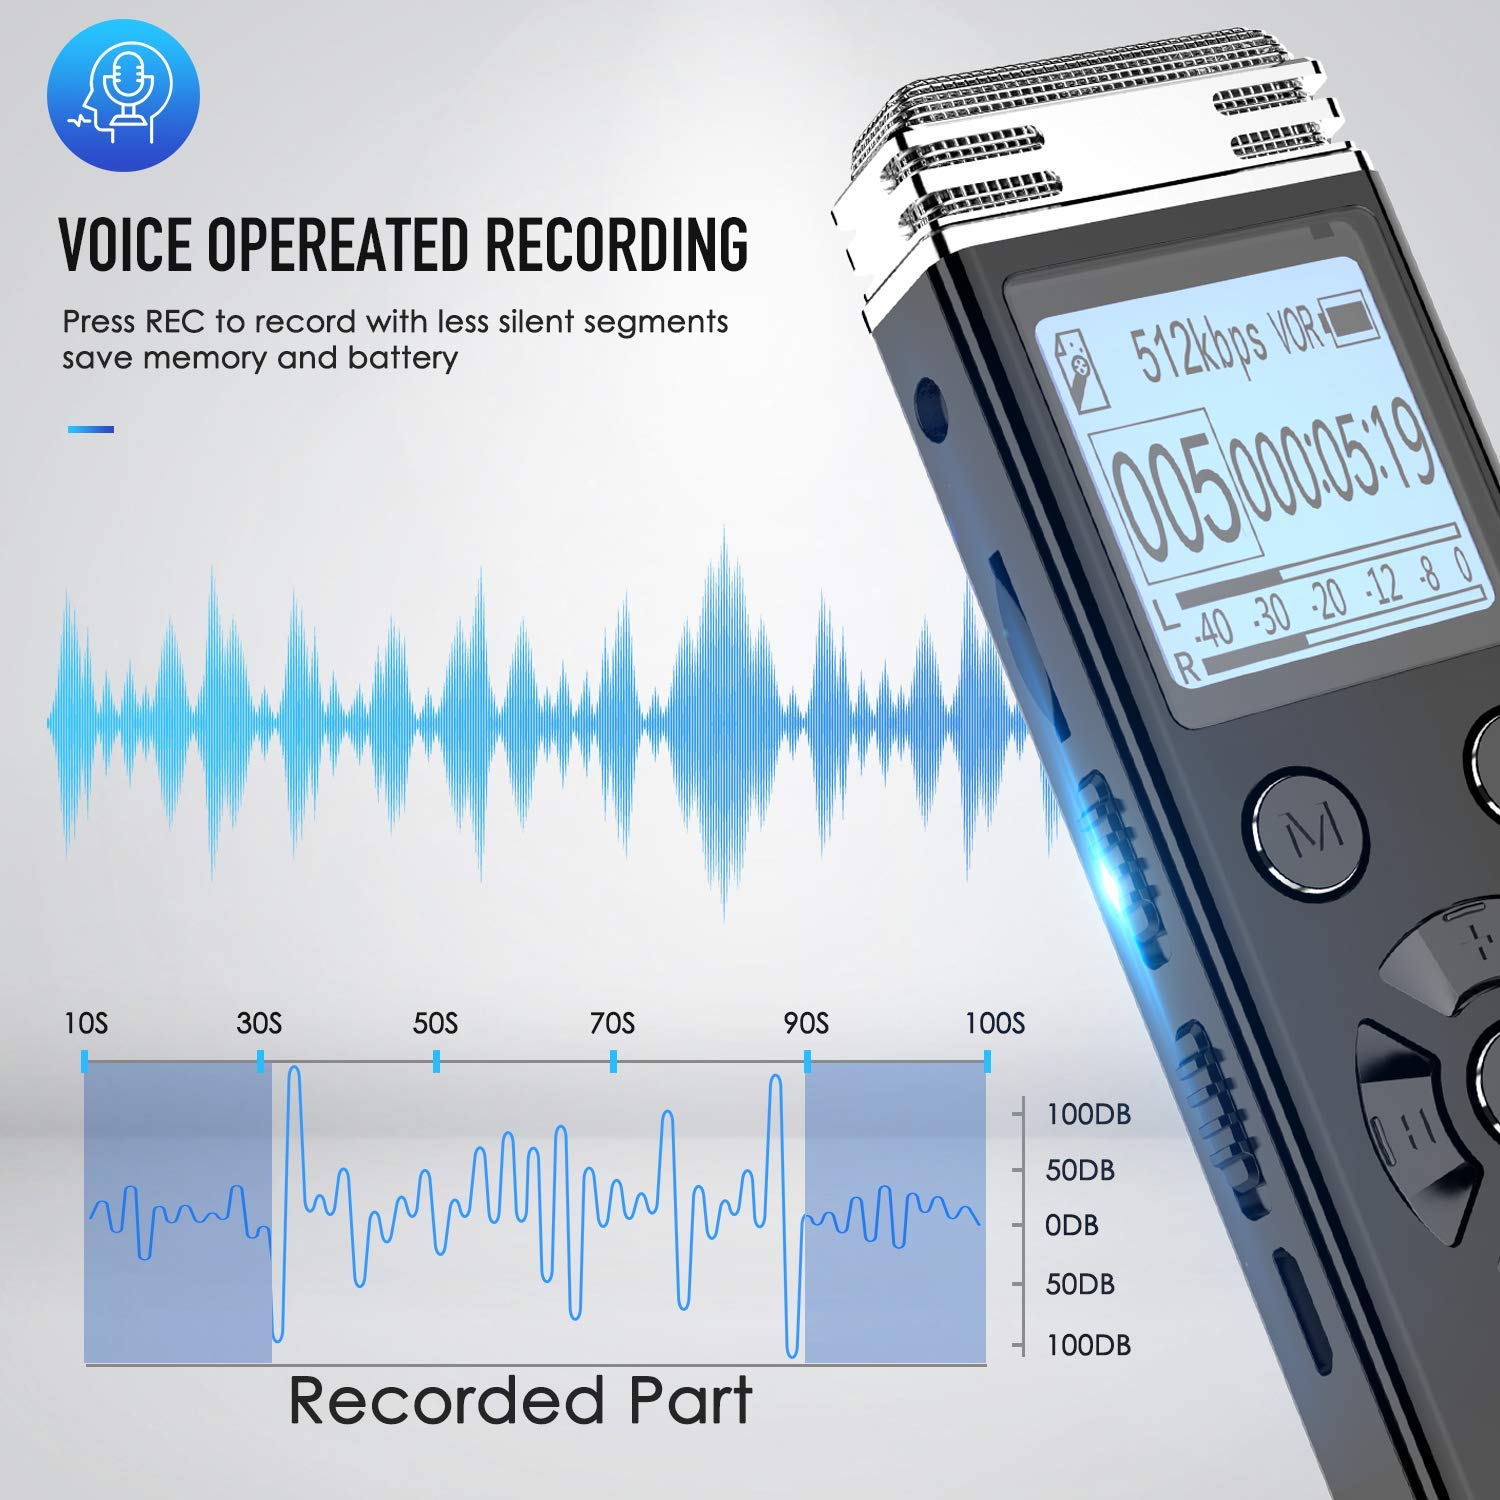
Image 4.3: The EVISTR V508 highlighting its MicroSD card support for expanded memory, alongside other features like password protection and auto-record.
4.6 Auto Record (Scheduled Recording)
You can schedule the device to start and stop recording automatically at specific times.
- Ensure the power button is in the 'ON' position for scheduled recording to function.
- Navigate to 'Settings' and select 'Auto Record' or 'Scheduled Recording'.
- Set the desired start time and end time for the recording.
- Activate the auto-record function.

Image 4.4: Visual representation of the Auto Record feature, showing how to set start and end times for automatic recording, with an important note to keep the power button in the 'ON' position.
4.7 Record Monitor
The record monitor function allows you to listen to the audio being recorded in real-time through earphones or an external microphone connected to the device.
- Connect earphones to the headphone jack.
- Start recording.
- Activate the 'Record Monitor' option in the recording settings (if available) or simply listen through the connected earphones.

Image 4.5: A user monitoring a recording with the EVISTR V508, demonstrating the ability to record and listen simultaneously using headphones or an external microphone.
5. File Management
5.1 Connecting to a Computer
You can connect the EVISTR V508 to a computer (Windows or Mac) to transfer files.
- Ensure the device is powered on.
- Connect the device to your computer using the provided USB cable.
- The device will appear as a removable disk drive on your computer.

Image 5.1: The EVISTR V508 connected to a laptop via USB cable, illustrating its charging and data download capabilities for both Mac and Windows systems.
5.2 Transferring Files
Once connected to a computer, you can drag and drop audio files from the device's 'RECORD' folder to your computer, or vice versa for music files.
5.3 Deleting Files
Files can be deleted directly from the device or via a connected computer.
- On Device: Navigate to the 'Recordings' or 'Files' menu, select the file you wish to delete, and choose the 'Delete' option. Confirm your selection.
- Via Computer: Access the device's storage on your computer, select the desired files, and delete them as you would any other file on your computer.
6. Maintenance
6.1 Battery Care
- Avoid fully discharging the battery frequently.
- Charge the device regularly, even if not in use, to maintain battery health.
- Store the device in a cool, dry place if not used for extended periods.
6.2 Cleaning
- Use a soft, dry cloth to clean the exterior of the device.
- Do not use liquid cleaners or solvents, as they may damage the device.
- Keep the microphone grille free from dust and debris for optimal audio quality.
6.3 Storage
Store the device in a protective case or pouch to prevent scratches and damage. Avoid exposing it to extreme temperatures, humidity, or direct sunlight.
7. Troubleshooting
7.1 Device Not Turning On
- Ensure the battery is charged. Connect the device to a power source and allow it to charge for at least 30 minutes.
- Check the power switch position. Make sure it is firmly in the 'ON' position.
- If the device is unresponsive, try performing a soft reset by pressing and holding the power button for 10-15 seconds.
7.2 Poor Recording Quality
- Ensure the microphone is not obstructed.
- Check the recording settings (e.g., bitrate, microphone sensitivity). Higher bitrate (1536kbps) generally provides better quality.
- Record in a quiet environment to minimize background noise.
- If using AVR mode, adjust the sensitivity level.
- Consider using an external microphone for specific recording needs.
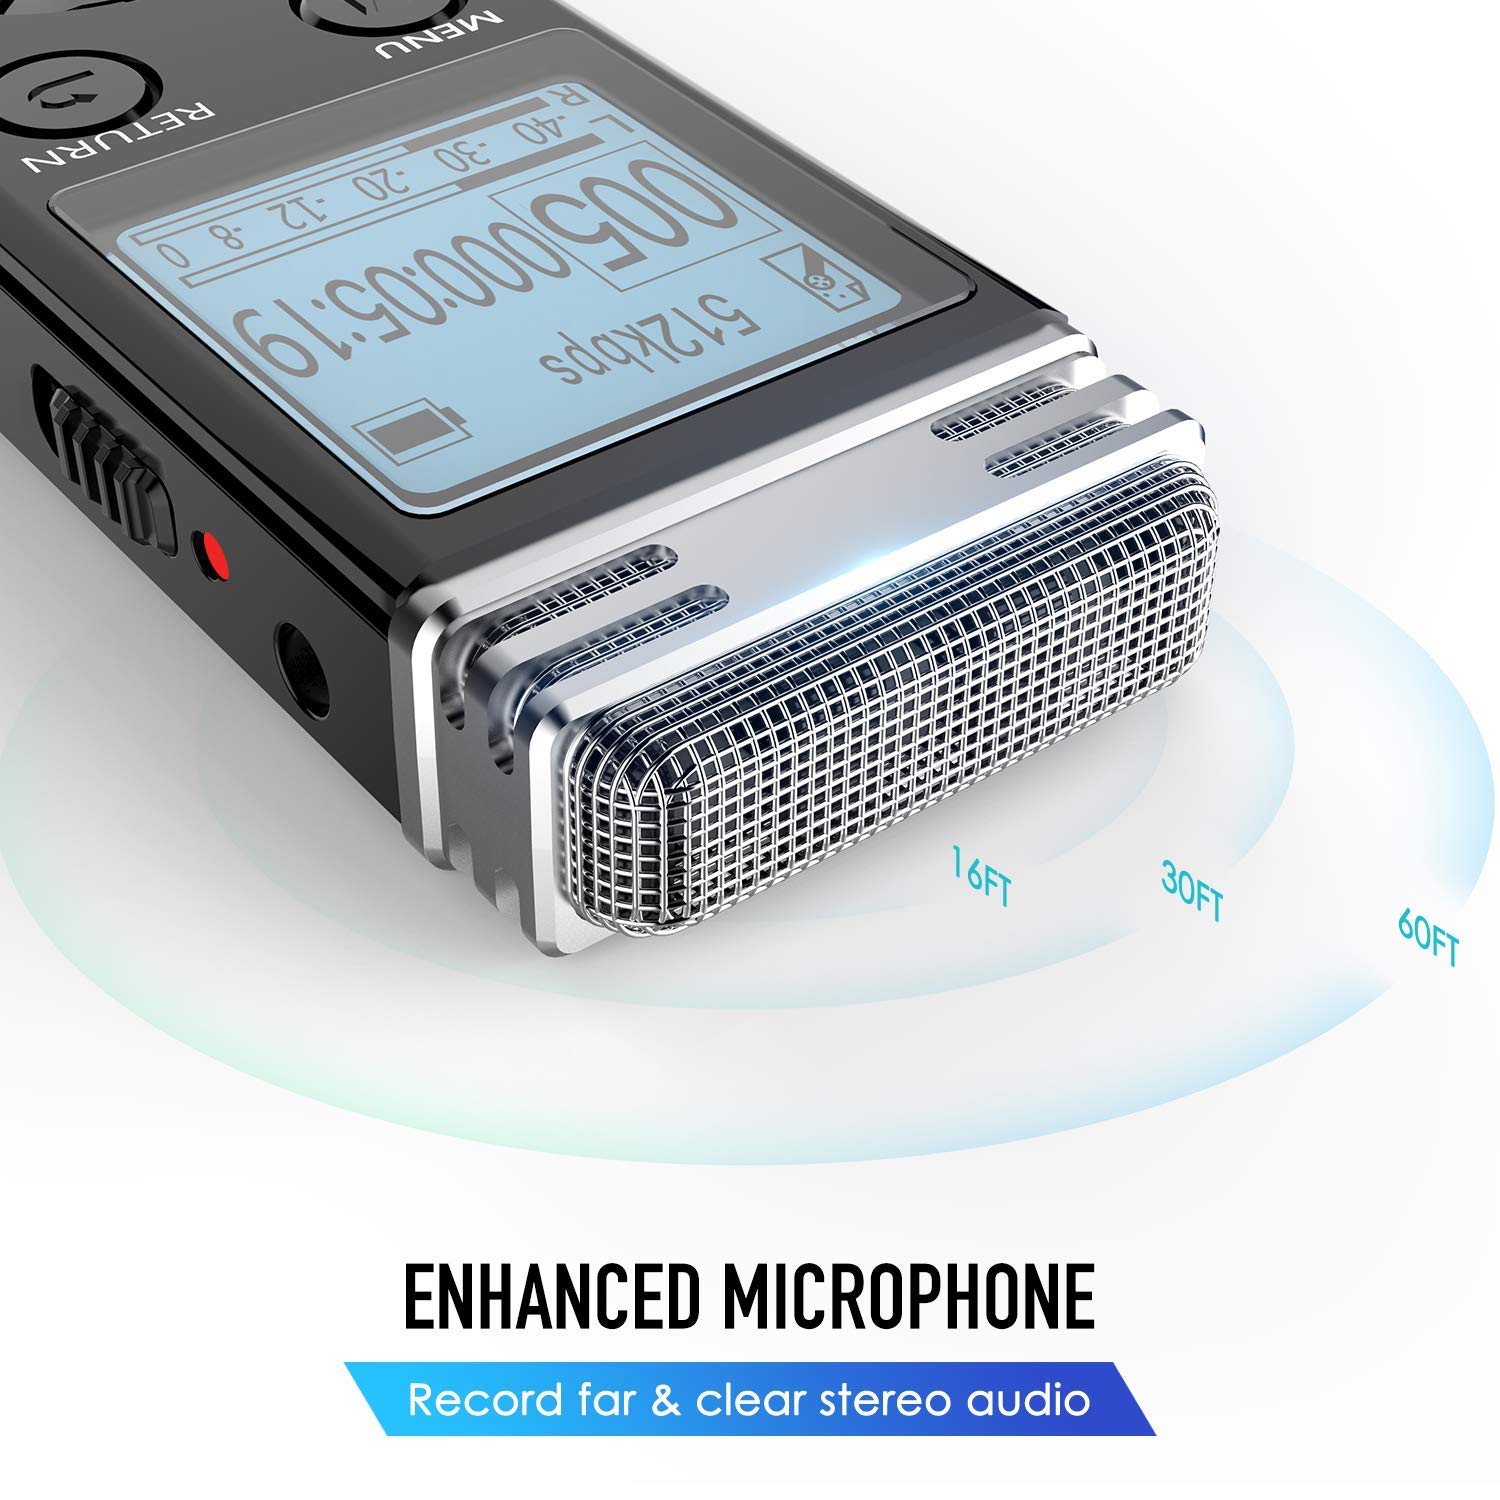
Image 7.1: Close-up of the EVISTR V508's enhanced microphone, illustrating its capability to record clear stereo audio from various distances.
7.3 Cannot Connect to Computer
- Ensure the USB cable is securely connected to both the device and the computer.
- Try a different USB port on your computer.
- Try a different USB cable.
- Restart both the device and the computer.
7.4 Forgotten Password
If you forget your password, you may need to perform a factory reset. Please note that a factory reset will erase all data on the device. Refer to the device's settings menu for the factory reset option or contact customer support for assistance.
8. Specifications
| Feature | Specification |
|---|---|
| Brand | EVISTR |
| Model | V508 |
| Product Dimensions | 10.01 x 2.69 x 1.19 cm |
| Item Weight | 73 g |
| Memory Storage Capacity | 16GB (Internal), expandable via MicroSD (up to 64GB) |
| Digital Storage Capacity | 8 GB (Internal, as per some listings) |
| Removable Memory | MicroSD |
| Hardware Interface | USB 3.0 Type C |
| Compatible Devices | MP3 Player |
| Display Technology | LCD |
| Standing Screen Display Size | 1.4 Inches |
| Microphone Format | Built-In (Dual enhanced dynamic noise-canceling) |
| Voltage | 3.7 Volts |
| Battery Average Life | 45 Hours (recording) |
| Battery Type | 1 Lithium Polymer (included) |
| Media Format | MP3 Audio, WAV, FLAC, APE, OGG, WMA |
9. Warranty and Support
EVISTR products are designed for reliability and performance. For warranty information, technical support, or service inquiries, please refer to the warranty card included with your product or visit the official EVISTR website. Keep your purchase receipt as proof of purchase for warranty claims.


