
Introduction
This manual provides detailed instructions for the installation, operation, and maintenance of the Dwyer ADPS-04-2-N Differential Pressure Switch. This device is designed to monitor and control differential pressure within a specified range, ensuring reliable performance in various industrial and scientific applications.
Key features include:
- Differential Pressure Type
- Pressure Setting Range: 0.12 to 1.6 inches Water Column (WC)
- Sample Line Connector: 1/4" Slip On Fitting
- Operating Temperature Range: -4 to 185°F
- Contact Type: Normally Open
- Mounting Type: Panel Mount
- International Protection Rating: IP54
Safety Information
Important Safety Instructions:
Read all instructions carefully before installation and operation. Failure to follow these instructions may result in equipment damage, personal injury, or death.
General Safety
- Ensure all power is disconnected before installation or maintenance.
- Installation and servicing should only be performed by qualified personnel.
- Do not exceed the specified pressure or temperature ratings.
- Protect the device from physical damage and extreme environmental conditions.
Electrical Safety
- Verify that the electrical supply matches the device's requirements.
- Use appropriate wiring and ensure all connections are secure.
- Ground the device properly to prevent electrical shock.
Pressure Safety
- Ensure the system is depressurized before connecting or disconnecting pressure lines.
- Use appropriate tubing and fittings rated for the system pressure.
Product Overview
The Dwyer ADPS-04-2-N Differential Pressure Switch is a compact device designed for reliable pressure sensing and switching.
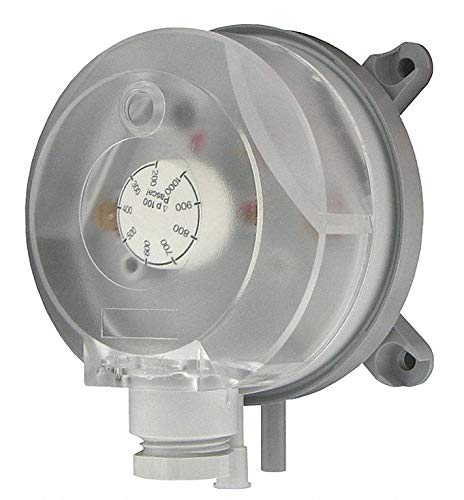
This image displays the Dwyer ADPS-04-2-N Differential Pressure Switch. It features a grey main body with a clear, transparent cover that allows visibility of the internal pressure adjustment dial. The dial is marked with pressure values in Pascals (e.g., 200, 400, 600, 800, 900, 1000 Pascal). Below the main body, there are two white slip-on fittings for pressure line connections. Mounting tabs are visible on the sides of the main body.
Key Components
- Pressure Ports: Two 1/4" slip-on fittings for connecting to the high and low pressure lines.
- Adjustment Dial: An internal dial, visible through the clear cover, used to set the desired differential pressure setpoint.
- Electrical Terminals: Quick-connect terminals for electrical wiring (Normally Open contact type).
- Mounting Tabs: Integrated tabs for panel mounting.
Technical Specifications
| Parameter | Value |
|---|---|
| Item | Pressure Switch |
| Type | Differential |
| Pressure Setting Range | 0.12 to 1.6 inches Water Column (WC) |
| Sample Line Connector | 1/4" Slip On Fitting |
| Operating Temperature Range | -4 to 185°F |
| Operation Mode | Automatic |
| Contact Type | Normally Open |
| Terminal | Quick-connect |
| Circuit Type | 1-way |
| Mounting Type | Panel Mount |
| Actuator Type | Manual (for adjustment) |
| Contact Material | Copper |
| International Protection Rating | IP54 |
| Number of Positions | 1 |
| Dimensions | 2 x 2 x 2 inches |
| Weight | 0.01 ounces |
Setup and Installation
The ADPS-04-2-N is designed for panel mounting and connection to differential pressure lines. Follow these steps for proper installation:
Mounting
- Select a suitable location for panel mounting, ensuring it is free from excessive vibration, moisture, and extreme temperatures.
- Use appropriate fasteners through the integrated mounting tabs to secure the switch to the panel.
Pressure Connections
- Identify the high and low pressure ports on the switch.
- Connect the 1/4" slip-on fittings to the respective pressure lines using flexible tubing. Ensure connections are secure and leak-free.
- Verify that the pressure lines are clean and free of debris.
Electrical Wiring
- Before wiring, ensure all power to the circuit is OFF.
- The switch features Normally Open (NO) quick-connect terminals.
- Connect the electrical circuit to the quick-connect terminals as required by your application. For a Normally Open contact, the circuit will close when the differential pressure reaches the setpoint.
- Ensure all electrical connections are tight and insulated.
Operating Instructions
The Dwyer ADPS-04-2-N operates automatically once installed and configured. The primary operational step is setting the desired differential pressure setpoint.
Setting the Pressure Setpoint
- The pressure setpoint is adjusted via the internal dial visible through the clear cover.
- Carefully remove the clear cover if necessary to access the adjustment dial, or adjust through the cover if designed for external adjustment.
- Rotate the dial to align the desired pressure value (e.g., 0.12 to 1.6 inches WC) with the indicator mark.
- Replace the clear cover securely if it was removed.
Functional Check
After setting the setpoint, apply differential pressure to the switch and observe its operation. The switch should actuate (close the Normally Open contact) when the differential pressure reaches or exceeds the setpoint.
Maintenance
Regular maintenance ensures the longevity and accurate operation of your differential pressure switch.
Routine Checks
- Visual Inspection: Periodically inspect the switch for any signs of physical damage, corrosion, or loose connections.
- Pressure Line Integrity: Check pressure lines and fittings for leaks, kinks, or blockages. Ensure they are clean.
- Electrical Connections: Verify that electrical quick-connect terminals remain secure and free from corrosion.
Cleaning
- Clean the exterior of the switch with a soft, damp cloth. Do not use abrasive cleaners or solvents.
- Ensure no moisture enters the internal components.
Calibration
If accuracy is critical and the switch is suspected of drifting, professional calibration may be required. Refer to Dwyer's official documentation or contact their support for calibration procedures.
Troubleshooting
This section provides solutions to common issues you might encounter with your differential pressure switch.
| Problem | Possible Cause | Solution |
|---|---|---|
| Switch does not actuate | Incorrect pressure setpoint | Adjust the setpoint dial to the desired pressure. |
| No differential pressure applied | Verify pressure source and connections. | |
| Blocked pressure lines/ports | Inspect and clear any blockages in the lines or fittings. | |
| Faulty electrical connection | Check wiring for loose connections or damage. | |
| Switch actuates erratically | Pressure fluctuations in system | Stabilize system pressure or consider a dampening mechanism. |
| Vibration | Ensure secure mounting and isolate from vibration sources. | |
| Contamination in pressure lines | Clean pressure lines and ensure media compatibility. |
Warranty and Support
Warranty Information
For specific warranty terms and conditions, please refer to the official documentation provided by Dwyer Instruments or visit their official website. Warranty coverage typically applies to defects in materials and workmanship under normal use.
Technical Support
If you encounter issues not covered in this manual or require further assistance, please contact Dwyer Instruments technical support.
- Website: www.dwyer-inst.com
- Contact Information: Refer to the website for phone numbers and email contacts specific to your region.