
ECCO FH577
ECCO FH577 Automotive Horn Instruction Manual
Model: FH577
Introduction
This manual provides detailed instructions for the proper installation, operation, and maintenance of your ECCO FH577 automotive horn. Please read this manual thoroughly before installation and use to ensure safe and optimal performance.
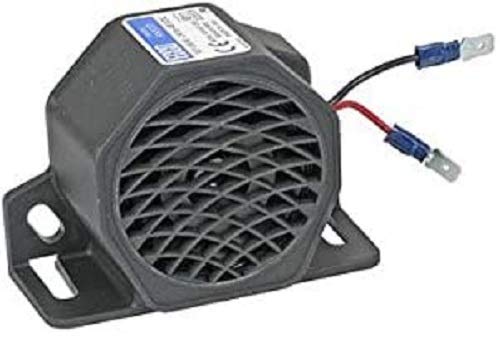
Figure 1: The ECCO FH577 automotive horn, a compact black unit with a gridded front and two electrical terminals.
Safety Information
Always observe the following safety precautions during installation and operation:
- Disconnect the vehicle's battery before performing any electrical work to prevent short circuits and electrical shock.
- Wear appropriate personal protective equipment, including safety glasses and gloves.
- Ensure all wiring connections are secure and properly insulated to prevent hazards.
- Mount the horn in a location where it is protected from direct water spray and excessive heat, but still allows sound to project effectively.
- Do not modify the horn or its wiring. Unauthorized modifications can void the warranty and create safety risks.
Setup and Installation
Follow these steps for proper installation of the FH577 horn:
- Choose a Mounting Location: Select a sturdy, flat surface in the engine bay or behind the grille that is free from obstructions and allows for sound projection. Ensure the location is away from extreme heat sources and direct water exposure.
- Mount the Horn: Use appropriate fasteners (not included) to securely attach the horn to the chosen surface. The horn typically has mounting tabs for this purpose. Ensure it is firmly fixed to prevent vibration and damage.
- Wiring Connections:
- Identify the positive (+) and negative (-) terminals on the horn. The FH577 typically uses standard spade connectors.
- Connect the positive wire from your vehicle's horn circuit (usually switched by the horn button) to the positive terminal of the FH577 horn.
- Connect the negative wire (ground) from the vehicle's chassis or a dedicated ground point to the negative terminal of the FH577 horn.
- Ensure all connections are tight and insulated with electrical tape or heat shrink tubing to prevent corrosion and short circuits.
- Reconnect Battery: Once all connections are secure and verified, reconnect the vehicle's battery.
Operating Instructions
The ECCO FH577 horn operates in conjunction with your vehicle's existing horn activation system. To sound the horn, simply press the horn button on your vehicle's steering wheel or designated control. The horn will sound for as long as the button is pressed.
Important: Use the horn responsibly and only when necessary to alert others of your presence or in emergency situations, in accordance with local traffic laws and regulations.
Maintenance
The ECCO FH577 horn is designed for durability and requires minimal maintenance. However, periodic inspection can help ensure its longevity and reliable performance:
- Visual Inspection: Periodically check the horn for any signs of physical damage, corrosion, or loose mounting.
- Wiring Check: Ensure all electrical connections remain tight and free from corrosion. Inspect the wiring for any fraying or damage to the insulation.
- Cleaning: If necessary, gently clean the exterior of the horn with a damp cloth. Avoid using harsh chemicals or high-pressure water sprays directly on the horn.
- Sound Test: Occasionally test the horn to ensure it is functioning correctly and producing a clear, consistent sound.
Troubleshooting
If your ECCO FH577 horn is not functioning as expected, refer to the following troubleshooting guide:
| Problem | Possible Cause | Solution |
|---|---|---|
| Horn does not sound |
|
|
| Weak or intermittent sound |
|
|
If you are unable to resolve the issue after following these steps, consult a qualified automotive technician.
Specifications
| Feature | Detail |
|---|---|
| Model | FH577 |
| Item Weight | 14.4 ounces |
| ASIN | B07L623RBF |
| First Available Date | January 8, 2021 |
| Brand | ECCO |
Warranty Information
ECCO products are manufactured to high-quality standards. This product is covered by a limited warranty against defects in materials and workmanship under normal use. Specific warranty terms and duration may vary by region and purchase date. Please retain your proof of purchase for warranty claims.
For detailed warranty information, please refer to the official ECCO website or contact customer support.
Customer Support
If you have any questions, require technical assistance, or need to report an issue with your ECCO FH577 horn, please contact ECCO customer support through the following channels:
- Website: www.ecco.com (Please note: This is a placeholder URL. Refer to your product packaging or official ECCO documentation for the correct support website.)
- Phone: Refer to your regional ECCO contact information.
- Email: Refer to your regional ECCO contact information.

Figure 2: The ECCO brand logo, featuring a stylized globe icon next to the text "ECCO".
Related documentsFH577


Ask a question about this manual
Ask about setup, troubleshooting, compatibility, parts, safety, or missing instructions. Manuals+ will review the question and use this page’s manual context to help answer it.