
Loom Solar SHARK 455W
Loom Solar Panel 455W-24V User Manual
Model: SHARK 455W
1. Introduction
This manual provides essential information for the safe and efficient installation, operation, and maintenance of your Loom Solar SHARK 455W Solar Panel. Please read this manual thoroughly before proceeding with any installation or operation. Proper adherence to these guidelines will ensure optimal performance and longevity of your solar panel system.
The Loom Solar SHARK 455W is a high-efficiency Mono PERC solar panel designed for various applications, including residential, commercial, and agricultural solar systems.
2. Safety Information
Warning: Solar panels generate electricity when exposed to light. Contact with electrically active parts can result in severe injury or death. Always handle panels with care and ensure proper safety measures are in place.
- Installation should only be performed by qualified and trained personnel.
- Do not attempt to disassemble or modify the solar panel.
- Wear appropriate personal protective equipment (PPE), including insulated gloves and safety glasses, during installation and maintenance.
- Avoid touching the panel's electrical terminals when it is exposed to sunlight.
- Ensure all wiring is correctly sized and protected according to local electrical codes.
- Keep children and unauthorized personnel away from the installation area.
- In case of fire, use appropriate fire extinguishing agents for electrical fires.
3. Product Features
The Loom Solar SHARK 455W Solar Panel incorporates several advanced features for superior performance and durability:
- High Efficiency: Advanced Mono PERC technology achieves over 21% efficiency, maximizing energy conversion from sunlight.
- Temperature Resilience: Designed to maintain high power generation even in extreme temperatures ranging from -40°C to +85°C, thanks to passivating contact cell technology.
- Premium Quality Construction: Features a strong black aluminum frame and 2.0mm/2.0mm toughened glass, providing protection against environmental factors and physical impact. The panel can sustain heavy wind and snow loads (2400 Pa & 5400 Pa or 550Kg/m²).
- Reduced Shading Losses: Equipped with 144 half-cut cells, which significantly reduce power losses caused by partial or full shading, ensuring consistent energy output.
- Versatile Applications: Suitable for a wide range of installations, including residential rooftops, commercial buildings, agricultural setups, and off-grid systems.
- Durable Junction Box: Features a waterproof junction box for enhanced safety and longevity.
- MC4 Connectors: Standard MC4 connectors ensure secure and reliable electrical connections.

4. Components Included
Each package of Loom Solar Panel 455W-24V typically includes:
- Loom Solar SHARK 455W Solar Panel(s)
Note: Additional components such as mounting hardware, inverters, batteries, and wiring are sold separately and are required for a complete solar power system.

5. Setup and Installation
Proper installation is crucial for the safety and performance of your solar panel system. It is highly recommended that installation be carried out by certified solar professionals.
5.1 Site Selection
Choose a location that receives maximum direct sunlight throughout the day, free from shading by trees, buildings, or other obstructions. Consider the optimal tilt angle for your geographical location to maximize annual energy yield.
5.2 Mounting
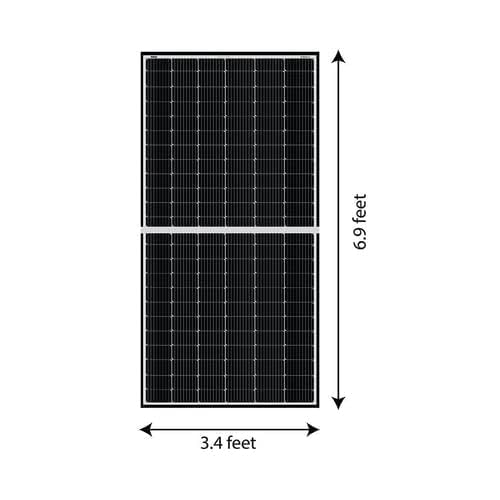
Securely mount the solar panels using appropriate racking systems designed for solar installations. Ensure the mounting structure can support the weight of the panels and withstand local wind and snow loads. The panel dimensions are approximately 2.09 meters (6.9 feet) in length and 1.04 meters (3.4 feet) in width.
5.3 Electrical Connections
- Connect the positive (+) and negative (-) MC4 connectors from the solar panels to form a series or parallel array, as required by your inverter or charge controller.
- Ensure all connections are tight and secure to prevent arcing and power loss.
- Properly ground the solar panel frames and mounting structure according to local electrical codes.
- Connect the solar array to a compatible solar inverter or charge controller.


6. Operating Instructions
Once installed and connected to an appropriate solar inverter and battery system (if applicable), your Loom Solar Panel will begin generating electricity when exposed to sunlight.
- The solar panels convert sunlight into DC (Direct Current) electricity.
- This DC electricity is then fed into a solar inverter, which converts it into AC (Alternating Current) electricity suitable for household or commercial use.
- For off-grid systems, the DC power can be stored in batteries via a charge controller before being converted to AC by an inverter.
- Monitor your system's performance using the inverter's display or a dedicated solar monitoring application, if available.


7. Maintenance
Regular maintenance ensures the optimal performance and longevity of your solar panels.
7.1 Cleaning
Dust, dirt, leaves, and other debris can accumulate on the surface of the solar panels, reducing their efficiency.
- Clean the panels periodically, especially in dusty environments. A common recommendation is to clean every few days or as needed.
- Use a soft brush or cloth with water to gently clean the surface. Avoid abrasive materials or harsh chemicals.
- Clean during cooler parts of the day (early morning or late evening) to prevent thermal shock to the glass.
7.2 Inspection
Periodically inspect the panels and mounting structure for any signs of damage or wear.
- Check for cracks in the glass, loose connections, or damaged wiring.
- Ensure the mounting hardware is secure and free from corrosion.
- Inspect for any signs of pest activity that could damage wiring or components.
8. Troubleshooting
If your solar panel system is not performing as expected, consider the following common issues and solutions:
| Problem | Possible Cause | Solution |
|---|---|---|
| Low Power Output |
|
|
| No Power Output |
|
|
| Unusual Noises from Inverter |
|
|
For issues not covered here or if problems persist, contact Loom Solar customer support or a certified solar technician.
9. Specifications
| Attribute | Value |
|---|---|
| Brand | Loom Solar |
| Model Number | SHARK 455W |
| Product Dimensions | 2.09L x 1.04W x 0.03H Meters |
| Item Weight | 24 Kilograms |
| Efficiency | High (21%+) |
| Connector Type | MC4 |
| Included Components | Solar Panel |
| Maximum Voltage | 24 Volts |
| Maximum Power | 445 Watts |
10. Warranty and Support
10.1 Warranty Information
The Loom Solar SHARK 455W Solar Panel comes with a comprehensive 25-year performance warranty. This warranty guarantees:
- 90% module efficiency after 10 years.
- 80% module efficiency after 25 years.
For detailed terms and conditions of the warranty, please refer to the official warranty document provided with your purchase or contact Loom Solar directly.
10.2 Customer Support
For any technical assistance, warranty claims, or product inquiries, please contact Loom Solar customer support:
- Manufacturer: LOOM SOLAR PVT. LTD.
- Email: sales@loomsolar.com
- Contact Number: 8447921124
Ask a question about this manual
Ask about setup, troubleshooting, compatibility, parts, safety, or missing instructions. Manuals+ will review the question and use this page’s manual context to help answer it.