1. Introduction
This manual provides essential information for the safe and efficient operation of your Creality Ender 3 V2 Neo 3D Printer. Please read this manual thoroughly before operating the printer to ensure proper setup, usage, and maintenance. Retain this manual for future reference.

Figure 1.1: Overview of the Creality Ender 3 V2 Neo 3D Printer, showcasing its design and a sample print.
2. Safety Information
- Hot Surfaces: The print nozzle and heated bed reach high temperatures during operation. Avoid touching these components directly to prevent burns. Allow them to cool completely before handling.
- Moving Parts: The printer contains moving parts that can cause injury. Keep hands, hair, and loose clothing clear of the print head, build plate, and other moving components during operation.
- Electrical Safety: Ensure the printer is connected to a grounded power outlet. Do not operate the printer with damaged power cords or plugs. Disconnect power before performing any maintenance or assembly.
- Ventilation: Operate the 3D printer in a well-ventilated area. Some filaments may emit fumes during printing.
- Children and Pets: Keep the printer out of reach of children and pets. Adult supervision is required if children are present during operation.
- Filament Handling: Use only recommended filament types and diameters. Store filament in a dry environment to prevent moisture absorption.
3. What's in the Box
The Creality Ender 3 V2 Neo 3D Printer comes 95% pre-installed. The package typically includes the following components:
- Pre-assembled printer base and gantry
- PC Spring Steel Magnetic Build Plate
- Filament spool holder
- Power cable
- Sample filament
- Tool kit (wrenches, screwdrivers, pliers, spatula, nozzle cleaning needle)
- SD card and USB card reader
- User manual
4. Setup Guide
The Ender 3 V2 Neo is designed for quick assembly, with 95% of the printer pre-installed. Follow these general steps to complete the setup:
- Attach the Gantry: Secure the pre-assembled gantry to the printer base using the provided screws. Ensure all connections are firm.
- Connect Cables: Connect all necessary cables, including motor cables, endstop cables, and the hotend/bed heater cables, to their respective ports. Refer to the included wiring diagram for precise connections.
- Install Filament Holder: Mount the filament spool holder onto the top of the gantry.
- Power On and Initial Check: Connect the power cable and turn on the printer. The 4.3-inch color knob screen should illuminate.

Figure 4.1: Visual representation of the three-step assembly process for the 95% pre-installed printer.
5. Key Features
- CR-Touch Auto Bed Leveling: The printer is equipped with CR-Touch for automatic 16-point bed leveling. This system precisely measures the bed's surface and compensates for any deviations, simplifying the leveling process and improving first-layer adhesion.
- Full-Metal Bowden Extruder: Features a durable full-metal Bowden extruder, providing stronger extrusion force and improved filament feeding compared to plastic extruders. A rotary knob facilitates smooth filament loading and unloading.
- PC Spring Steel Magnetic Build Plate: The innovative print platform combines a PC coating, a spring steel sheet, and a magnetic sticker. The PC coating enhances filament adhesion, and finished models can be easily removed by bending the flexible print sheet.
- Silent Motherboard (32-bit 4.2.2 Version): Equipped with a self-developed silent motherboard, featuring stronger anti-interference capabilities, faster and more stable motion performance, and low decibel operation for a quieter printing environment.
- 4.3-inch Color Knob UI: The upgraded user interface includes a model preview function, allowing users to easily observe the printing shape and progress. It supports nine languages.
- Resume Printing Function: In the event of a power failure, the printer can resume printing from the last recorded position once power is restored, preventing print failures and material waste.
- Integrated Tool Drawer: A human-centered design feature, the printer includes a small drawer for convenient storage of tools and accessories.

Figure 5.1: The CR-Touch sensor performing automatic bed leveling, ensuring precision and stability.

Figure 5.2: Visual comparison highlighting the CR-Touch auto-leveling system and the full-metal Bowden extruder.

Figure 5.3: Exploded view of the PC Spring Steel Magnetic Build Plate, showing its layered construction.

Figure 5.4: Visual comparison highlighting the PC Spring Steel Magnetic Plate and the silent motherboard's internal components.
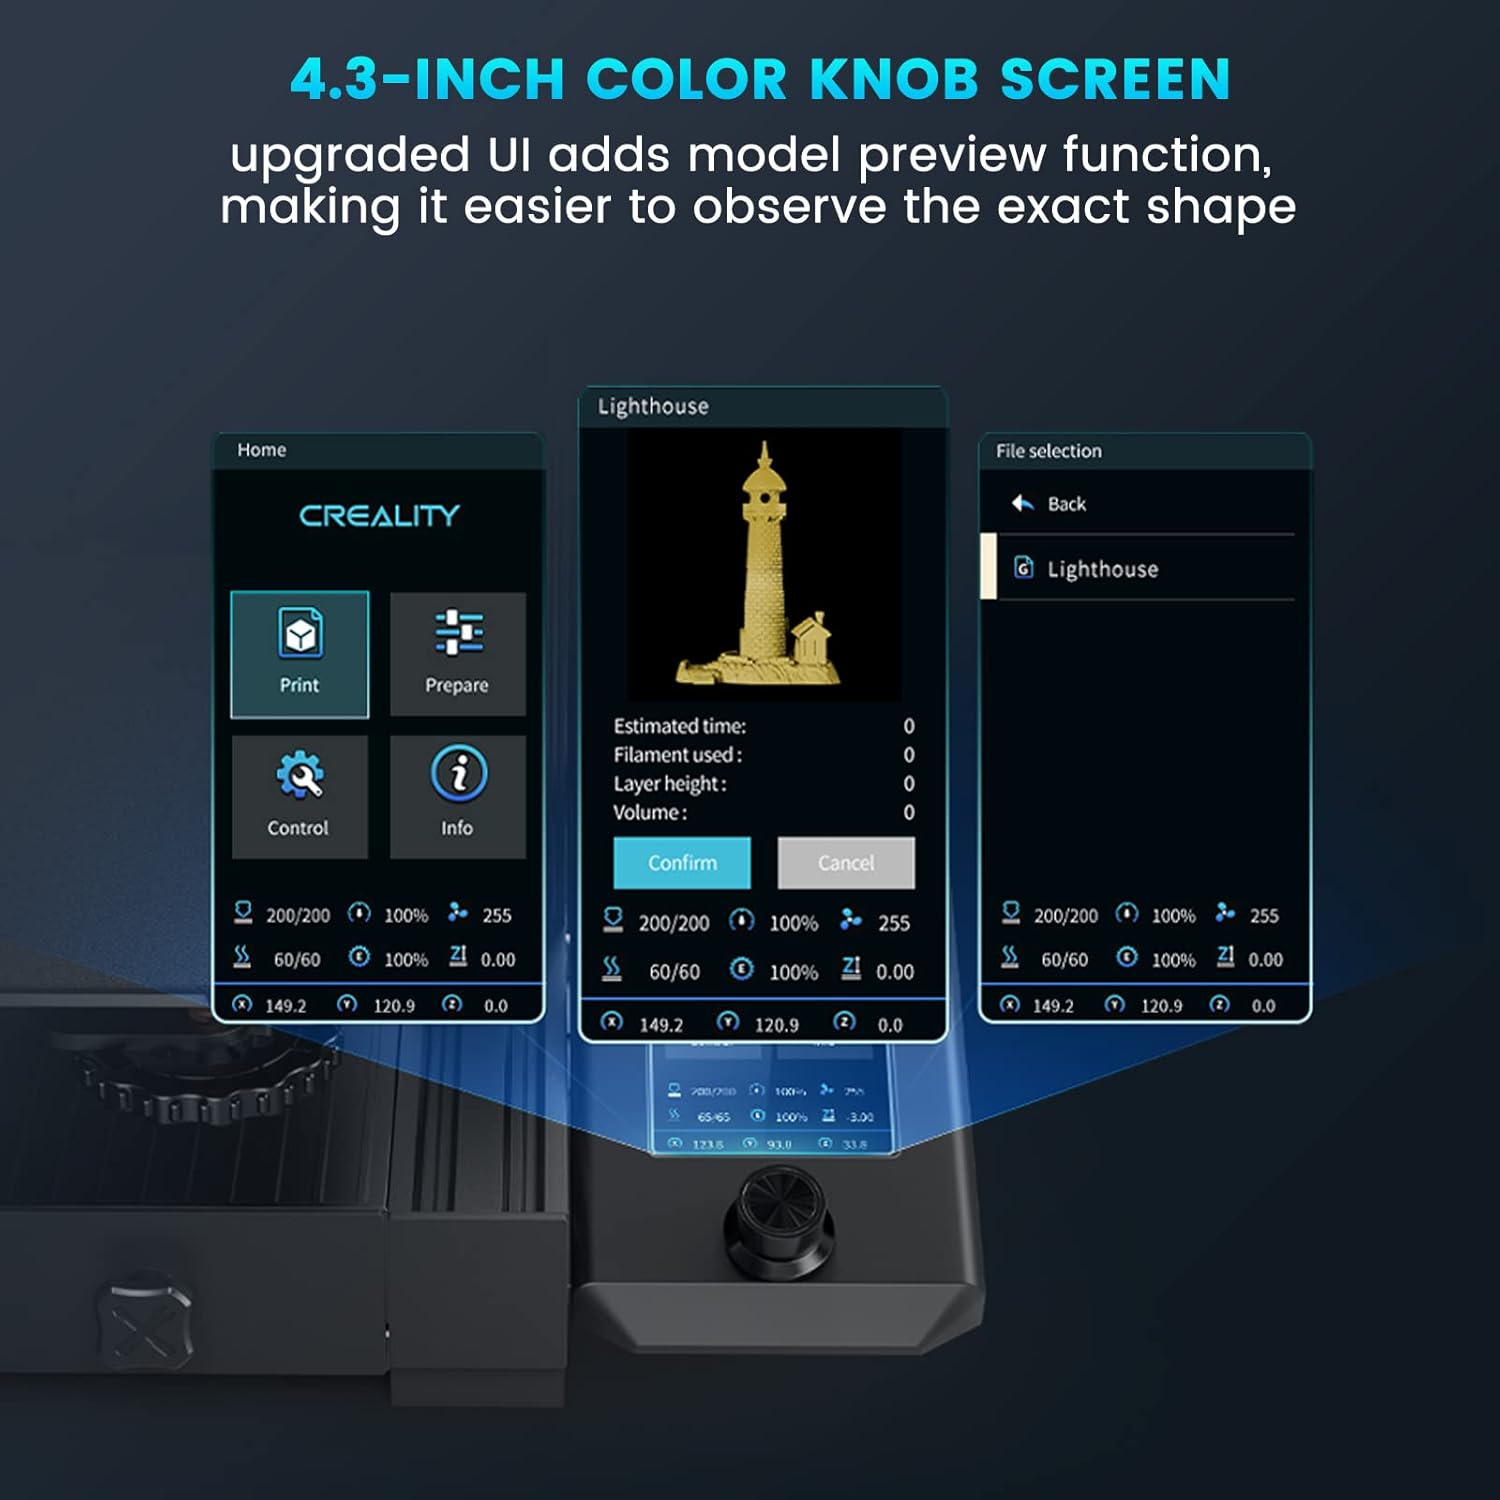
Figure 5.5: The 4.3-inch color knob screen displaying various UI elements, including a model preview.

Figure 5.6: Illustration of the resume printing function, showing a print continuing after a power interruption.

Figure 5.7: The integrated tool drawer for convenient storage of accessories.
6. Operating Instructions
6.1. Loading Filament
- Place the filament spool onto the spool holder.
- Feed the filament through the filament sensor (if present) and into the Bowden extruder.
- Press the extruder lever to open the mechanism and push the filament through the Bowden tube until it reaches the hotend.
- On the UI, navigate to 'Prepare' > 'Preheat PLA' (or appropriate filament type). Once the nozzle reaches temperature, manually push the filament further until molten plastic extrudes from the nozzle.
6.2. Bed Leveling (CR-Touch)
The CR-Touch system automates bed leveling. To initiate:
- Ensure the build plate is clean.
- On the UI, navigate to 'Level' or 'Auto Level'.
- The printer will automatically home and then probe multiple points on the build plate.
- Once complete, the printer will save the mesh data for print compensation.
6.3. Starting a Print
- Prepare your 3D model using slicing software (e.g., Creality Slicer, Cura, Simplify3D) and save it as an .STL, .OBJ, or .AMF file.
- Transfer the sliced G-code file to the provided SD card.
- Insert the SD card into the printer's card slot.
- On the UI, navigate to 'Print' > 'SD Card' and select your desired G-code file.
- Confirm the print. The printer will preheat and begin printing.
6.4. Monitoring and Pausing Prints
- Monitor the first layer to ensure proper adhesion. Adjust Z-offset if necessary during the first layer.
- To pause a print, select 'Pause' from the UI. To resume, select 'Resume'.
- To stop a print, select 'Stop' from the UI. This will cancel the current print job.
7. Maintenance
- Clean the Build Plate: After each print, allow the build plate to cool and remove the printed model. Clean the PC coating with isopropyl alcohol to ensure optimal adhesion for subsequent prints.
- Nozzle Maintenance: Regularly check the nozzle for clogs or wear. Use the provided needle to clear minor clogs. Replace the nozzle if it shows signs of significant wear or damage.
- Lubricate Moving Parts: Periodically apply a small amount of lithium grease to the Z-axis lead screw and smooth rods to ensure smooth movement.
- Check Belt Tension: Ensure the X and Y-axis belts are properly tensioned. They should be taut but not overly tight. Adjust if necessary to prevent layer shifting or poor print quality.
- Firmware Updates: Check the official Creality website for the latest firmware updates for your model. Follow the provided instructions carefully when updating firmware.
8. Troubleshooting
| Problem | Possible Cause | Solution |
|---|---|---|
| Filament not sticking to bed | Bed not level, bed too far from nozzle, dirty build plate, incorrect bed temperature. | Perform CR-Touch auto-leveling, adjust Z-offset, clean build plate with isopropyl alcohol, verify bed temperature settings. |
| No filament extrusion | Clogged nozzle, tangled filament, extruder gear slip, incorrect temperature. | Clear nozzle with cleaning needle, ensure filament is untangled, check extruder tension, verify nozzle temperature. |
| Poor print quality (layer shifting, stringing) | Loose belts, incorrect print speed, retraction settings, worn nozzle. | Check and tighten X/Y axis belts, adjust print speed in slicer, optimize retraction settings, replace nozzle. |
| Printer not powering on | Power cable disconnected, power supply switch off, faulty power supply. | Check all power connections, ensure power supply switch is on, contact support if issue persists. |
| Print stops mid-way (without power loss) | Corrupt SD card, faulty G-code, thermal runaway error. | Reformat SD card and re-slice model, check G-code for errors, ensure proper ventilation and temperature sensors are working. |
9. Specifications

Figure 9.1: Detailed product parameters for the Ender 3 V2 Neo.
| Feature | Detail |
|---|---|
| Modelling Technology | FDM (Fused Deposition Modeling) |
| Build Volume | 220 x 220 x 250 mm (8.66 x 8.66 x 9.84 inches) |
| Printing Speed | Maximum 120mm/s |
| Printing Precision | ±0.1mm |
| Layer Height | 0.05~0.35mm |
| Filament Diameter | 1.75mm |
| Nozzle Diameter | 0.4 mm (standard) |
| Nozzle Temperature | Up to 260℃ |
| Heat Bed Temperature | Up to 100℃ |
| Extruder Type | Full-metal Bowden Extruder |
| Leveling Mode | CR Touch Auto-leveling |
| Display | 4.3" Color Knob Screen |
| Mainboard | 32-bit Silent Mainboard |
| Resume Printing | Yes |
| Supported Filament | PLA, PETG, ABS |
| Supported File Format | STL, OBJ, AMF |
| Slicing Software | Creality Slicer/Cura/Simplify3D |
| Data Transmission Method | Micro USB/TF Card |
| Net Weight | 7.8kg (17.2 lbs) |
| Product Dimensions | 438 x 424 x 472 mm (17.24 x 16.69 x 18.58 inches) |
| Power Consumption (On-mode) | 350.0 watts |
10. Warranty and Support
For warranty information, technical support, and service inquiries, please refer to the official Creality website or contact their customer service directly. Keep your purchase receipt as proof of purchase for warranty claims.
Official Creality Store: Visit the Creality Store


