Introduction
This manual provides instructions for the setup, operation, and maintenance of your Zelotes T20 Ergonomic Vertical Mouse. Please read this manual thoroughly before using the product to ensure proper function and longevity.
Product Overview
The Zelotes T20 is an ergonomic vertical mouse designed to promote a natural hand and wrist posture, reducing strain during extended use. It features adjustable DPI settings and multiple programmable buttons for enhanced control.

Figure 1: Zelotes T20 Ergonomic Vertical Mouse. This image displays the overall design of the mouse, highlighting its vertical orientation and LED lighting.
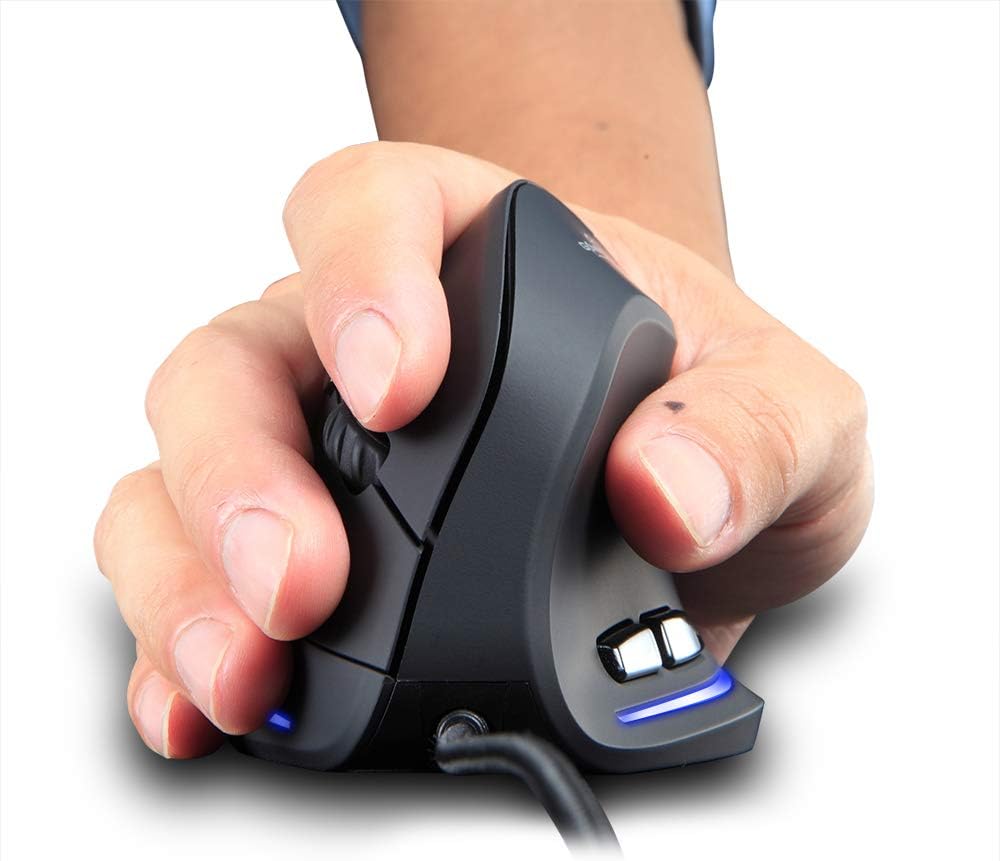
Figure 2: Proper hand placement on the Zelotes T20 mouse. This image illustrates how the vertical design allows for a natural handshake grip, intended to reduce wrist strain.

Figure 3: Ergonomic comparison. This diagram contrasts the natural wrist posture with a vertical mouse against the twisted posture often associated with traditional horizontal mice, emphasizing fatigue reduction.
Package Contents
Verify that all items are present in the package:
- 1 x Zelotes Ergonomic Vertical Mouse
- 1 x Instruction Manual (this document)
Setup
- Connect the Mouse: Plug the USB cable of the Zelotes T20 mouse into an available USB port on your computer.
- Driver Installation: The mouse is plug-and-play. Your operating system should automatically detect and install the necessary drivers. No additional software installation is typically required.
- Remove Protective Film: Before use, locate and remove the protective film from the "Bigfoot pads" on the underside of the mouse for optimal gliding performance.

Figure 4: Underside of the mouse. This image shows the Teflon material pads and indicates the location of the protective film that should be removed before initial use.
Operating Instructions
Button Functions
The Zelotes T20 mouse features 6 buttons for various functions:
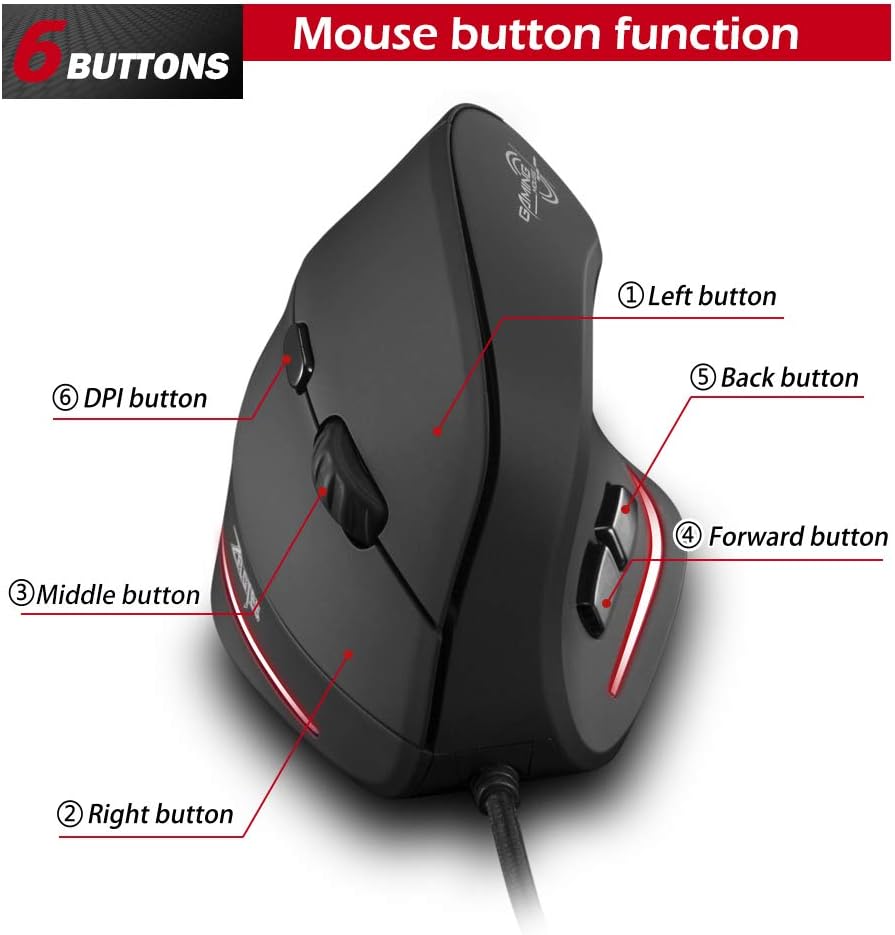
Figure 5: Mouse button layout. This diagram labels each of the six buttons: Left, Right, Middle (scroll wheel click), Forward, Back, and DPI adjustment button.
- Left Button: Standard left-click function.
- Right Button: Standard right-click function.
- Middle Button (Scroll Wheel): Clickable scroll wheel for middle-click functions.
- Forward Button: Navigates forward in web browsers or file explorers.
- Back Button: Navigates backward in web browsers or file explorers.
- DPI Button: Adjusts mouse sensitivity (DPI).
Adjusting DPI (Sensitivity)
The mouse offers four adjustable DPI settings to suit different tasks and preferences. Press the DPI button (Button 6 in Figure 5) to cycle through the settings. Each DPI level is indicated by a specific LED light color:
- 1200 DPI: Blue light hint
- 1600 DPI: Dark purple light hint
- 2400 DPI: Red light hint
- 3200 DPI: Light purple light hint
The light will stay on for approximately 3 seconds when switching DPI settings to indicate the current level.

Figure 6: DPI adjustment and LED indicators. This image illustrates the DPI button and the color coding for each of the four sensitivity settings.
Using Forward/Back Keys
The dedicated Forward and Back buttons (Buttons 4 and 5 in Figure 5) provide quick navigation. These buttons are designed to streamline browsing through web pages or folders, reducing the need for on-screen clicks.

Figure 7: Forward and Back navigation buttons. This image highlights the placement of the forward and back buttons, designed for convenient web and file navigation.
Maintenance
- Cleaning: Use a soft, dry cloth to clean the surface of the mouse. For stubborn dirt, a slightly damp cloth can be used, ensuring no liquid enters the mouse.
- Sensor Maintenance: Keep the optical sensor on the underside of the mouse clean and free from dust or debris to ensure accurate tracking.
- Cable Care: Avoid sharp bends or excessive pulling on the USB cable to prevent damage.

Figure 8: Mouse surface texture. This image provides a close-up view of the mouse's surface, described as smooth for comfortable handling.
Troubleshooting
- Mouse Not Responding:
- Ensure the USB cable is securely plugged into a working USB port on your computer.
- Try plugging the mouse into a different USB port.
- Restart your computer.
- Inaccurate Tracking:
- Clean the optical sensor on the underside of the mouse.
- Ensure you are using the mouse on a suitable surface (e.g., a mouse pad). Highly reflective or transparent surfaces may cause issues.
- Adjust the DPI setting using the DPI button.
- Buttons Not Functioning Correctly:
- Verify that the mouse is properly connected.
- Test the mouse on another computer to determine if the issue is with the mouse or the computer's settings.
Specifications
| Feature | Detail |
|---|---|
| Model | T20 |
| Button Number | 6 buttons |
| Tracking System | Optical |
| USB Cable Length | 1.8m |
| Working Voltage/Current | 5V/100mA |
| Button Life | 5 million times |
| Roller Life | 1.2 million turns |
| Product Dimensions (L x W x H) | 110 x 72 x 75 mm (4.33 x 2.83 x 2.95 inches) |
| Product Weight | 160 ± 5g (5.6 ounces) |
| Resolution (DPI) | 1200-1600-2400-3200 |
| Rate of Return (Polling Rate) | 125Hz |
| Compatibility | Windows 2000/ME/XP (x64)/Vista/7/8/10, Mac OS X (over V10.4), Linux |

Figure 9: Product dimensions. This image provides detailed measurements of the mouse from various angles.
Warranty and Support
For warranty information or technical support, please refer to the manufacturer's official website or contact their customer service department. Keep your purchase receipt as proof of purchase.


