1. Introduction
This manual provides instructions for the installation, operation, and maintenance of your AVLT Single Monitor Arm Desk Mount. This mount is designed to support a single flat, curved, or ultrawide monitor between 17 and 38 inches, weighing up to 26.4 lbs (12 kg), with VESA 75x75mm or 100x100mm mounting patterns. It features a premium mechanical spring for effortless adjustments and an ergonomic viewing experience.

Image: The AVLT Single Monitor Arm Desk Mount supporting a monitor, highlighting its robust construction and ergonomic design.
2. Safety Information
- Ensure the desk surface is stable and capable of supporting the combined weight of the mount and your monitor.
- Do not exceed the maximum weight capacity of 26.4 lbs (12 kg).
- Verify that your monitor has VESA 75x75mm or 100x100mm mounting holes.
- Tighten all screws securely during installation. Loose connections can cause instability.
- Adjust the spring tension carefully to match your monitor's weight to prevent sudden movements.
- Keep children and pets away from the installation area.
3. Package Contents
Please check that all components are present before beginning installation:
- Monitor Arm Assembly
- Desk Clamp Base
- Grommet Mount Base
- VESA Plate
- Hardware Kit (screws, washers, Allen wrenches)
- Instruction Manual
4. Setup & Installation
The AVLT Single Monitor Arm offers two installation options: C-Clamp or Grommet Mount. Choose the method suitable for your desk.
4.1. Choose Mounting Method

Image: Illustration of the C-Clamp and Grommet mounting options, detailing desk thickness and hole diameter requirements.
4.2. Desk Clamp Installation
- Attach the C-clamp to the desk edge. Ensure it is securely tightened.
- Insert the main pole into the C-clamp base and secure it.
4.3. Grommet Mount Installation
- If your desk has a grommet hole, insert the grommet base through the hole.
- Secure the grommet base from underneath the desk using the provided hardware.
- Insert the main pole into the grommet base and secure it.
4.4. Attaching the Monitor Arm
- Slide the lower arm onto the main pole.
- Slide the upper arm onto the lower arm.
- Secure the arms with the provided screws and Allen wrenches.
4.5. Attaching the VESA Plate to Monitor
- Attach the VESA plate to the back of your monitor using the appropriate screws from the hardware kit.
- Ensure the VESA plate is firmly secured to the monitor.
4.6. Mounting the Monitor
- Carefully slide the monitor (with the attached VESA plate) onto the VESA head of the monitor arm.
- Secure the monitor to the arm using the quick-release mechanism or tightening screw.
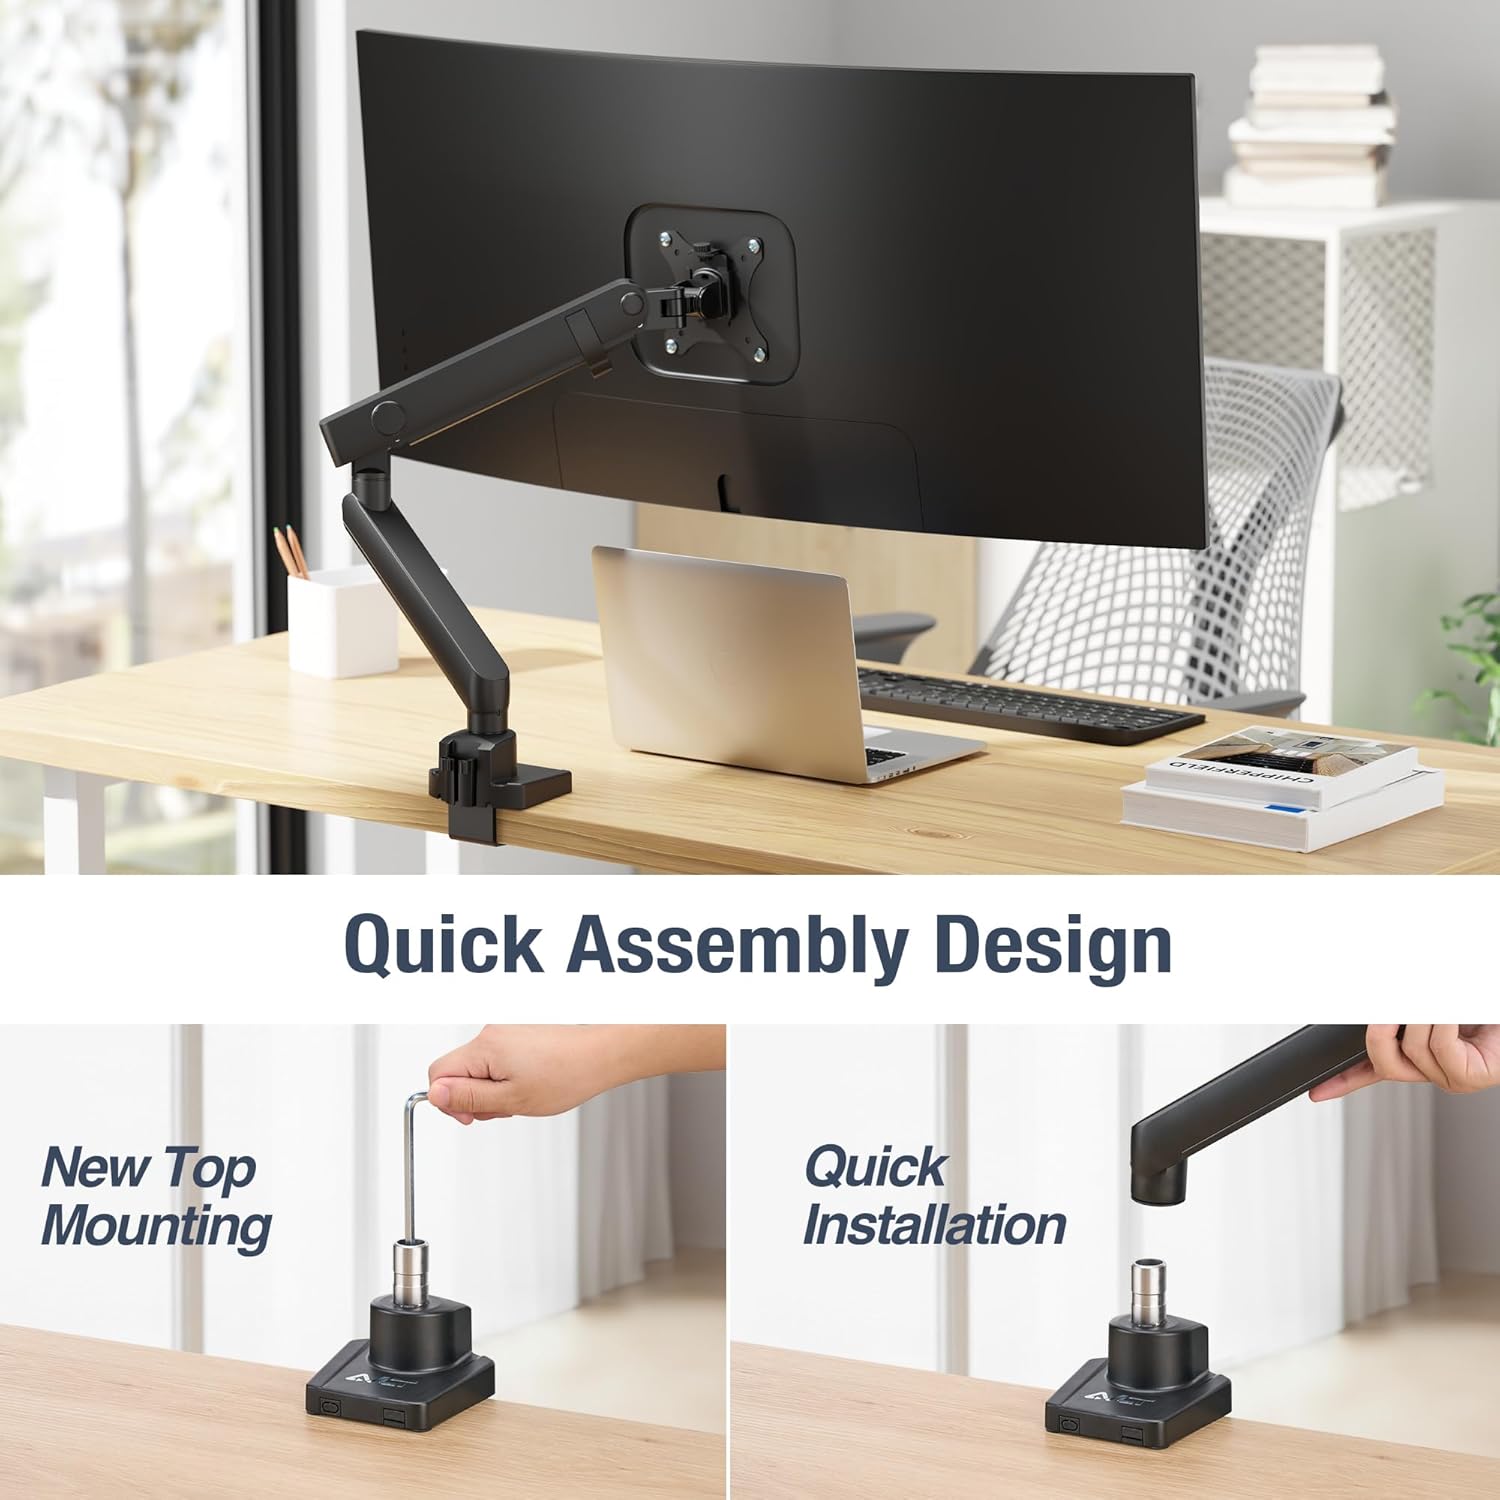
Image: Quick assembly design, illustrating the top mounting method and quick installation of the arm components.
4.7. Installation Video Guide
Video: Official AVLT installation guide for the Single 26 lbs Monitor Desk Top Mount, demonstrating the assembly process including C-clamp/grommet installation, arm attachment, VESA plate setup, and initial adjustments.
5. Operating Instructions & Adjustments
The AVLT monitor arm provides full motion capabilities for optimal viewing comfort.
5.1. Adjusting Spring Tension
The mechanical spring tension needs to be adjusted to match your monitor's weight for smooth and stable positioning. Use the provided Allen wrench to turn the tension screw located on the arm. Turn clockwise to increase tension for heavier monitors, and counter-clockwise to decrease tension for lighter monitors.
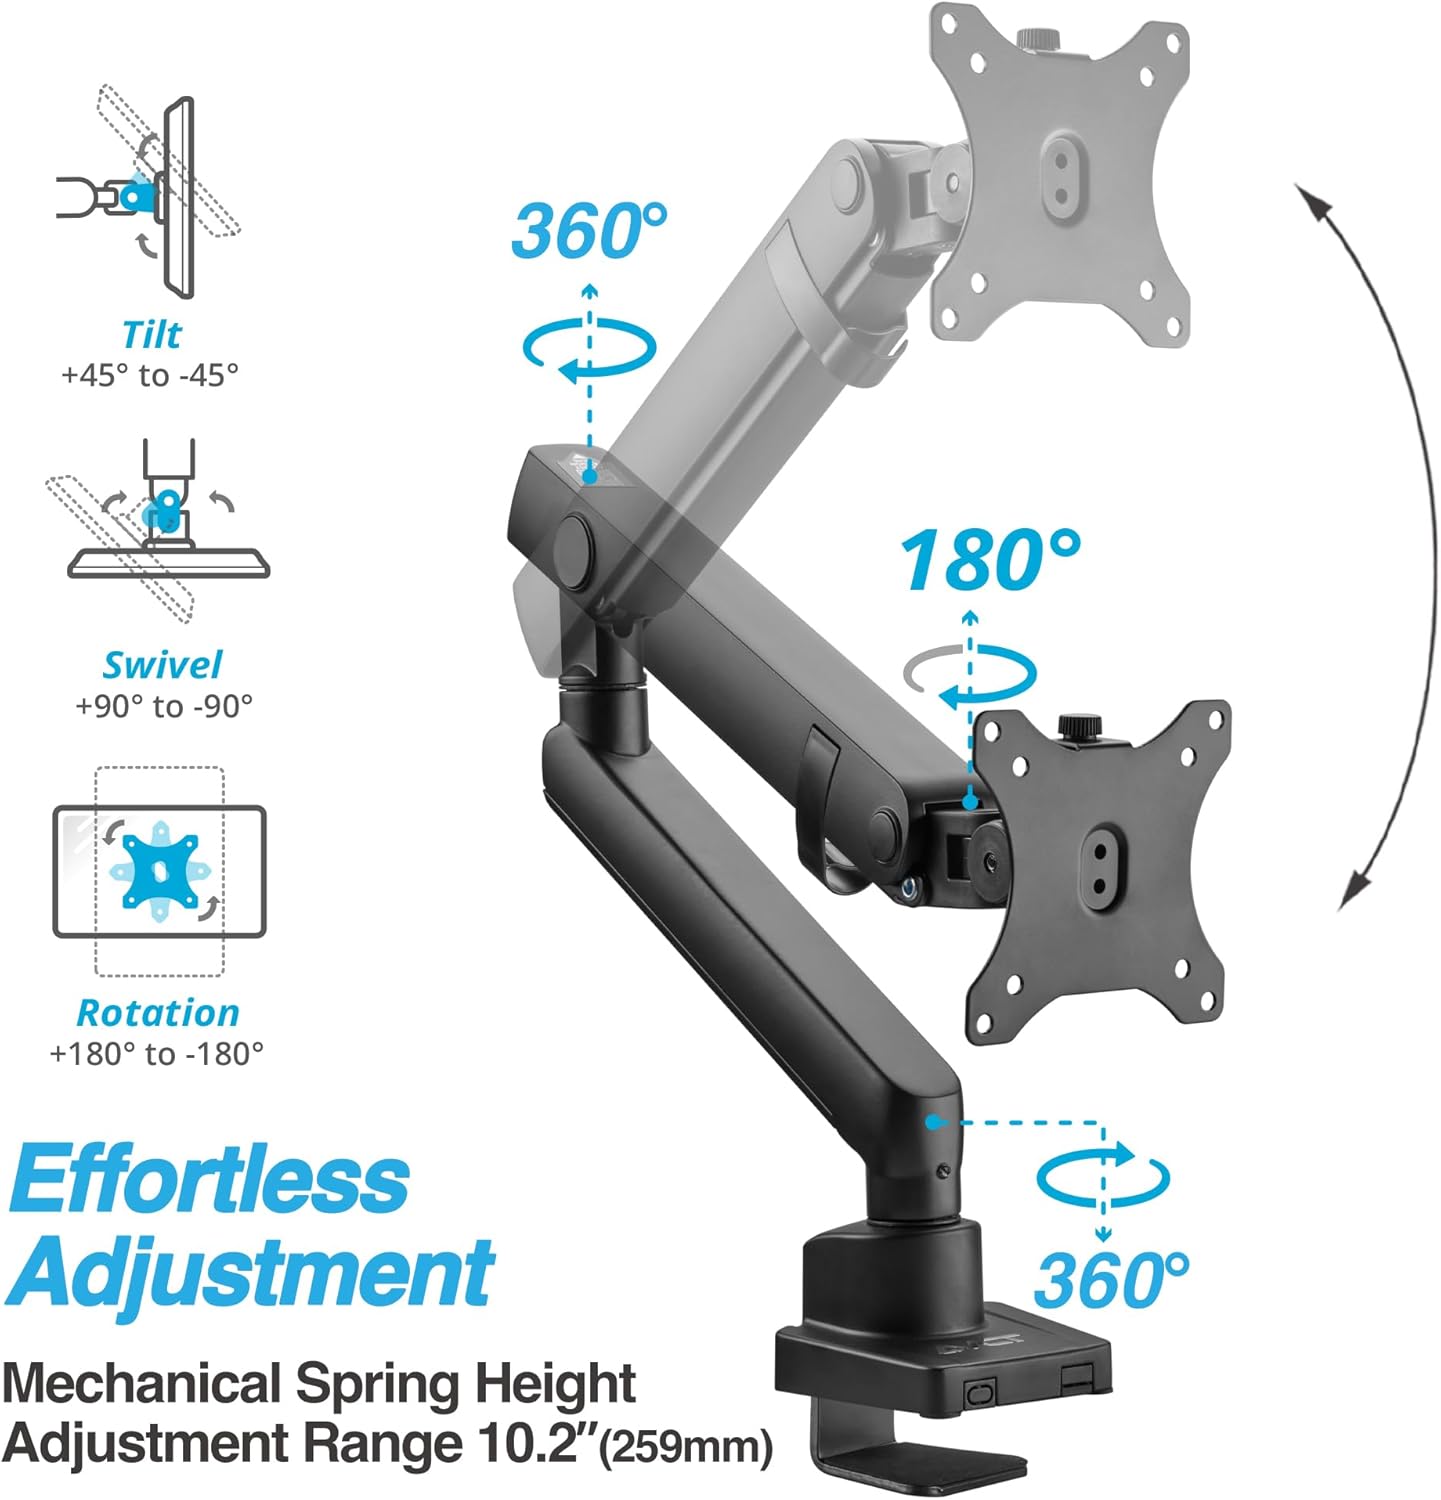
Image: Visual guide to the effortless adjustments, including tilt (+45° to -45°), swivel (+90° to -90°), and rotation (+180° to -180°).
5.2. Height Adjustment
The premium mechanical spring allows for height adjustment from 7.7 inches (196mm) to 17.9 inches (455mm). Gently push or pull the monitor to the desired height. If the monitor does not stay in place, adjust the spring tension.

Image: Detailed view of the mechanical spring mechanism facilitating smooth height adjustments.
5.3. Tilt, Swivel, and Rotation
- Tilt: Adjust the monitor screen angle up or down (+45° to -45°) to reduce glare and optimize viewing.
- Swivel: Rotate the monitor horizontally (+90° to -90°) to share your screen or change viewing angles.
- Rotation: Rotate the monitor 360° (landscape to portrait mode) for different work tasks.

Image: Close-up of the monitor arm's head, demonstrating the adjustable tilt function.
6. Cable Management
The monitor arm features an integrated cable management system to keep your workspace tidy and organized. Route your monitor and power cables through the designated channels on the arm to hide them from view.

Image: The monitor arm with cables neatly routed through its integrated management system, contributing to a clean desk.

Image: Close-up view of the cable management clips on the monitor arm.
7. Maintenance
- Regularly check all screws and connections to ensure they remain tight.
- Clean the monitor arm with a soft, damp cloth. Avoid abrasive cleaners.
- Periodically re-adjust the spring tension if your monitor's weight changes or if the arm's movement becomes too loose or stiff.
8. Troubleshooting
| Problem | Possible Cause | Solution |
|---|---|---|
| Monitor sags or does not stay at desired height. | Spring tension is too low for the monitor's weight. | Increase spring tension by turning the adjustment screw clockwise with the provided Allen wrench. |
| Monitor arm is too stiff to move. | Spring tension is too high. | Decrease spring tension by turning the adjustment screw counter-clockwise. |
| Monitor wobbles or feels unstable. | Mounting screws are loose or desk clamp/grommet is not secure. | Check and tighten all mounting screws and the desk clamp/grommet mechanism. Ensure the desk surface is stable. |
| Monitor does not fit the VESA plate. | Incorrect VESA pattern. | Verify your monitor's VESA pattern is 75x75mm or 100x100mm. If not, an adapter may be required (not included). |
9. Specifications
| Feature | Detail |
|---|---|
| Model Number | AVLT-DM13-1 |
| Screen Size Compatibility | 17" - 38" (Flat/Curved/Ultrawide) |
| Weight Capacity | Up to 26.4 lbs (12 kg) |
| VESA Compatibility | 75x75mm, 100x100mm |
| Height Adjustment Range | 7.7" to 17.9" (196mm to 455mm) |
| Tilt Angle | +45° to -45° |
| Swivel Angle | +90° to -90° |
| Rotation | 360° (Landscape/Portrait) |
| Mounting Options | C-Clamp, Grommet Mount |
| Material | Aluminum |
10. Warranty & Support
This AVLT product comes with a 3-year warranty. For technical support, warranty claims, or any questions regarding your monitor arm, please contact AVLT customer service through their official website or the retailer where the product was purchased. Please have your model number (AVLT-DM13-1) and proof of purchase ready.


