
1. Introduction
This manual provides essential information for the installation, operation, and maintenance of your EPEVER 60A MPPT Solar Charge Controller, Model Tracer6415AN. This controller is designed to optimize power harvesting from your solar panels and efficiently charge various battery types in off-grid solar applications. Please read this manual thoroughly before installation and use to ensure proper function and safety.
2. Product Features
- Negative Ground Tracer AN series MPPT Controller: Supports 12V/24V/36V/48V auto-identifying system voltage. Features an auto-control system to limit charging power and current to prevent exceeding rated values.
- High Input Capacity: Max Input Current: 60 amp. Max Input Solar Power: 750W/12V, 1500W/24V, 2250W/36V, 3000W/48V. Max input Voltage: 150V.
- Battery Compatibility: Supports 4 types of battery charging: Lithium, Lead-acid (Sealed, AGM, Gel, Flooded), and User-defined (note: Lithium settings cannot be user-defined). Includes battery temperature compensation for extended controller life.
- Communication Interface: Equipped with an RS-485 communication bus interface and Modbus communication protocol, suitable for various communication requirements.
- Lithium Battery Activation: Upgraded versions (from August 2020 onwards) support lithium batteries and include a lithium battery activation function.
3. Product Overview
The EPEVER 60A MPPT Solar Charge Controller features a robust design with clearly labeled components for easy installation and operation. Below is a diagram identifying the main parts of the controller.
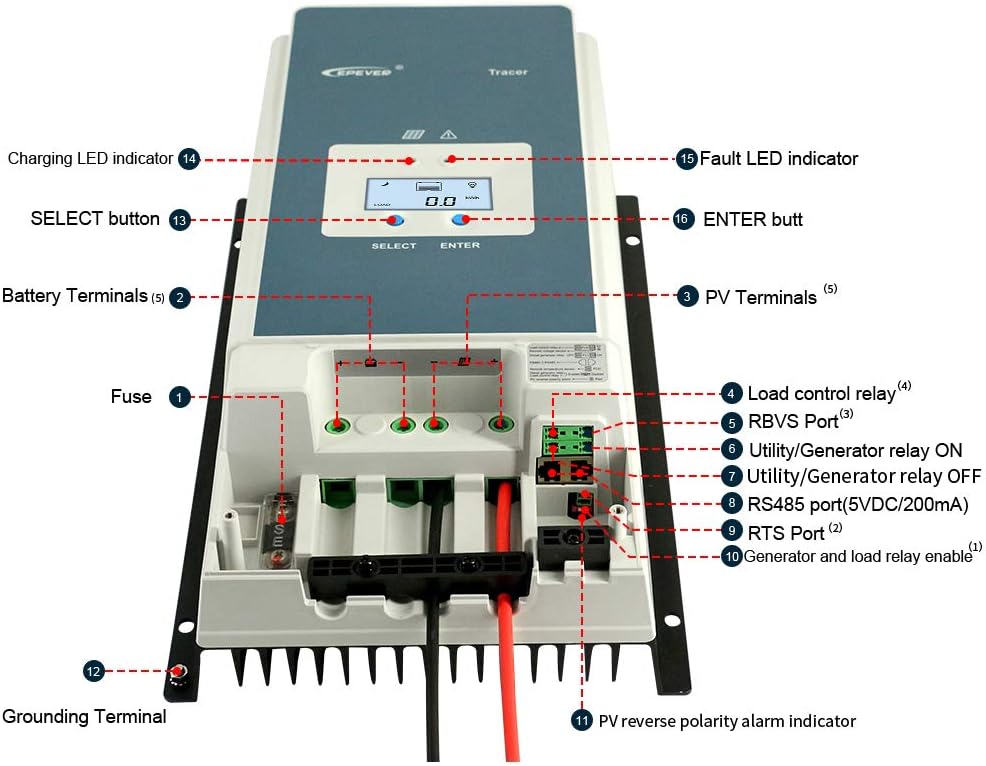
Figure 3.1: Controller Components
This image displays the EPEVER 60A MPPT Solar Charge Controller from the front, highlighting key components with numbered labels for identification. These include the Charging LED indicator, Fault LED indicator, SELECT button, ENTER button, Battery Terminals, PV Terminals, Fuse, Load control relay, RBVS Port, Utility/Generator relay ON, Utility/Generator relay OFF, RS485 port, RTS Port, Generator and load relay enable, PV reverse polarity alarm indicator, and Grounding Terminal.
The controller's LCD display provides real-time information and allows for configuration. The following image illustrates the various screens and navigation options.

Figure 3.2: LCD Display Navigation
This image shows the EPEVER 60A MPPT Solar Charge Controller's LCD display and the sequence of information screens accessible via the SELECT and ENTER buttons. Screens display PV voltage, PV current, PV kWh, battery voltage, battery current, battery temperature, load current, and load kWh.
The controller is designed with multiple protection features to ensure safe and reliable operation.

Figure 3.3: Protection Features
This image highlights the various protection mechanisms integrated into the EPEVER 60A MPPT Solar Charge Controller, including PV Over Current/Power Protection, PV Reverse Polarity Protection, Night Reverse Charging Protection, Battery Over Voltage Protection, Battery Over Discharge Protection, Load Overload Protection, Lithium Battery Low Temperature Protection, and TVS High Voltage Transients Protection.
4. Setup and Installation
4.1 Safety Precautions
- Ensure all connections are secure and correct before applying power.
- Always connect the battery to the controller first, then the solar panel. Disconnect in the reverse order.
- Install the controller in a well-ventilated area, away from direct sunlight, high temperatures, and moisture.
- The controller shell must be properly grounded to shield against electromagnetic interference and prevent electric shock.
4.2 Wiring Connections
Connect the components in the following sequence:
- Connect the Battery: Connect the battery to the controller's battery terminals. Ensure correct polarity.
- Connect the Load (Optional): If using a DC load directly from the controller, connect it to the load terminals.
- Connect the Solar Panel: Connect the solar panel array to the controller's PV terminals. Ensure correct polarity.

Figure 4.1: Fuse and Port Details
This image provides a detailed view of the fuse and various connection ports on the EPEVER 60A MPPT Solar Charge Controller, including the battery and PV terminals, and communication ports.
4.3 Battery Type Selection
The controller supports various battery types: Flooded, Gel, AGM/Sealed, and Lithium-ion. For user-defined settings, only lead-acid battery parameters can be customized. Lithium battery parameters are pre-set and cannot be user-defined directly on the controller.

Figure 4.2: Battery Compatibility
This image illustrates the compatibility of the MPPT Charge Controller with various battery types: Flooded, Gel, SLD (AGM/Sealed), USER (custom battery), and LI (Lithium-ion). It also notes that programming for Lithium batteries can be done via PC (RS485 accessory needed) or phone APP (Ebox-Wifi or Ebox-Blue accessories needed).
5. Operating Instructions
5.1 LCD Display Operation
Use the 'SELECT' and 'ENTER' buttons to navigate through the display screens and adjust settings. Refer to Figure 3.2 for a visual guide to the display screens.
5.2 Programming for Lithium Batteries
To program the controller for Lithium batteries, you will need additional accessories:
- Via PC: An RS485 communication cable is required to connect the controller to a computer.
- Via Phone APP: An Ebox-Wifi or Ebox-Blue module is needed to enable wireless communication with a smartphone application.
Detailed instructions for software and app usage are typically provided with the respective communication accessories.
6. Maintenance
Regular maintenance ensures optimal performance and longevity of your solar charge controller:
- Inspection: Periodically check all wiring connections for tightness and corrosion.
- Cleaning: Keep the controller clean and free from dust and debris. Use a dry cloth for cleaning.
- Ventilation: Ensure the installation area has adequate ventilation to prevent overheating.
- Battery Check: Monitor battery voltage and health according to battery manufacturer guidelines.
7. Troubleshooting
If you encounter issues with your EPEVER 60A MPPT Solar Charge Controller, consider the following common troubleshooting steps:
- No Display/Power: Check battery connections and ensure the battery is charged. Verify the fuse is intact.
- No Charging: Confirm solar panel connections and ensure there is sufficient sunlight. Check for any PV reverse polarity alarms.
- Incorrect Voltage Readings: Verify all wiring is correctly connected and tightened.
- Overload Protection: If the load is disconnected, reduce the load connected to the controller.
For persistent issues, consult the full product manual or contact customer support.
8. Specifications
Key technical specifications for the EPEVER 60A MPPT Solar Charge Controller (Tracer6415AN):
| Specification | Value |
|---|---|
| Model | Tracer6415AN |
| Brand | EPEVER |
| Max Input Current | 60 Amp |
| System Voltage | 12V/24V/36V/48V Auto |
| Max Input PV Voltage | 150V |
| Max Input Solar Power (12V) | 750W |
| Max Input Solar Power (24V) | 1500W |
| Max Input Solar Power (36V) | 2250W |
| Max Input Solar Power (48V) | 3000W |
| Battery Type Compatibility | Lithium, Lead-acid (Sealed, AGM, Gel, Flooded), User |
| Display Type | LCD |
| Item Weight | 4.5 Kilograms |
For detailed dimensions, refer to the diagram below:

Figure 8.1: Controller Dimensions
This image provides the physical dimensions of the EPEVER 60A MPPT Solar Charge Controller, showing its height (H: 134MM), length (L: 394MM), and width (W: 240MM), along with details of the heat sink fins.
9. Warranty and Support
The EPEVER 60A MPPT Solar Charge Controller comes with a manufacturer's warranty for 2 years from the date of purchase.
For technical support, warranty claims, or further inquiries, please refer to the contact information provided with your product packaging or visit the official EPEVER website.


