
1. Introduction
This manual provides detailed instructions for the installation, operation, and maintenance of your visiPower 7 Inch TFT/LCD Video Intercom Door Phone System. Please read this manual thoroughly before installation and use to ensure proper function and safety.

Figure 1: visiPower 7 Inch Video Intercom Door Phone System components.
2. Product Overview
2.1 Key Features
- Indoor Monitor: Features a 7-inch TFT/LCD screen for clear video display and a modern design.
- Outdoor Camera: Constructed from durable aluminum alloy, offering resistance to rain and oxidation. Equipped with a 1/4" CMOS 700TVL camera.
- Enhanced Vision: Includes an IR-Cut filter for improved picture and color quality, especially in varying light conditions.
- Door Control: Supports electric lock control for convenient access management.
- Monitoring Function: Allows real-time monitoring of the area outside the door.
- Customizable Ringtones: Offers 25 selectable doorbell ringtones.
- Easy Installation: Designed for straightforward installation with included adapter and cables.
2.2 Package Contents
Verify that all items listed below are included in your package:
- 1 x Outdoor Unit (Camera)
- 2 x Indoor Unit (Monitor)
- 1 x DC15V Power Adapter
- 1 x 5-meter 4-core Connection Cable
- 1 x 2-core Connection Cable
- 2 x Additional 4-core Connection Cables
- 1 x Package of Screws for mounting

Figure 2: Package contents.
3. Component Identification
3.1 Outdoor Unit (Camera)
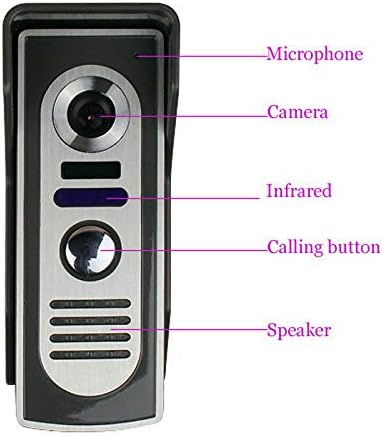
Figure 3: Outdoor Unit Components.
The outdoor unit includes:
- Microphone: For two-way audio communication.
- Camera: Captures video feed.
- Infrared Sensors: For night vision capabilities.
- Calling Button: Initiates a call to the indoor monitor(s).
- Speaker: For audio output.
3.2 Indoor Unit (Monitor)

Figure 4: Indoor Monitor Back Panel and Controls.
The indoor monitor features:
- 7-inch TFT Screen: Displays video from the outdoor camera.
- Power Light: Indicates power status.
- Microphone: For two-way audio communication.
- Control Buttons: Including Monitor, Interior Intercom, Volume, Unlock, and Intercom Button.
- Speakers: For audio output.
- Connection Ports: For power input, outdoor unit connection, and additional indoor units.
- Hanging Plate: For wall mounting.
4. Setup and Installation
4.1 Pre-Installation Test
Before permanent installation, it is recommended to test the door phone kit using the provided original cables. Connect all components temporarily and ensure they function correctly. During this test, keep the outdoor unit and indoor monitor(s) at a reasonable distance from each other to avoid audio feedback or noise interference.
4.2 Mounting the Units
- Outdoor Unit: Choose a suitable location near your door, ensuring it is at an appropriate height for visitors and protected from direct heavy rain if possible. Use the provided screws to securely mount the outdoor unit to the wall.
- Indoor Monitor(s): Select a convenient indoor location, such as a hallway or living area. Mount the hanging plate to the wall using screws, then attach the indoor monitor to the plate.

Figure 5: Outdoor Unit Dimensions.
4.3 Wiring Diagram
Follow the wiring diagrams carefully. The system uses 4-core cables for connection between the outdoor unit and indoor monitor(s), and between multiple indoor monitors. A 2-core cable is typically used for electric lock connection.

Figure 6: System Wiring Diagram (Two Monitors and Electric Lock).

Figure 7: Example Installation and Electric Lock Wiring.
Important: Ensure all power is disconnected before performing any wiring to prevent electrical shock or damage to the system.
5. Operating Instructions
5.1 Answering a Call
When a visitor presses the calling button on the outdoor unit, the indoor monitor(s) will ring. Press the 'Intercom Button' on the indoor monitor to establish two-way audio communication with the visitor.
5.2 Monitoring the Outdoor Area
To view the outdoor area without a visitor call, press the 'Monitor' button on the indoor unit. The screen will display the live video feed from the outdoor camera.
5.3 Unlocking the Door
If an electric lock is connected to the system, you can unlock the door by pressing the 'Unlock' button on the indoor monitor during a call or while monitoring.
5.4 Adjusting Settings
Use the 'Volume' button to adjust the audio level of the indoor monitor. Other settings, such as ringtone selection, may be accessible through the monitor's interface (refer to specific model features if applicable).
6. Maintenance
- Cleaning: Use a soft, dry cloth to clean the screens and surfaces of both indoor and outdoor units. Avoid abrasive cleaners or solvents.
- Connections: Periodically check all wiring connections to ensure they are secure and free from corrosion.
- Outdoor Unit: Ensure the camera lens and infrared sensors on the outdoor unit are clear of dirt, dust, or spiderwebs for optimal performance.
7. Troubleshooting
| Problem | Possible Cause | Solution |
|---|---|---|
| No image on indoor monitor | Loose connection between outdoor unit and monitor; Power issue; Damaged cable. | Check all wiring connections. Ensure power adapter is correctly plugged in. Inspect cables for damage. |
| No sound or poor audio quality | Volume too low; Loose audio connection; Microphone/speaker obstruction. | Adjust volume on indoor monitor. Check audio wiring. Ensure microphone and speaker are not blocked. |
| Doorbell not ringing | Outdoor unit button not working; Wiring issue; Ringer volume off. | Test the outdoor unit button. Check wiring to the indoor monitor. Ensure ringer volume is not muted. |
| Electric lock not opening | Incorrect wiring to lock; Lock power issue; Faulty lock. | Verify electric lock wiring according to the diagram. Check power supply to the lock. Test the lock independently if possible. |
8. Specifications
8.1 Outdoor Camera Unit
- Camera Sensor: 1/4" CMOS 700TV Lines
- Minimum Illumination: 0.5 Lux
- Video Output: 1Vp-p/75Ω
- Adapter Input: AC100~240V, 50/60Hz
- Adapter Output: DC15V/1.2A
- Working Temperature: -20℃ to 50℃
- Installation: Wall mounted
- Material: ABS plastic & aluminum alloy
- Dimensions: 120mm × 50mm × 43mm (Height × Width × Depth)
8.2 Indoor Monitor Unit
- Screen: 7" TFT/LCD
- Power Source: AC100V-240V / 50-60Hz
- Effective Pixels: 480 * 234 * 30
- Power Consumption: ≤14W (operation), ≤2W (standby)
- Wiring: 4 wires
- Dimensions: 195mm × 132mm × 20mm (Width × Height × Depth)
8.3 General
- Model Number: SY818M12
- Manufacturer: visiPower
9. Warranty and Support
For warranty information and technical support, please refer to the documentation provided with your purchase or contact visiPower customer service. Keep your purchase receipt as proof of purchase.