
Denver 110131200060
Denver DVBC-120 Cable TV Receiver User Manual
Comprehensive guide for setup, operation, and maintenance of your Denver DVBC-120 Cable TV Receiver.
1. Introduction
The Denver DVBC-120 is a high-definition DVB-C (Digital Video Broadcasting - Cable) receiver designed to provide access to digital cable television channels. It supports MPEG-4 and MPEG-2 formats, allowing you to receive free-to-cable (FTC) channels from your cable TV provider. This device also features PVR (Personal Video Recorder) functionality via USB, enabling you to record TV programs and play back various media files.

Figure 1.1: Front view of the Denver DVBC-120 Cable TV Receiver. The device is a black rectangular box featuring a USB port on the left side of the front panel and a green LED display on the right, currently showing "OFF". Three control buttons are located to the right of the display.
2. Important Safety Information
Please read all safety instructions carefully before using the device. Keep this manual for future reference.
- Power Supply: Use only the power adapter supplied with the unit. Ensure the power supply voltage (110-240V ~ 50-60Hz) matches your local power grid.
- Ventilation: Do not block any ventilation openings. Ensure adequate airflow around the unit to prevent overheating.
- Water and Moisture: Do not expose the unit to rain, moisture, or dripping/splashing liquids. Do not place objects filled with liquids, such as vases, on the unit.
- Cleaning: Unplug the unit from the power outlet before cleaning. Use a soft, dry cloth. Do not use liquid cleaners or aerosol cleaners.
- Servicing: Do not attempt to service this product yourself. Refer all servicing to qualified service personnel. Opening the cover may expose you to dangerous voltage or other hazards.
- Placement: Place the unit on a stable, flat surface. Avoid placing it near heat sources or in direct sunlight.
3. Package Contents
Verify that all items listed below are included in your package:
- Denver DVBC-120 Cable TV Receiver
- Remote Control
- Power Adapter
- User Manual (this document)

Figure 3.1: The Denver DVBC-120 Cable TV Receiver package contents. Shown are the main receiver unit, a black remote control, and a power adapter with its cable.
4. Setup
4.1. Connecting the Receiver
Follow these steps to connect your Denver DVBC-120 to your television and cable network:
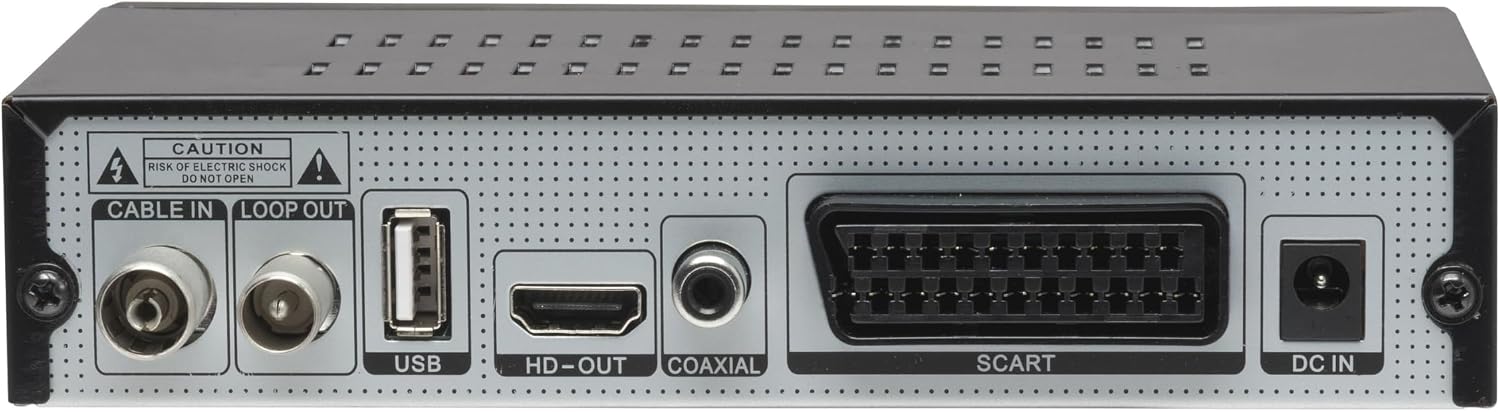
Figure 4.1: Rear panel of the Denver DVBC-120, displaying various input and output ports including Cable In, Loop Out, USB, HDMI (HD-OUT), Coaxial, SCART, and DC IN for power.
- Cable Connection: Connect your cable TV antenna or wall outlet to the CABLE IN port on the rear of the receiver.
- TV Connection (HDMI): For high-definition video and audio, connect an HDMI cable from the HD-OUT port on the receiver to an HDMI input port on your television.
- TV Connection (SCART - Optional): If your TV does not have an HDMI port, or for standard definition, connect a SCART cable from the SCART port on the receiver to the SCART input on your television.
- Power Connection: Connect the supplied power adapter to the DC IN port on the receiver, then plug the adapter into a wall power outlet.
- USB Device (Optional): If you plan to use the PVR function or play media files, insert a USB stick (not included) into the USB port on the front or rear of the receiver.
4.2. Initial Power On and Channel Scan
After connecting all cables, proceed with the initial setup:
- Turn on your television and select the correct HDMI or SCART input source that the receiver is connected to.
- The receiver will power on automatically or can be turned on using the power button on the remote control or the front panel.
- Upon first use, the receiver will typically display an initial setup wizard. Follow the on-screen prompts to select your language, country, and perform an automatic channel scan.
- During the channel scan, the receiver will search for available DVB-C channels. This process may take several minutes. Do not turn off the receiver during the scan.
- Once the scan is complete, the receiver will save the found channels and tune to the first available channel.
5. Operating Instructions
5.1. Basic Operation
- Power On/Off: Press the POWER button on the remote control or the front panel to turn the receiver on or off. The receiver features an energy-saving mode that activates after 3 hours of inactivity.
- Channel Selection: Use the CH+ / CH- buttons on the remote to navigate through channels. Alternatively, enter the channel number directly using the numeric keypad.
- Volume Control: Adjust the volume using the VOL+ / VOL- buttons on the remote control.
- Mute: Press the MUTE button to temporarily silence the audio. Press again to restore sound.
5.2. Using the Remote Control
The remote control provides full functionality for your Denver DVBC-120 receiver. Familiarize yourself with its layout:
Figure 5.1: The remote control for the Denver DVBC-120. It features a standard layout with power, numeric, channel, volume, menu, and media control buttons.
- MENU: Access the main On-Screen Display (OSD) menu for settings and features.
- OK / Navigation Buttons: Use the arrow keys to navigate through menus and options, and OK to confirm selections.
- EXIT: Exit the current menu or screen.
- INFO: Display current channel information.
- EPG: Access the Electronic Program Guide (if available from your cable provider).
- SUB-T: Toggle DVB subtitles on/off.
- TTX: Access Teletext (if available).
- PVR Controls: Buttons like REC, PLAY, PAUSE, STOP, FF (Fast Forward), REW (Rewind) for PVR and media playback.
5.3. PVR Function (Recording)
The Denver DVBC-120 allows you to record TV programs to an external USB storage device (not included). Ensure a USB stick is connected to the receiver's USB port.
- Instant Recording: While watching a program, press the REC button on the remote control to start recording immediately. Press STOP to end the recording.
- Scheduled Recording (Timer): Access the timer function via the OSD menu (usually under "System" or "PVR Settings") to schedule future recordings. You can set the start time, end time, and channel for the recording.
- Playback Recorded Files: Access recorded files through the "PVR" or "Media" menu. Select the desired recording and press PLAY.
5.4. Media Playback (USB)
The receiver supports playback of movies and JPEG photos from a connected USB storage device.
- Insert your USB stick containing media files into the USB port.
- Navigate to the "Media" or "USB" section in the OSD menu.
- Select the type of media you wish to play (e.g., "Movie", "Photo").
- Browse your USB device's folders and select the file you want to play.
5.5. Menu Navigation and Settings
The multi-language OSD (On-Screen Display) menu allows you to configure various settings:
- Press the MENU button on the remote control to open the main menu.
- Use the arrow keys to navigate between menu categories (e.g., "Channel", "Installation", "System", "PVR", "Media").
- Press OK to enter a sub-menu or confirm a setting.
- Use the arrow keys to change values or select options.
- Press EXIT to go back to the previous menu or exit the menu entirely.
- Screen Format: Adjust the aspect ratio (4:3 or 16:9) in the display settings menu to match your TV.
6. Maintenance
Proper maintenance ensures the longevity and optimal performance of your Denver DVBC-120 receiver.
- Cleaning: Regularly wipe the exterior of the receiver with a soft, dry, lint-free cloth. Do not use abrasive cleaners, waxes, or solvents.
- Ventilation: Ensure that the ventilation slots on the top and sides of the unit are not obstructed. Dust accumulation can be removed gently with a soft brush or a vacuum cleaner with a brush attachment.
- Storage: If storing the unit for an extended period, disconnect it from the power supply and store it in a cool, dry place away from direct sunlight and extreme temperatures.
7. Troubleshooting
If you encounter issues with your Denver DVBC-120, refer to the table below for common problems and their solutions.
| Problem | Possible Cause | Solution |
|---|---|---|
| No power | Power cable not connected; power outlet faulty. | Check power cable connection to receiver and wall outlet. Test outlet with another device. |
| No signal / "No Signal" message on TV | Incorrect TV input selected; cable connection loose; no channels scanned. | Ensure TV is on the correct HDMI/SCART input. Check cable IN connection. Perform a channel scan. |
| Poor picture quality | Weak signal; incorrect display settings. | Check cable connection. Ensure signal strength is adequate. Adjust screen format (4:3/16:9) in settings. |
| Remote control not working | Batteries depleted; obstruction between remote and receiver; remote sensor blocked. | Replace batteries. Remove any obstructions. Ensure remote is pointed at the receiver's front panel. |
| Cannot record to USB | USB stick not inserted; USB stick not formatted correctly; insufficient space. | Ensure USB stick is inserted. Format USB stick to FAT32 (refer to receiver's menu). Check available space. |
8. Technical Specifications
| Feature | Specification |
|---|---|
| Model Number | 110131200060 |
| Tuner Type | DVB-C (Digital Video Broadcasting - Cable) |
| Video Decoding | MPEG-2, MPEG-4, H.264, H.265/HEVC |
| Supported Resolutions | 720p, 1080p (HD Signal) |
| Aspect Ratio | 4:3, 16:9 (Selectable) |
| Audio Output Mode | Stereo, 5.1 Surround Sound |
| Connections | RF IN, RF LOOP OUT, HDMI (1), SCART, USB (2), Coaxial, DC IN |
| USB Ports | 2 (for PVR and media playback) |
| PVR Function | Yes (via USB, USB stick not included) |
| Media Playback | Movies, JPEG Photos |
| Power Supply | 110-240V ~ 50-60Hz |
| Power Output | 5 Watts |
| Additional Features | DVB Subtitles, Teletext, Multi-language OSD, Energy Saving Mode |
| Manufacturer | Denver Electronics |
| Country of Origin | China |
9. Warranty and Support
For warranty information and technical support, please refer to the warranty card included with your product or visit the official Denver Electronics website. Keep your purchase receipt as proof of purchase for warranty claims.
For further assistance, you may also contact your local retailer or the customer service department of Denver Electronics.
Ask a question about this manual
Ask about setup, troubleshooting, compatibility, parts, safety, or missing instructions. Manuals+ will review the question and use this page’s manual context to help answer it.