
1. Overview
The PIPO X11 is a versatile Mini PC designed for various applications, featuring a 9.0-inch multi-touch display. It integrates the functionality of a desktop computer with the portability of a tablet, making it suitable for home entertainment, office tasks, and educational purposes. This device operates on Windows 10 and is equipped with an Intel Cherry Trail Z8350 processor, 3GB of RAM, and 64GB of internal storage.

Figure 1.1: PIPO X11 Mini PC in use, demonstrating its touch screen capabilities.
2. Product Features
- Display: 9.0-inch LCD touch screen with a resolution of 1920 x 1200 pixels.
- Processor: Intel Cherry Trail Z8350, with a maximum burst frequency of up to 1.92GHz.
- Memory & Storage: 3GB RAM and 64GB eMMC internal storage.
- Operating System: Pre-installed Windows 10.
- Wireless Connectivity: 2.4G WiFi 802.11b/g/n for network access.
- Bluetooth: Bluetooth 4.0 for connecting wireless peripherals.
3. Device Layout and Ports
Familiarize yourself with the various ports and buttons on your PIPO X11 Mini PC for proper connection and operation.

Figure 3.1: Front and side views illustrating the device's ports and controls.
Front/Rear Panel Ports:
- REST Button: Small reset button (requires a pin to press).
- TF Card Slot: For expandable storage using a MicroSD card.
- USB 2.0 Ports (x2): For connecting USB peripherals.
- HDMI Port: For connecting to an external display (monitor, TV).
- Ethernet Port: For wired network connection.
- DC Power Input: For connecting the power adapter.
Side Panel Controls and Ports:
- ON/OFF Button: Power button for turning the device on or off.
- Volume +/- Buttons: Adjusts the system volume.
- USB 2.0 Port (x1): Additional USB port for peripherals.
- USB 3.0 Port (x1): High-speed USB port for compatible devices.
- AV Port: Audio/Video output.

Figure 3.2: Side view highlighting the power and volume buttons, and speaker grille.
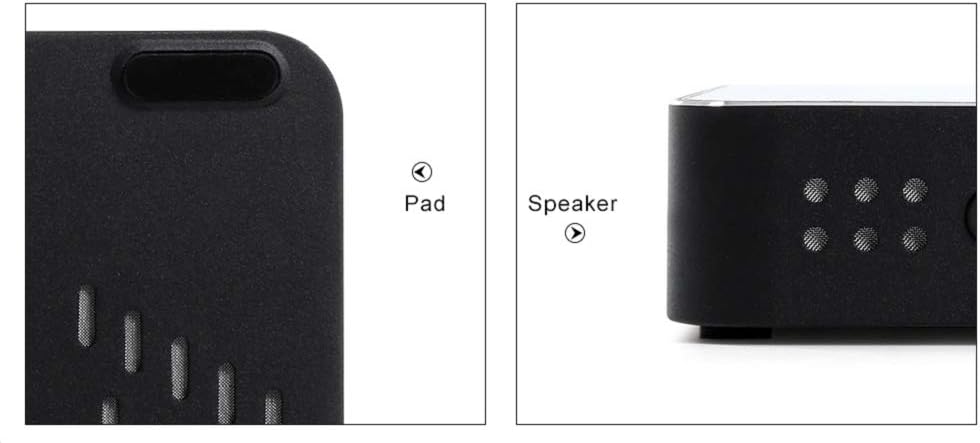
Figure 3.3: Detail of the integrated speaker and anti-slip pad.
4. Setup Instructions
- Positioning the Device: Place the PIPO X11 on a stable, flat surface. The device includes retractable kickstands for an angled viewing position.
- Connect to Power: Insert the power adapter into the DC Power Input port on the device, then plug the adapter into a wall outlet.
- Connect to Display (Optional): If using an external monitor or TV, connect an HDMI cable from the HDMI port on the PIPO X11 to the HDMI input on your display.
- Connect Peripherals (Optional): Connect a USB keyboard and mouse to the available USB ports. For wireless peripherals, ensure they are charged and ready for Bluetooth pairing.
- Power On: Press and hold the ON/OFF button on the side of the device until the screen illuminates.
- Initial Setup: Follow the on-screen instructions for Windows 10 initial setup, including language, region, network connection, and user account creation.

Figure 4.1: PIPO X11 with kickstands extended for optimal viewing.
5. Operating Instructions
5.1 Basic Windows 10 Operation
- Touch Screen: Navigate Windows 10 using touch gestures. Tap to select, swipe to scroll, and pinch to zoom.
- Start Menu: Tap the Windows icon in the bottom-left corner to access applications, settings, and power options.
- Desktop Mode: The device defaults to desktop mode. You can switch to Tablet Mode via the Action Center for a touch-optimized interface.
5.2 Network Connection (Wi-Fi)
- Tap the Wi-Fi icon in the system tray (bottom-right corner).
- Select your desired Wi-Fi network from the list.
- Enter the network password if prompted, then click Connect.
5.3 Bluetooth Pairing
- Go to Settings > Devices > Bluetooth & other devices.
- Ensure Bluetooth is turned On.
- Put your Bluetooth device (e.g., keyboard, mouse) into pairing mode.
- Click Add Bluetooth or other device and select Bluetooth.
- Select your device from the list and follow any on-screen prompts to complete pairing.
6. Maintenance
- Cleaning: Use a soft, lint-free cloth to clean the screen and exterior. Avoid abrasive cleaners or solvents.
- Software Updates: Regularly check for and install Windows updates to ensure optimal performance and security. Go to Settings > Update & Security > Windows Update.
- Storage Management: Periodically clear temporary files and uninstall unused applications to free up storage space.
- Ventilation: Ensure the ventilation holes on the device are not obstructed to prevent overheating.
7. Troubleshooting
7.1 Device Does Not Power On
- Ensure the power adapter is securely connected to both the device and a working power outlet.
- Verify the power outlet is functional by testing it with another device.
- Press and hold the power button for 10-15 seconds to perform a hard reset.
7.2 No Display on External Monitor
- Check the HDMI cable connection at both ends.
- Ensure the external monitor is powered on and set to the correct HDMI input source.
- Try a different HDMI cable or monitor if possible.
7.3 Wi-Fi Connection Issues
- Restart the PIPO X11 and your Wi-Fi router.
- Ensure you are within range of your Wi-Fi network.
- Verify the Wi-Fi password is entered correctly.
7.4 Slow Performance
- Close unnecessary applications running in the background.
- Check for and install any pending Windows updates.
- Run a disk cleanup to remove temporary files.
- Consider reducing the number of startup programs.
8. Specifications

Figure 8.1: PIPO X11 dimensions and key specifications.
| Feature | Specification |
|---|---|
| Processor | Intel Cherry Trail Z8350 (up to 1.92GHz) |
| RAM | 3GB |
| Storage | 64GB eMMC |
| Operating System | Windows 10 |
| Display | 9.0 inch LCD Touch Screen, 1920 x 1200P |
| Wi-Fi | 2.4G WiFi 802.11b/g/n |
| Bluetooth | Bluetooth 4.0 |
| Ports | HDMI Type A, 3x USB 2.0, 1x USB 3.0, Ethernet (RJ45), TF Card Slot, DC Power, AV Port |
| Dimensions (L x W x H) | 220mm x 153mm x 27mm |
| Color | Black |
9. Safety Information
- Use only the provided power adapter. Using unauthorized adapters may damage the device and void the warranty.
- Avoid exposing the device to extreme temperatures, direct sunlight, or high humidity.
- Do not attempt to disassemble or repair the device yourself. Refer to qualified service personnel.
- Keep the device away from water or other liquids.
- Ensure proper ventilation to prevent overheating.
10. Warranty and Support
For warranty information and technical support, please refer to the documentation included with your purchase or contact your retailer. Keep your proof of purchase for warranty claims.
For further assistance, you may visit the official Pipo website or contact their customer service department.


