
1. Introduction
This manual provides essential information for the safe and efficient installation, operation, and maintenance of your Dieffematic 8K01MP-012 24VDC Swing Gate Opener System. This system is designed for automating swing gates up to 2 meters per leaf. Please read this manual thoroughly before beginning any installation or operation procedures to ensure proper functionality and to prevent damage or injury.
For additional support or detailed technical specifications, please refer to the official Dieffematic website or contact authorized service personnel.
2. Safety Information
WARNING: Failure to follow these safety instructions could result in serious injury or death, and may void your warranty.
- Installation must be performed by qualified personnel in accordance with all local and national safety regulations.
- Ensure the main power supply is disconnected before performing any installation, maintenance, or repair work.
- Keep children and pets away from the gate area, especially during operation.
- Do not attempt to repair or modify the system components yourself. Contact qualified service personnel.
- Ensure all safety devices (e.g., photocells, safety edges) are correctly installed and functioning before operating the gate.
- The gate must be in good mechanical condition and move freely before installing the automation system.
3. Package Contents
Carefully unpack the system and verify that all components are present and undamaged. If any items are missing or damaged, contact your supplier immediately.
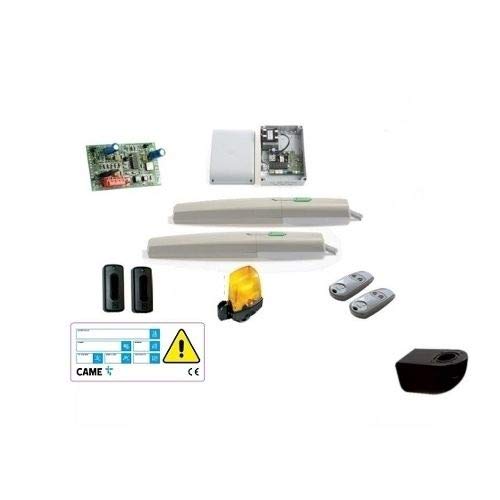
Figure 1: Overview of the Dieffematic 8K01MP-012 swing gate opener system components. This image shows the main control unit, two linear actuators, and various mounting brackets and accessories.
A typical complete system package for the 8K01MP-012 includes:
- 2 x 24VDC Linear Actuators for swing gates
- 1 x Control Unit with integrated receiver
- 2 x Remote Controls (transmitters)
- 1 x Pair of Safety Photocells
- 1 x Flashing Light with integrated antenna
- Mounting Brackets and Fasteners
- User Manual and Installation Guide
4. Setup and Installation
IMPORTANT: Installation of this gate automation system requires technical expertise and adherence to electrical and mechanical safety standards. It is strongly recommended that installation be carried out by a qualified professional.
- Pre-installation Check: Ensure the gate leaves are structurally sound, move freely without friction, and are properly balanced. Verify that there is adequate space for the actuators to operate without obstruction.
- Mounting Actuators: Securely attach the linear actuators to the gate posts and gate leaves using the provided mounting brackets. Ensure correct alignment and leverage for smooth gate movement. Refer to the detailed installation diagrams in the separate installation guide for precise measurements and positioning.
- Control Unit Installation: Mount the control unit in a protected, easily accessible location, away from direct weather exposure. Ensure proper ventilation.
- Electrical Connections: Connect the actuators, photocells, flashing light, and power supply to the control unit according to the wiring diagrams provided in the installation guide. All electrical connections must comply with local electrical codes. The system operates on 24VDC.
- Safety Device Installation: Install the safety photocells at appropriate heights and distances to detect obstructions in the gate's path. Connect them to the control unit.
- Initial Configuration: Power on the system. Follow the control unit's programming instructions to set gate travel limits, operating speeds, and remote control pairing. Perform several test cycles to ensure smooth operation and correct functioning of all safety features.
5. Operating Instructions
The Dieffematic 8K01MP-012 system is designed for user-friendly operation.
5.1. Remote Control Operation
- Press the assigned button on your remote control once to open the gate.
- Press the same button again while the gate is moving to stop it.
- Press the button a third time to reverse the gate's direction (e.g., if it was opening, it will start closing).
- The gate will automatically close after a preset time (if auto-close function is enabled).
5.2. Manual Override
In case of power failure or system malfunction, the gate can be operated manually.
- Locate the manual release mechanism on each actuator (usually covered by a cap or flap).
- Insert the provided key into the lock and turn it to disengage the motor.
- Manually push the gate leaves open or closed.
- To re-engage the motor, turn the key back to the locked position and operate the gate with the remote control to synchronize the actuators.
6. Maintenance
Regular maintenance ensures the longevity and reliable operation of your gate opener system.
6.1. Monthly Checks
- Gate Movement: Manually open and close the gate to check for any stiffness, grinding noises, or obstructions. Lubricate hinges if necessary.
- Safety Devices: Test the photocells by breaking the beam with an object (e.g., a broom handle) while the gate is closing. The gate should stop or reverse.
- Actuators: Inspect actuators for any signs of wear, damage, or loose mounting. Clean any debris from the actuator rods.
- Electrical Connections: Visually inspect all wiring for fraying or damage. Ensure connections are secure.
6.2. Annual Professional Service
It is recommended to have the system inspected and serviced by a qualified technician annually. This includes checking motor performance, control unit diagnostics, and lubrication of moving parts.
7. Troubleshooting
This section addresses common issues you might encounter. For problems not listed here, contact technical support.
| Problem | Possible Cause | Solution |
|---|---|---|
| Gate does not respond to remote control. |
|
|
| Gate opens but does not close. |
|
|
| Gate moves slowly or with difficulty. |
|
|
8. Specifications
Key technical specifications for the Dieffematic 8K01MP-012 Swing Gate Opener System:
- Model: 8K01MP-012
- Brand: Dieffematic
- Power Supply: 24 VDC
- Max Gate Leaf Length: 2 meters (per leaf)
- ASIN: B07JR1CMPX
- Availability on Amazon.it: From May 30, 2022
- Application: Residential swing gates
- Safety Features: Obstacle detection, photocell input, manual release
9. Warranty and Support
Your Dieffematic 8K01MP-012 system comes with a manufacturer's warranty. Please refer to the warranty card included in your package for specific terms and conditions, including warranty duration and coverage details.
For technical assistance, spare parts, or warranty claims, please contact your authorized Dieffematic dealer or visit the official Dieffematic website for support contact information. When contacting support, please have your model number (8K01MP-012) and purchase date readily available.
Online Resources: For further information, installation videos (if available), and FAQs, please visit the Dieffematic Official Website.