
1. Introduction
The EPEVER MPPT Solar Charge Controller Triron4215N is an advanced Maximum Power Point Tracking (MPPT) charge controller designed for off-grid solar systems. It efficiently manages power from solar panels to charge batteries, ensuring optimal performance and longevity of your battery system. This manual provides detailed instructions for setup, operation, maintenance, and troubleshooting.
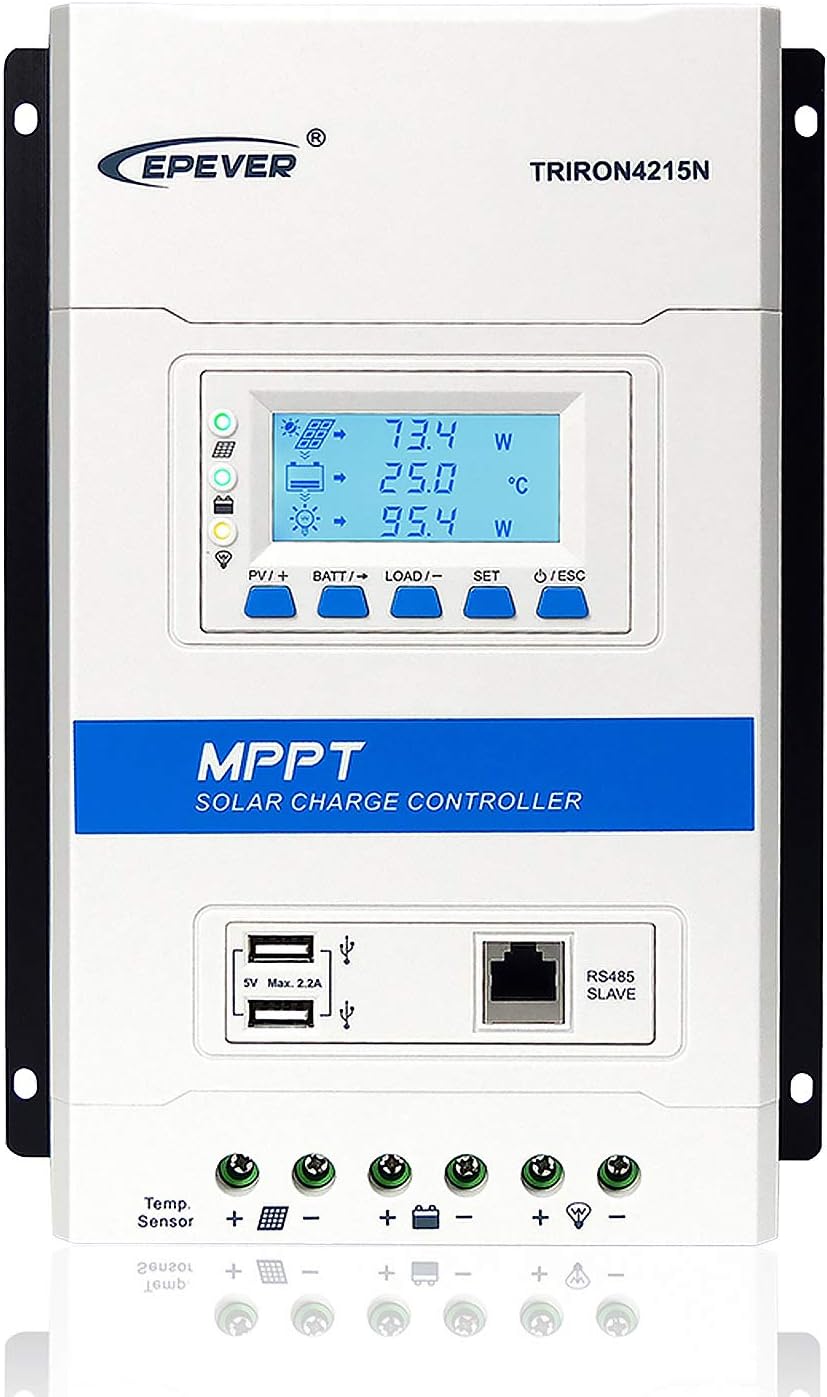
Figure 1.1: EPEVER MPPT Solar Charge Controller Triron4215N
2. Key Features
- MPPT Technology: Ultra-fast tracking speed and high tracking efficiency (≥99.5%) for maximum power harvest.
- Versatile Battery Compatibility: Supports Sealed, Gel (AGM), Flooded, LiFePO4, Li(NiCoMn)O2, and User-defined battery types.
- Automatic Voltage Recognition: Automatically detects 12V/24V battery systems.
- Advanced Charging Stages: Four stages of charging (bulk, absorption, float, equalization) to prolong battery lifespan.
- Dual USB Output: Two 5VDC/2.2A USB ports for direct charging of electronic devices.
- Comprehensive Protections: Built-in against reverse polarity, overcharging, over-discharging, overload, short-circuiting, and reverse current.
- Modular Design: Can be integrated with different display and interface modules for various functional requirements.
- Real-Time Data: Provides real-time energy statistics and operational data.
3. Setup and Installation
3.1 Safety Precautions
- Ensure all connections are secure and correct before powering on.
- Always connect the battery first, then the load, and finally the solar panel. Disconnect in reverse order.
- Install the controller in a well-ventilated area, away from flammable materials.
- Use appropriate wire gauges for all connections to prevent overheating.
- Avoid direct exposure to water or excessive humidity.
3.2 Package Contents
Upon unboxing, verify that all items are present:
- EPEVER MPPT Solar Charge Controller (Triron4215N)
- User Manual
- Temperature Sensor (RT-MF58R47K3.81A)
- Certificate
For a visual guide to unboxing, please refer to the video below:
Video 3.1: EPEVER MPPT solar charge controller Triron-N unboxing. This video demonstrates the contents of the product packaging.
3.3 Physical Overview
Familiarize yourself with the controller's components and terminals:
Figure 3.1: Front view of the controller showing LCD, buttons, USB ports, and RS485 port.

Figure 3.2: Rear view of the controller highlighting the heat sink for efficient heat dissipation.

Figure 3.3: The modular design allows for integration with different display and interface modules.
3.4 Wiring Diagram
Follow the wiring diagram carefully for proper system connection. Always connect the battery first, then the load, and finally the solar panel. Disconnect in reverse order.
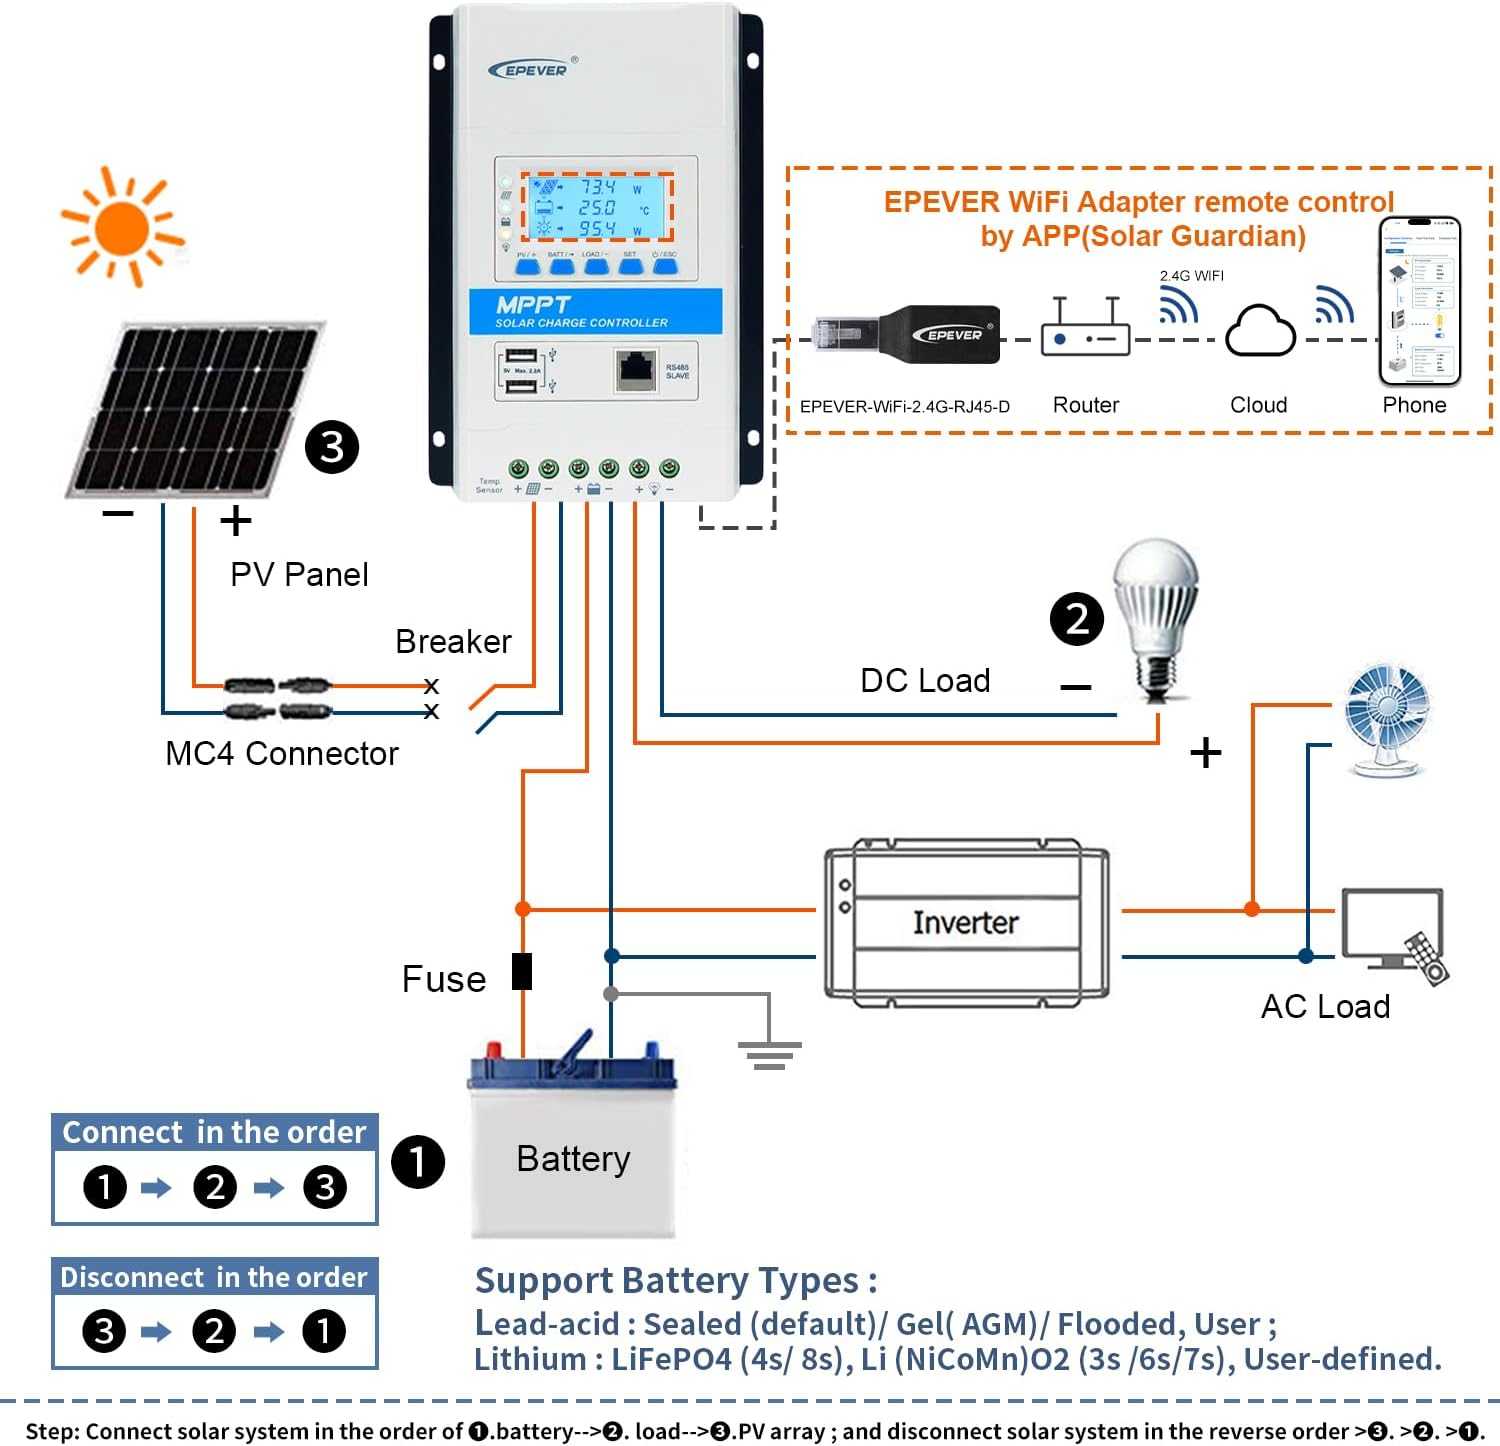
Figure 3.4: System wiring diagram showing connections for solar panel, battery, and DC load.
For a step-by-step wiring demonstration, watch the video below:
Video 3.2: EPEVER MPPT solar charger 40 Amp. This video provides a detailed guide on connecting the solar charge controller to your system.
3.5 Battery Type Configuration
The controller is compatible with multiple battery types. You can configure the battery type directly from the LCD display.

Figure 3.5: Various supported battery types including Sealed, Gel, Flooded, LiFePO4, and User-defined.

Figure 3.6: Steps to set the battery type using the controller's LCD and buttons.
For detailed battery type setting and other advanced configurations, refer to the video below:
Video 3.3: EPEVER MPPT solar charge controller Triron-N 2022 Upgraded. This video covers advanced features and battery type configuration.
4. Operating Instructions
4.1 LCD Display and Buttons
The controller features an intuitive LCD display and five buttons for easy operation and monitoring.

Figure 4.1: LCD display and button functions for navigation and settings.

Figure 4.2: Browse interface displaying PV, battery, and load parameters.
4.2 Load Control
The controller provides dual USB outputs for direct charging of small electronic devices.
- Dual 5VDC USB output interface (Max 2.2A)

Figure 4.3: Charging a smartphone using the controller's USB output.
4.3 Remote Monitoring and Control
The controller supports remote monitoring and control via optional accessories and dedicated software/apps.

Figure 4.4: PC software for real-time monitoring and data analysis.

Figure 4.5: Mobile application for remote monitoring and parameter adjustment.
Learn how to connect and use the controller with PC software:
Video 4.1: EPEVER MPPT charge controller connected via PC software. This video demonstrates the process of connecting the controller to a PC for monitoring and configuration.
Learn how to connect and use the controller with the WiFi adapter and mobile app:
Video 4.2: EPEVER WiFi Adapter for MPPT Solar Charge Controller. This video shows how to set up and use the WiFi adapter for app-based control.
5. Maintenance
Regular maintenance ensures the longevity and optimal performance of your EPEVER MPPT Solar Charge Controller.
- Cleaning: Periodically clean the controller's exterior, especially the heat sink, to ensure proper heat dissipation. Use a dry cloth.
- Connection Checks: Regularly inspect all wiring connections for tightness and corrosion. Loose connections can lead to power loss or overheating.
- Battery Inspection: Check battery terminals for corrosion and ensure they are clean. Monitor battery voltage and temperature regularly.
- Firmware Updates: Check the EPEVER official website for any available firmware updates to ensure your controller has the latest features and bug fixes.
6. Troubleshooting
This section provides solutions to common issues you might encounter with your solar charge controller.
- No Charging:
- Check solar panel connections and ensure sufficient sunlight.
- Verify battery connections and voltage.
- Ensure the controller is powered on and the PV indicator is active.
- Load Not Working:
- Check load connections and ensure the load is not overloaded.
- Verify the load status on the controller's display (ensure it's ON).
- Check for short circuits in the load circuit.
- Display Errors/No Display:
- Ensure the battery is connected and has sufficient voltage to power the display.
- If using external display modules, check their connections.
- Overheating:
- Ensure adequate ventilation around the controller.
- Verify that the load and solar panel input are within the controller's specified limits.
If issues persist, contact EPEVER customer support for assistance.
7. Specifications
Detailed technical specifications for the EPEVER MPPT Solar Charge Controller Triron4215N.
| Parameter | Value |
|---|---|
| Model | Triron4215N |
| Nominal System Voltage | 12V/24V Auto Work |
| Rated Charge Current | 40A |
| Rated Discharge Current | 40A |
| Battery Input Voltage Range | 8 - 32V |
| Max. PV Open Circuit Voltage | 150V |
| Max. PV Input Power (12V/24V) | 520W/1040W |
| Battery Type | Sealed, Gel (AGM), Flooded, LiFePO4, Li(NiCoMn)O2, User-defined |
| Dimensions | 7.2 x 10.08 x 2.6 inches (183 x 256.8 x 66.7 mm) |
| Item Weight | 4.99 pounds (2.27 kg) |
| Display Type | LCD or LED |
| Charging Port Type | USB |
8. Warranty and Support
EPEVER products are designed for reliability and performance. For warranty information, please refer to the documentation included with your product or visit the official EPEVER website.
For technical support or inquiries, please contact EPEVER customer service. Our US engineer team in Chicago is available to assist with off-grid solar system questions.

