
1. Introduction
Thank you for choosing the Maono AU-A03 Condenser Microphone Kit. This manual provides detailed instructions for setting up, operating, and maintaining your microphone kit to ensure optimal performance. The AU-A03 is designed for clear audio capture, ideal for podcasting, recording, and streaming.
2. What's in the Box
- Condenser Microphone
- Adjustable Scissor Arm Microphone Stand
- Metal Shock Mount
- Pop Filter
- Foam Microphone Windscreen
- Table Mounting Clamp
- XLR to 3.5mm Cable
- Y Adapter (for devices with a single audio jack)

An image showing all components included in the Maono AU-A03 microphone kit: condenser microphone, boom arm, shock mount, pop filter, foam windscreen, table mounting clamp, XLR to 3.5mm cable, and Y adapter.
3. Setup Instructions
3.1 Mount the Boom Arm
- Attach the table mounting clamp to the edge of your desk or table. Ensure it is securely tightened.
- Insert the adjustable scissor arm microphone stand into the hole on the table mounting clamp. Adjust the arm to your desired position.

The Maono AU-A03 microphone mounted on its adjustable boom arm, clamped to a desk.
3.2 Attach Microphone and Accessories
- Screw the metal shock mount onto the end of the boom arm.
- Gently place the condenser microphone into the shock mount. The shock mount helps reduce noise from vibrations.
- Attach the pop filter to the boom arm and position it in front of the microphone. The pop filter reduces plosive sounds.
- Place the foam windscreen over the microphone for additional wind and breath noise reduction.

A close-up view of the Maono AU-A03 condenser microphone attached to its shock mount and pop filter, ready for use.
3.3 Connect to Computer
- Connect the XLR end of the provided cable to the microphone.
- Connect the 3.5mm jack end of the cable to your computer's microphone input.
- For Laptops/PCs with a single audio jack: Use the included Y adapter. Plug the 3.5mm microphone cable into the microphone input of the Y adapter, then plug the Y adapter into your device's combined audio jack.
- For Laptops/PCs with two audio jacks: Plug the 3.5mm microphone cable directly into the dedicated microphone jack.
- The microphone is plug-and-play; no additional drivers are typically required for Windows and Mac operating systems.

An illustration showing the Maono AU-A03 microphone connected to a desktop computer via the 3.5mm audio jack, with the XLR to 3.5mm cable and Y adapter visible.
An overview video demonstrating the key features and components of the Maono AU-A03 Condenser Microphone Kit, including its cardioid pickup pattern, noise reduction accessories, and plug-and-play connectivity.
4. Operating Instructions
The Maono AU-A03 features a cardioid pickup pattern, which means it primarily captures sound from the front and minimizes background noise from the sides and rear. For best results, follow these guidelines:
- Orientation: Always face the side of the microphone with the MAONO logo towards the sound source (your mouth) for optimal sound capture and background noise reduction.
- Distance: Maintain an appropriate distance from the microphone, typically 6-12 inches (15-30 cm), to achieve a balanced sound without distortion or excessive plosives.
- Software Settings: After connecting, ensure your computer's audio input settings are configured to use the Maono AU-A03 microphone. Adjust input volume (gain) as needed within your operating system or recording software.

A diagram illustrating the correct orientation for speaking into the Maono AU-A03 microphone, with the Maono logo facing the sound source for optimal cardioid pickup.

A diagram illustrating the cardioid polar pattern of the Maono AU-A03 microphone, showing its ability to reduce background noise and capture sound from the front.
5. Maintenance
- Cleaning: Use a soft, dry cloth to clean the microphone body and stand. Do not use liquid cleaners or solvents.
- Pop Filter and Windscreen: The pop filter and foam windscreen can be gently cleaned with a damp cloth if necessary. Ensure they are completely dry before reattaching.
- Storage: When not in use, store the microphone kit in a clean, dry environment to protect it from dust and moisture.
- Handling: Avoid dropping or subjecting the microphone to strong impacts, as this can damage the internal components.
6. Troubleshooting
- No Sound/Low Volume:
- Ensure all cables are securely connected.
- Verify that the microphone is selected as the input device in your computer's sound settings.
- Check the input volume (gain) settings in your operating system or recording software.
- If using a laptop/PC with a single audio jack, confirm the Y adapter is correctly used.
- Some PC models may require an external phantom power supply (not included) for optimal recording effect, especially if the microphone's power supply is insufficient.
- Background Noise:
- Ensure the microphone's MAONO logo is facing directly towards the sound source.
- Utilize the pop filter and foam windscreen to reduce breath and wind noise.
- The shock mount helps isolate the microphone from vibrations that could cause unwanted noise.
- Minimize ambient noise in your recording environment.
- Distorted Sound:
- Reduce the input volume (gain) in your computer's sound settings or recording software.
- Increase the distance between yourself and the microphone.

An image showcasing the Maono AU-A03 microphone kit's noise reduction features, including the high-density wind muff, pop filter, shock mount, and XLR to 3.5mm plug for stable signal.
7. Specifications
| Model Number | AU-A03 |
| Microphone Form Factor | Condenser |
| Polar Pattern | Unidirectional (Cardioid) |
| Connectivity Technology | XLR |
| Connector Type | 3.5 mm Jack, XLR |
| Frequency Response | 16 KHz |
| Signal-to-Noise Ratio | 78 dB |
| Compatible Devices | Laptop, Personal Computer |
| Material | Metal |
| Color | Black |
| Item Weight | 1.2 Kilograms (1 kg 200 g) |
| Product Dimensions (L x W x H) | 15.2 x 7.6 x 4.5 Centimeters |
| UPC | 667016188728 |
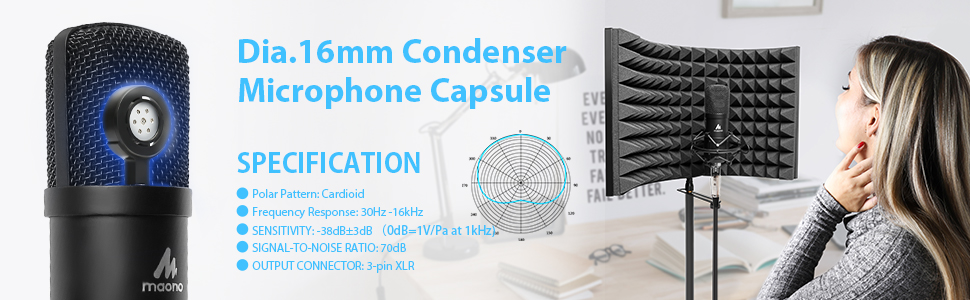
A diagram highlighting the 16mm condenser microphone capsule, indicating high sound quality and professional sound chip for low noise.
8. Warranty and Support
MAONO products are designed for reliability and performance. For any support needs, please refer to the following information:
- Warranty: This product typically comes with a 1-year warranty. Please refer to your purchase documentation for specific warranty terms.
- Returns: Defective products may be eligible for returns within a specified period.
- Customer Care Email: service@maono.com
- Official Website: www.maono.com
MAONO is committed to providing excellent customer service and support for its products.

An image detailing Maono's customer care information, including email (service@maono.com) and website (www.maono.com), along with warranty and return policy icons.