1. Introduction
Thank you for purchasing the ORIA WA54 Wireless Indoor/Outdoor Thermometer Hygrometer. This device provides accurate temperature and humidity readings for up to four locations simultaneously: one main unit (indoor) and three remote sensors (indoor or outdoor). Featuring a large LCD display with backlight, MIN/MAX record, and comfort level indicators, it helps you monitor environmental conditions effectively. Please read this manual carefully before use to ensure proper operation and longevity of your device.
2. Package Contents
- 1 x Main Display Unit
- 3 x Remote Sensors
- 1 x User Manual (this document)
Note: AAA batteries are not included and must be purchased separately.
3. Product Overview
3.1 Main Display Unit
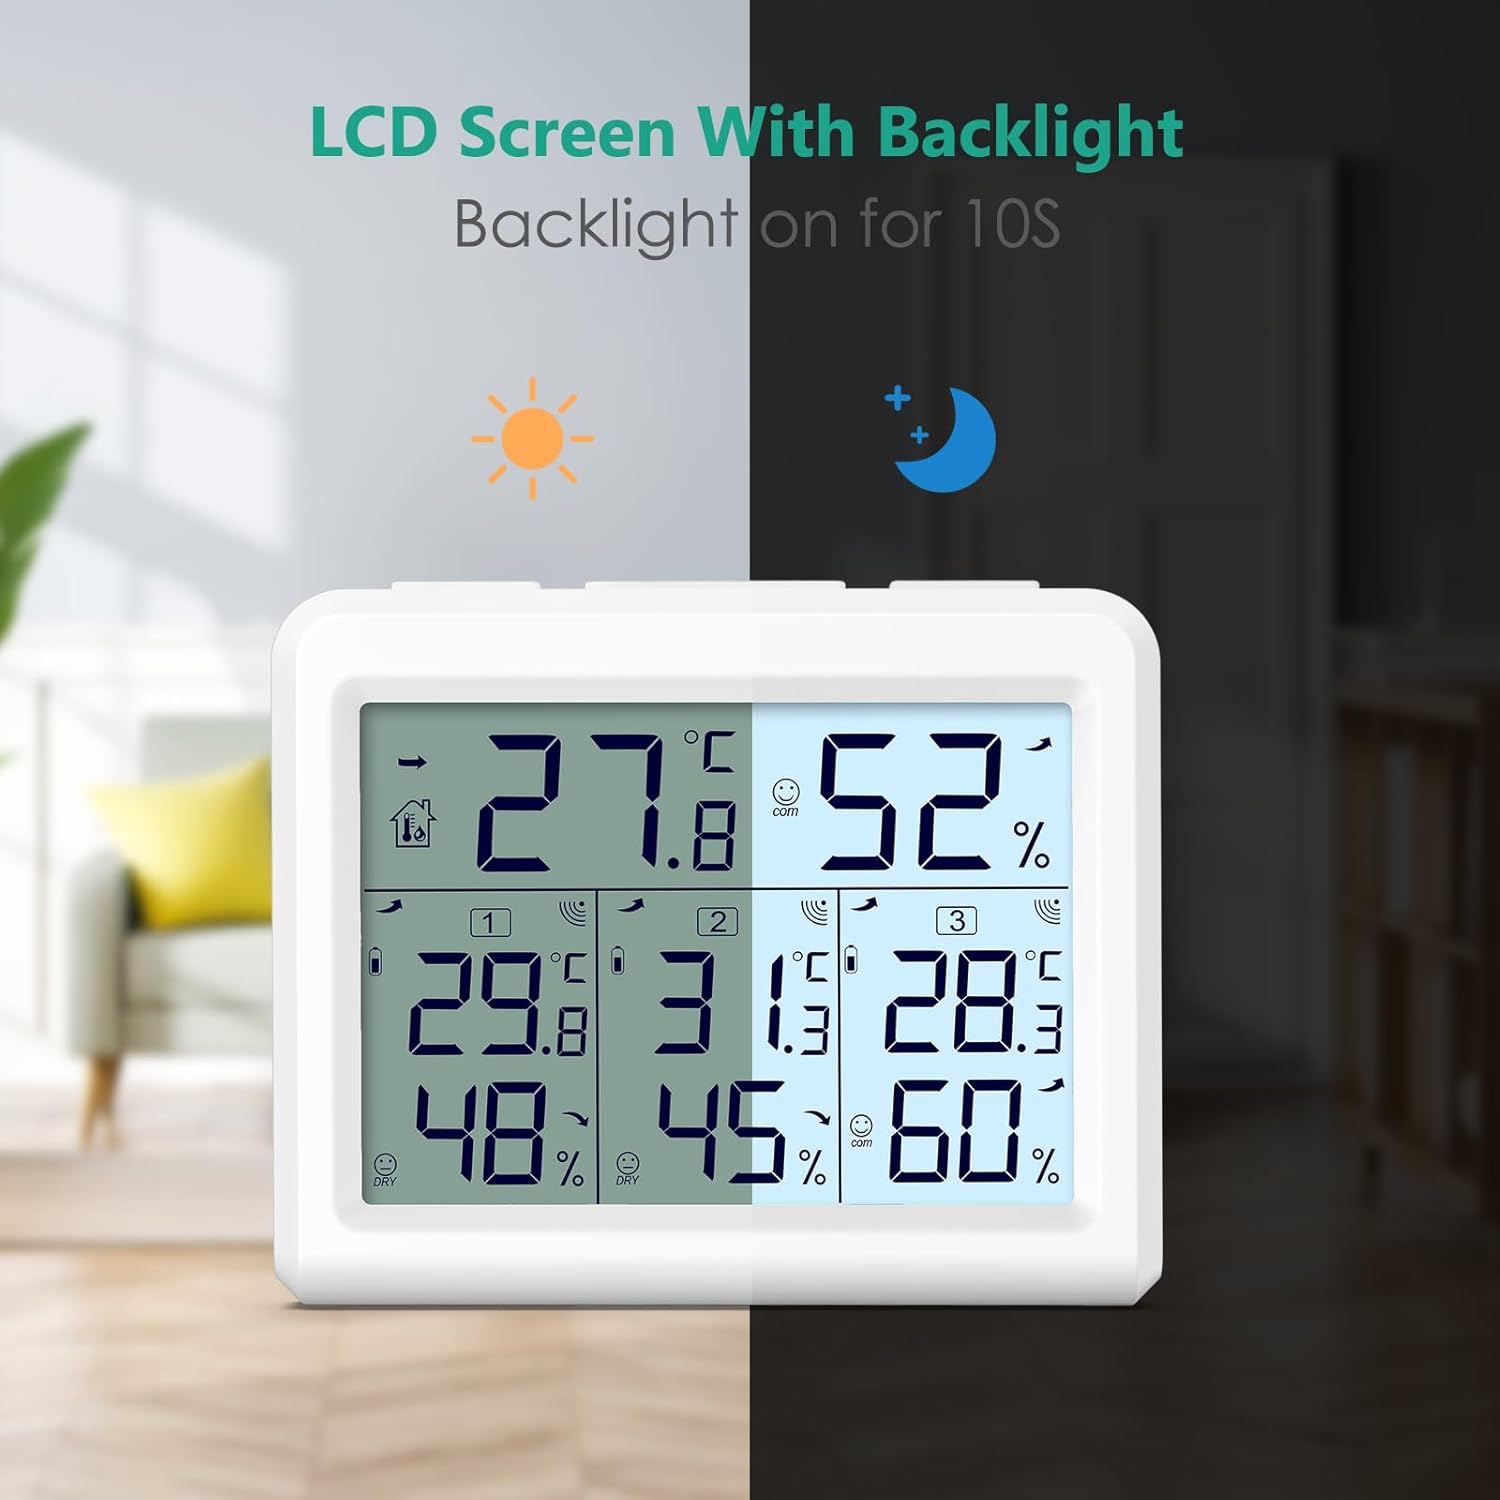
Image: The main display unit and three remote sensors, showcasing the complete product set.
- Large LCD Display: Shows indoor temperature/humidity and up to three outdoor sensor readings.
- LIGHT Button: Activates the backlight for 10 seconds.
- MIN/MAX Button: Cycles through maximum, minimum, and current temperature/humidity records.
- °C/°F Button: Switches between Celsius and Fahrenheit temperature units.
- CHANNEL Button: Manually switches between remote sensor channels or enables auto-cycle.
- Comfort Indicator: Displays DRY, COMFORT, or WET based on humidity levels.
- Trend Arrows: Indicates rising, stable, or falling temperature/humidity.
- Low Battery Indicator: Alerts when batteries need replacement.
- Integrated Stand and Hanging Hole: For versatile placement.

Image: A close-up of the main display unit's LCD, highlighting indoor temperature, indoor humidity, comfort indicator, trend arrow, and readings for Channel 1, Channel 2, and Channel 3.
3.2 Remote Sensors
- Temperature and Humidity Sensor: Collects environmental data.
- Channel Switch: Allows selection of channel 1, 2, or 3.
- LED Indicator: Flashes during data transmission.
- Hanging Hole: For wall mounting.

Image: The main display unit and a remote sensor, illustrating their approximate dimensions (Main unit: 3.74in/9.5cm width, 3in/7.6cm height).
4. Setup
4.1 Battery Installation
- Open the battery compartment on the back of each remote sensor and insert 2 x AAA batteries, observing polarity (+/-).
- Open the battery compartment on the back of the main display unit and insert 3 x AAA batteries, observing polarity (+/-).

Image: A diagram showing the battery compartments for the main unit (3x AAA) and a remote sensor (2x AAA), indicating that batteries are not included.
4.2 Pairing Remote Sensors
Once batteries are installed in both the main unit and remote sensors, the main unit will automatically begin searching for RF signals from the sensors. The RF reception icon on the main unit will flash. The sensors should connect within 3 minutes. If a sensor does not connect, press the 'CHANNEL' button on the main unit to manually search for the sensor.
Video: This video demonstrates the initial setup and pairing process of the ORIA WA54 thermometer hygrometer with its remote sensors. It shows how to install batteries and how the main unit receives signals from the sensors, including the use of the 'CHANNEL' button for pairing.
4.3 Sensor Placement
Place the remote sensors in desired locations. For accurate outdoor readings, ensure sensors are:
- Protected from direct sunlight and rain.
- Within the maximum transmission range of 100 meters (328 feet) in an open area. Walls and obstacles will reduce this range.
- Away from large metal objects or electrical appliances that may cause interference.

Image: The main display unit showing readings from three sensors, with illustrative examples of remote sensor placement on a wall, on a bedside table, and near a baby's crib, demonstrating multi-zone monitoring.

Image: An illustration of a house with three remote sensors placed at different outdoor locations, demonstrating the device's capability for multi-zone monitoring with a maximum transmission distance of 100m (328ft) in open areas.
5. Operating Instructions
5.1 Display Information
The main unit's LCD displays the following information:
- Indoor Temperature and Humidity: Shown at the top of the display.
- Remote Sensor Readings: Channels 1, 2, and 3 display temperature and humidity from their respective sensors.
- Comfort Level: An icon (DRY, COMFORT, WET) indicates the current humidity comfort level.
- Temperature/Humidity Trend: Arrows indicate if readings are rising, stable, or falling.
- Low Battery Indicator: Appears when batteries in the main unit or a specific sensor are low.
5.2 MIN/MAX Record
Press the MIN/MAX button to view recorded maximum and minimum temperature and humidity values:
- Press once: Displays maximum recorded values (MAX).
- Press twice: Displays minimum recorded values (MIN).
- Press three times: Returns to current temperature and humidity values.
To clear the MIN/MAX records, press and hold the MIN/MAX button for 3 seconds while in MAX or MIN display mode. The records will reset to current values.
5.3 °C/°F Switch
Press the °C/°F button on the back of the main unit to switch the temperature display between Celsius (°C) and Fahrenheit (°F).
5.4 Backlight Function
Press the LIGHT button on the top of the main unit to activate the backlight. The backlight will stay on for approximately 10 seconds and then automatically turn off to conserve battery power.

Image: The main display unit shown in both unlit and backlit states, demonstrating the effect of pressing the 'LIGHT' button to illuminate the screen for 10 seconds.
6. Maintenance
- Clean the device with a soft, damp cloth. Do not use abrasive cleaners or solvents.
- Avoid exposing the main unit or remote sensors to extreme temperatures, direct sunlight, or excessive moisture.
- Replace batteries promptly when the low battery indicator appears to ensure continuous and accurate readings.
- If the device will not be used for an extended period, remove the batteries to prevent leakage.
7. Troubleshooting
| Problem | Possible Cause | Solution |
|---|---|---|
| No remote sensor signal (dashes on display) | 1. Batteries are low or incorrectly installed. 2. Sensor is out of range or experiencing interference. 3. Sensor channel not correctly set. | 1. Replace batteries in the sensor and/or main unit. Ensure correct polarity. 2. Move sensor closer to the main unit. Avoid large metal objects or electronics. Try different locations. 3. Press the 'CHANNEL' button on the main unit to manually search for the sensor. Ensure the sensor's channel switch matches the selected channel on the main unit. |
| Inaccurate temperature/humidity readings | 1. Sensor exposed to direct sunlight or rain. 2. Sensor placed near heat sources or vents. | 1. Relocate the sensor to a shaded, dry area. Ensure proper ventilation around the sensor. 2. Move the sensor away from any heat or cold sources. |
| Display is dim or blank | Low batteries in the main unit. | Replace the 3 x AAA batteries in the main unit. |
8. Specifications
- Brand: ORIA
- Model: WA54
- Indoor Temperature Range: 14.2°F to 122°F (-10°C to 50°C)
- Outdoor Temperature Range: -40°F to 158°F (-40°C to 70°C)
- Temperature Accuracy: ±1.8°F (±1°C)
- Humidity Accuracy: ±5%RH
- Refresh Rate: Every 30 seconds
- Wireless Frequency: 433 MHz
- Transmission Distance: Up to 100 meters (328 feet) in open areas
- Power Source (Main Unit): 3 x AAA batteries (not included)
- Power Source (Remote Sensors): 2 x AAA batteries per sensor (not included)
- Display Type: LCD
- Material: Plastic
- Item Weight: 228 Grams
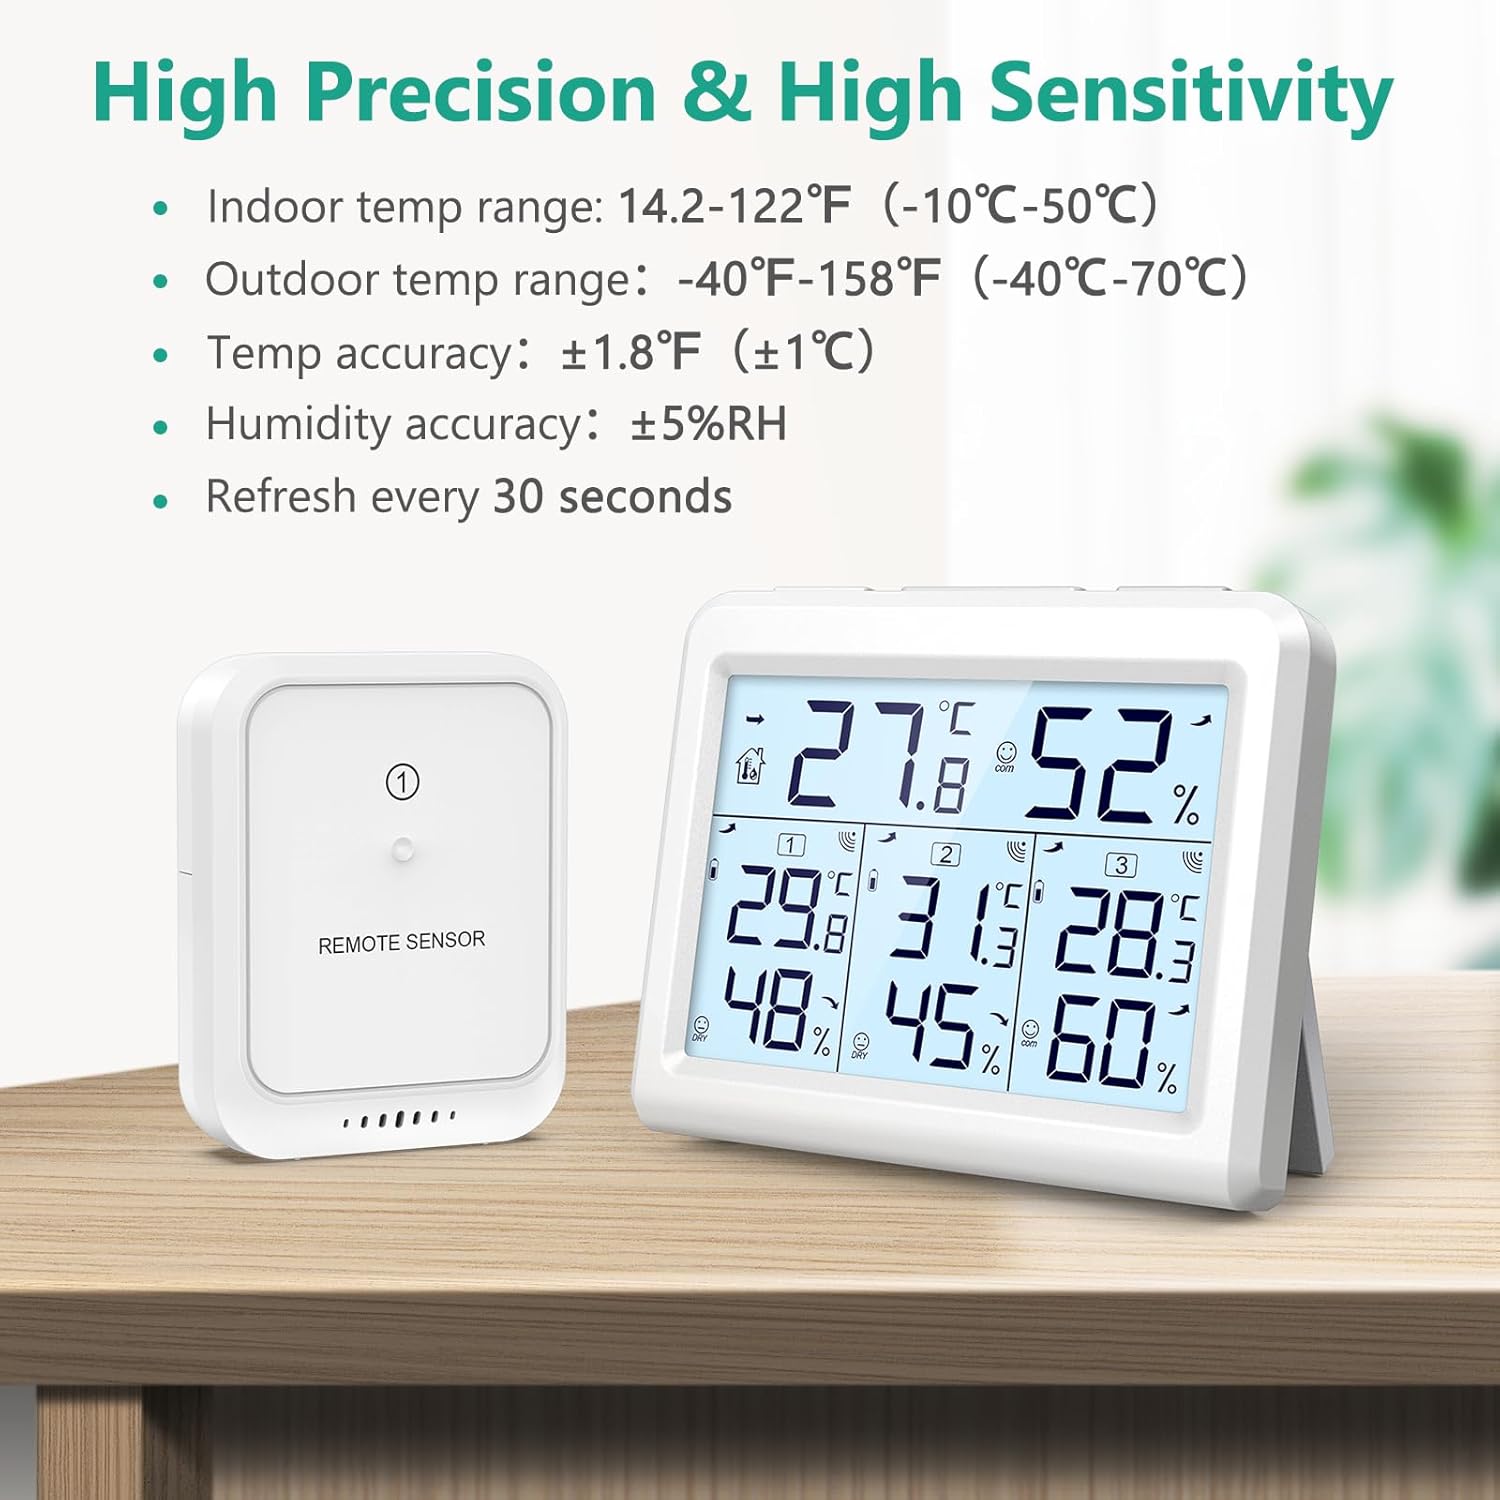
Image: The main display unit and a remote sensor, detailing the high precision and sensitivity specifications including indoor and outdoor temperature ranges, temperature accuracy, humidity accuracy, and refresh rate.
9. Warranty and Support
ORIA is committed to providing high-quality products and excellent customer service. This product comes with:
- 2-Year Warranty: Covers manufacturing defects and malfunctions under normal use.
- 90-Day Free Replacements: For any issues within the first 90 days of purchase.
- 30-Day Free Returns: If you are not satisfied with your purchase.
- 24/7 Customer Support: Assistance available around the clock.
- Lifetime Technical Assistance: For any technical queries or support needed throughout the product's lifespan.
For further assistance or inquiries, please contact ORIA customer support through your purchase platform or visit the official ORIA website.

Image: Icons representing ORIA's customer service commitments, including 2-year warranty, 90-day free replacements, 30-day free returns, 24/7 customer support, and lifetime technical assistance.


