
Innovair WIN12H1V51
Innovair 12000 BTUH 115V Mini Split System User Manual
This manual provides comprehensive instructions for the installation, operation, maintenance, and troubleshooting of your Innovair Air Conditioner Inverter Ductless Wall Mount Mini Split System Heat Pump. Please read thoroughly before use.
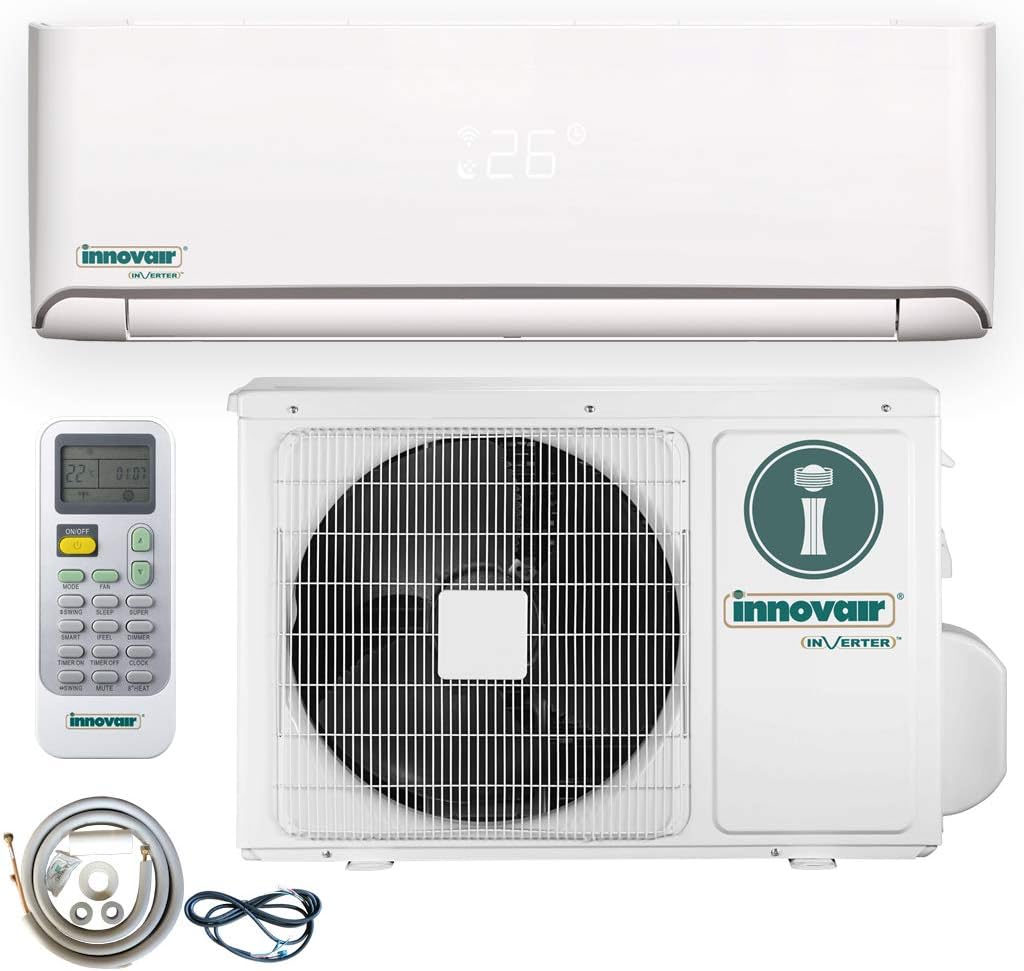
Figure 1: Complete Innovair Mini Split System components.
1. Safety Information
Always adhere to local and national electrical codes. Installation should be performed by a qualified HVAC technician. Failure to do so may result in electric shock, fire, or serious injury.
- Ensure the power supply matches the unit's specifications (115V).
- Do not attempt to repair or modify the unit yourself. Contact qualified service personnel.
- Keep children and pets away from the outdoor unit during operation.
- Disconnect power before performing any maintenance or cleaning.
2. Components Checklist
Before beginning installation, verify that all components are present and undamaged:
- Indoor Unit (Evaporator)
- Outdoor Unit (Condenser)
- Remote Control
- 16FT Installation Kit (Copper Line Set, Drain Hose, Electrical Wire)
- User Manual (this document)
- Mounting Plate for Indoor Unit
- Remote Control Holder
3. Setup and Installation
Professional installation is highly recommended for optimal performance and safety. The unit is pre-charged with refrigerant up to 25 feet of line set.
- Site Selection: Choose a location for both indoor and outdoor units that allows for proper airflow, drainage, and minimal noise. Ensure the wall can support the indoor unit's weight.
- Mounting Indoor Unit: Secure the mounting plate to the wall, ensuring it is level. Drill a hole for the refrigerant lines and drain hose.
- Connecting Refrigerant Lines: Carefully connect the pre-flared copper lines between the indoor and outdoor units. Avoid kinking the lines.
- Electrical Connections: Connect the power supply and communication wires according to the wiring diagram provided in the full installation guide. Ensure proper grounding.
- Vacuuming the System: A vacuum pump must be used to evacuate air and moisture from the refrigerant lines. This is a critical step for system longevity and efficiency.
- Opening Valves: Once vacuuming is complete, open the service valves on the outdoor unit to release the refrigerant into the system.
- Drainage: Ensure the drain hose is properly installed with a downward slope to allow for condensation drainage.

Figure 2: Examples of suitable installation environments for the ductless mini split system.
4. Operating Instructions
Your Innovair Mini Split System offers multiple operating modes for year-round comfort. All functions are controlled via the wireless remote.

Figure 3: Advanced Remote Control functions.
Operating Modes:
- Cool Mode: Provides cooling by removing heat from the room. Adjust temperature using the Up/Down arrows.
- Heat Mode: Provides heating by transferring heat into the room (Heat Pump function).
- Dehumidifier Mode: Reduces humidity in the air without significant temperature change.
- Fan Mode: Circulates air without heating or cooling. Fan speed can be adjusted.
- Sleep Mode: Adjusts temperature gradually for comfortable sleep and energy savings.
- Turbo Cool: Provides rapid cooling for quick temperature reduction.
- Hyper Heat: Enhanced heating performance in colder climates.

Figure 4: Perfect solution for all seasons, demonstrating heating and cooling capabilities.

Figure 5: Anti-Freeze Protection and Low Temperature Operation feature.

Figure 6: High Efficiency Solution, illustrating energy savings.
5. Maintenance
Regular maintenance ensures optimal performance and extends the lifespan of your unit. Always disconnect power before servicing.
Air Filter Cleaning:
The indoor unit is equipped with a multi-layer filter system (Catechin, HEPA, Vitamin C, Silver Ion filters) for improved air quality. Clean filters every two weeks or more frequently depending on usage and air quality.
- Open the front panel of the indoor unit.
- Remove the air filters.
- Clean the filters using a vacuum cleaner or wash them with lukewarm water and mild detergent.
- Allow filters to dry completely in a shaded area before re-installing.

Figure 7: 4-in-1 Air Filter system for enhanced air purification.
Outdoor Unit Maintenance:
- Keep the area around the outdoor unit clear of debris, leaves, and snow to ensure proper airflow.
- Periodically clean the outdoor coil with a soft brush or water hose. Avoid bending the fins.
- Check the drain pan and drain line for blockages.
6. Troubleshooting
Before contacting service, check the following common issues:
| Problem | Possible Cause | Solution |
|---|---|---|
| Unit does not turn on. | No power, remote batteries low, circuit breaker tripped. | Check power supply, replace remote batteries, reset breaker. |
| Insufficient cooling/heating. | Dirty air filters, blocked outdoor unit, incorrect mode, low refrigerant. | Clean filters, clear obstructions, select correct mode, contact technician for refrigerant check. |
| Unusual noise. | Loose parts, fan obstruction, normal operating sounds (e.g., refrigerant flow). | Inspect for loose parts/obstructions. If persistent or loud, contact service. |
| Water leakage from indoor unit. | Clogged drain hose, improper installation angle. | Clear drain hose, ensure proper slope. Contact installer if issue persists. |
7. Specifications
| Feature | Detail |
|---|---|
| Brand | Innovair |
| Model Number | WIN12H1V51 |
| Item Weight | 24 pounds |
| Product Dimensions | 32 x 11 x 8.5 inches (Indoor Unit) |
| Efficiency (SEER) | 18.00 |
| Capacity | 1 Tons (12000 British Thermal Units) |
| Installation Type | Split System |
| Form Factor | Wall-Mounted Ductless Mini Split |
| Special Features | Anti Bacterial Filter, Gold-Fin Outdoor, Multi-Layer Filter, Wifi Capable |
| Color | White |
| Voltage | 115 Volts |
| Refrigerant | R 410A |
8. Warranty and Support
For warranty information, technical support, or service requests, please refer to the warranty card included with your product or visit the official Innovair website. Ensure you have your model number (WIN12H1V51) and purchase date available when contacting support.
Note: Improper installation or unauthorized repairs may void your warranty.
Related documentsWIN12H1V51


Ask a question about this manual
Ask about setup, troubleshooting, compatibility, parts, safety, or missing instructions. Manuals+ will review the question and use this page’s manual context to help answer it.