1. Introduction
This manual provides detailed instructions for the installation, operation, and maintenance of your GIGABYTE Z390 AORUS PRO motherboard. Designed for 9th and 8th generation Intel Core processors, this ATX motherboard features advanced power delivery, robust thermal solutions, and extensive connectivity options to enhance your computing experience.
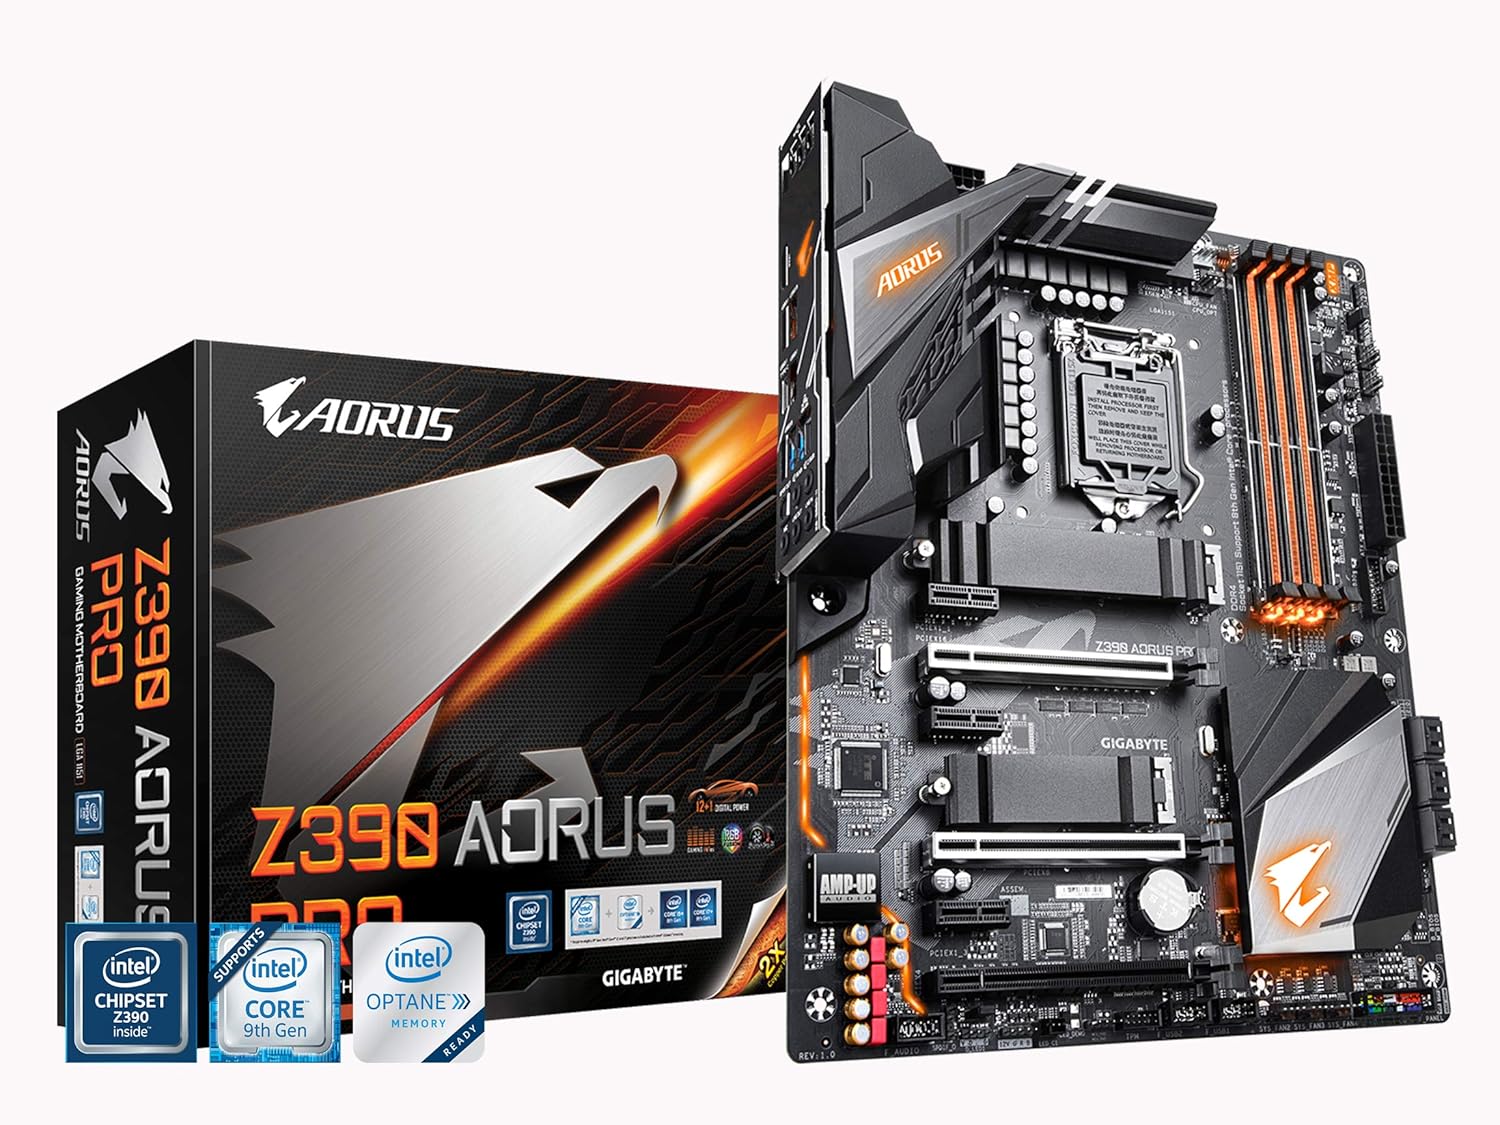
Figure 1: GIGABYTE Z390 AORUS PRO Motherboard and Retail Box. This image displays the motherboard alongside its packaging, highlighting the AORUS branding and key features.
2. Setup and Installation
Before beginning installation, ensure your system is powered off and disconnected from the power source. Handle the motherboard by its edges to avoid static discharge.
2.1 Motherboard Overview

Figure 2: Top-down view of the GIGABYTE Z390 AORUS PRO Motherboard. This image provides a clear layout of the motherboard components, including the CPU socket, DIMM slots, and PCIe slots.
2.2 CPU Installation
- Locate the LGA1151 CPU socket on the motherboard.
- Open the CPU socket lever and lift the load plate.
- Carefully align your Intel 8th or 9th Gen Core processor with the socket, ensuring the gold triangle on the CPU matches the triangle on the socket.
- Gently place the CPU into the socket. Do not force it.
- Close the load plate and secure it with the lever.
2.3 Memory (RAM) Installation
The Z390 AORUS PRO supports Dual Channel Non-ECC Unbuffered DDR4 memory across 4 DIMM slots.
- Open the clips at both ends of the DIMM slot.
- Align the memory module with the slot, ensuring the notch on the module matches the key on the slot.
- Press down firmly on both ends of the memory module until the clips snap into place.
- For dual-channel configuration, refer to your motherboard's specific manual for recommended slot pairing.
2.4 Storage Device Installation (M.2 SSDs)
This motherboard features dual Ultra-Fast NVMe PCIe Gen3 x4 M.2 slots with dual thermal guards.
- Locate the M.2 slots on the motherboard.
- Remove the M.2 thermal guard and the screw/standoff from the desired M.2 slot.
- Insert the M.2 SSD into the slot at a 30-degree angle.
- Push the SSD down and secure it with the screw/standoff.
- Reattach the M.2 thermal guard for optimal cooling.

Figure 3: Angled view of the GIGABYTE Z390 AORUS PRO Motherboard. This perspective highlights the M.2 slots and their thermal guards, as well as the VRM heatsinks.
2.5 Connecting Peripherals and Power
- Connect the 24-pin ATX power connector and the 8-pin CPU power connector from your power supply to the motherboard.
- Install your graphics card(s) into the PCIe x16 slots.
- Connect SATA drives to the SATA ports.
- Connect front panel headers (USB, audio, power/reset buttons, LED indicators) according to the motherboard manual.
- Connect case fans to the Smart Fan 5 headers.

Figure 4: Detailed angled view of the GIGABYTE Z390 AORUS PRO Motherboard. This image provides a closer look at various connectors and headers on the board.
2.6 Rear I/O Panel
The integrated I/O shield simplifies installation and provides a range of connectivity options.

Figure 5: Rear I/O Panel of the GIGABYTE Z390 AORUS PRO Motherboard. This view shows the various ports available for external devices, including USB 3.1 Gen 2 Type-A and Type-C, HDMI, and audio jacks.
3. Operating Instructions
3.1 BIOS/UEFI Setup
To enter the BIOS/UEFI setup, press the DEL key during system startup. The BIOS allows configuration of system settings, boot order, and advanced features.
3.2 RGB FUSION
The motherboard features RGB FUSION with Multi-Zone LED Light Show Design, supporting addressable LED and RGB LED strips. Use the GIGABYTE RGB FUSION software (available on the GIGABYTE website) to customize lighting effects and synchronization.
3.3 Smart Fan 5
Smart Fan 5 features multiple temperature sensors and hybrid fan headers with FAN STOP functionality. This allows for precise control over system cooling, optimizing fan speeds based on temperature readings to maintain quiet operation or maximum cooling performance. Configure these settings within the BIOS or through the GIGABYTE SIV (System Information Viewer) software.
3.4 Audio Configuration
The ALC1220-VB audio codec enhances 114dB (Rear) / 110dB (Front) SNR in the microphone with WIMA audio capacitors. For optimal audio performance, install the latest audio drivers from the GIGABYTE website. Adjust audio settings through the Realtek Audio Console or Windows Sound settings.
4. Maintenance
4.1 BIOS Updates
Regularly check the GIGABYTE website for the latest BIOS updates. BIOS updates can improve system stability, add support for new hardware, and fix bugs. Follow the instructions provided by GIGABYTE carefully when updating the BIOS to avoid system damage.
4.2 Driver Updates
Ensure all drivers (chipset, audio, LAN, graphics, etc.) are up-to-date for optimal performance and compatibility. Download the latest drivers from the GIGABYTE official website or the respective component manufacturer's website.
4.3 Cleaning
Periodically clean your computer's interior to prevent dust buildup, which can lead to overheating. Use compressed air to remove dust from fans, heatsinks, and other components. Ensure the system is powered off and unplugged before cleaning.
5. Troubleshooting
This section addresses common issues you might encounter with your GIGABYTE Z390 AORUS PRO motherboard.
5.1 System Does Not Power On or Boot
- Verify all power cables (24-pin ATX, 8-pin CPU, PCIe for GPU) are securely connected.
- Ensure the power supply switch is in the ON position.
- Check front panel connections (power button, reset button) for correct polarity and secure fit.
- Reseat RAM modules and the CPU.
- If the motherboard has diagnostic LEDs, check their status for error codes related to CPU, RAM, or GPU.
5.2 No Display Output
- Ensure your monitor is connected to the graphics card (or motherboard if using integrated graphics) and powered on.
- Reseat the graphics card in its PCIe slot.
- Try a different display cable or monitor.
- If using multiple RAM sticks, try booting with only one stick installed.
5.3 Audio Issues (e.g., Whining from Headsets)
- Ensure the correct audio drivers are installed.
- If experiencing noise or interference, especially with rear audio ports, try connecting your headset to the front audio ports of your case. This can sometimes mitigate electrical interference.
- Verify audio output settings in your operating system.
6. Specifications
| Feature | Detail |
|---|---|
| Brand | GIGABYTE |
| Model Name | Z390 AORUS PRO |
| CPU Socket | LGA 1151 |
| Compatible Processors | 8th and 9th Generation Intel Core Processors |
| Chipset Type | Intel Z390 |
| RAM Memory Technology | DDR4 (Dual Channel Non-ECC Unbuffered) |
| Number of DIMM Slots | 4 |
| Memory Speed | Up to 2133 MHz (and higher via OC) |
| M.2 Slots | Dual Ultra-Fast NVMe PCIe Gen3 x4 with Thermal Guard |
| Audio Codec | Realtek ALC1220-VB (114dB SNR Rear, 110dB SNR Front) |
| LAN | Intel Gigabit LAN with cFosSpeed |
| USB Ports | Front USB 3.1 Gen 1 Type-C Header, USB 3.1 Gen 2, USB 3.0, USB 2.0 |
| Wireless Type | 802.11a/b/g/n/ac (if applicable, check specific SKU) |
| Form Factor | ATX (305x244mm) |
| Dimensions (LxWxH) | 13.18 x 10.62 x 3.14 inches |
| Weight | 3 pounds |
7. Warranty and Support
For warranty information, please refer to the warranty card included with your product or visit the official GIGABYTE website. GIGABYTE provides technical support and resources to assist with product inquiries and issues.
- Official Website: Visit the GIGABYTE official website for drivers, BIOS updates, and support documentation.
- Technical Support: Contact GIGABYTE technical support for assistance with product-related issues.
- Product Registration: Register your product on the GIGABYTE website to receive updates and support.


