
MSI MPG Z390 GAMING PRO CARBON
MSI MPG Z390 Gaming PRO Carbon Motherboard User Manual
Model: MPG Z390 GAMING PRO CARBON
1. Introduction
This manual provides detailed instructions for the installation, operation, and maintenance of your MSI MPG Z390 Gaming PRO Carbon motherboard. Designed for high-performance computing, this ATX form factor motherboard supports Intel 8th and 9th Generation processors and offers advanced features for an optimized user experience.
2. Package Contents
Verify that all items listed below are present in your motherboard package. If any item is missing or damaged, please contact your retailer.
- MSI MPG Z390 Gaming PRO Carbon Motherboard
- Cables and Connectors
- Quick Setup Guide

Figure 2.1: Contents of the MSI MPG Z390 Gaming PRO Carbon motherboard package, including the motherboard, various cables, and documentation.
3. Motherboard Layout
Familiarize yourself with the various components and connectors on your motherboard to ensure correct installation and configuration.

Figure 3.1: Main view of the MSI MPG Z390 Gaming PRO Carbon motherboard, highlighting the CPU socket, RAM slots, PCIe slots, and M.2 slots.
3.1 Rear I/O Panel
The rear I/O panel provides external connectivity for your peripherals.
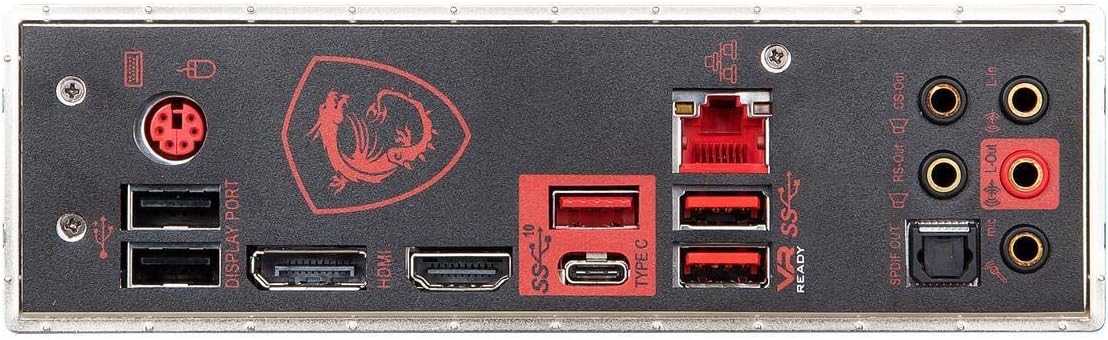
Figure 3.2: Detailed view of the rear I/O panel, showing various USB ports (including Turbo USB 3.1 Gen2), HDMI, DisplayPort, Ethernet, and audio jacks.
4. Setup
Follow these steps for proper installation of your motherboard components.
4.1 CPU Installation
- Locate the LGA 1151 socket on the motherboard.
- Open the CPU socket lever.
- Carefully align your Intel 8th or 9th Generation Core, Pentium Gold, or Celeron processor with the socket, ensuring the gold triangle on the CPU matches the indicator on the socket.
- Gently place the CPU into the socket without forcing it.
- Close the CPU socket lever to secure the processor.
4.2 Memory (RAM) Installation
- Identify the DDR4 DIMM slots on the motherboard.
- Open the clips at both ends of the DIMM slot.
- Align your DDR4 memory module with the slot, ensuring the notch on the module matches the key in the slot.
- Press down firmly on both ends of the memory module until the clips snap into place. This motherboard supports dual-channel DDR4 memory up to 4400(OC) MHz.
4.3 Storage Device Installation
- For M.2 SSDs, locate the Turbo M.2 slots. This motherboard features two Turbo M.2 slots and is Intel Optane Memory Ready.
- Remove the M.2 Shield Frozr heatsink if present.
- Insert the M.2 SSD into the slot at an angle.
- Gently push down the M.2 SSD and secure it with the provided screw or retention mechanism.
- Reattach the M.2 Shield Frozr for optimal cooling.
- For SATA drives, connect the SATA data and power cables to the respective ports on the motherboard and the drive.
4.4 Graphics Card Installation
- Locate the PCIe x16 slots for your graphics card(s). This motherboard supports Multi-GPU configurations (SLI/CFX).
- Open the retention clip at the end of the PCIe slot.
- Align your graphics card with the slot and press down firmly until it is seated and the retention clip locks.
- Secure the graphics card to your PC case with screws.
- Connect any necessary PCIe power cables from your power supply to the graphics card.
4.5 Power Connections
- Connect the 24-pin ATX main power connector from your power supply to the corresponding port on the motherboard.
- Connect the 8-pin (or 4+4-pin) CPU power connector(s) to the motherboard.
5. Operating
This section covers basic operational aspects of your MSI MPG Z390 Gaming PRO Carbon motherboard.
5.1 System Power On/Off
To power on your system, press the power button on your PC case. To shut down, use the operating system's shutdown function. For a hard shutdown, press and hold the power button for several seconds.
5.2 BIOS/UEFI Configuration
The BIOS (Basic Input/Output System) or UEFI (Unified Extensible Firmware Interface) allows you to configure fundamental system settings. To access the BIOS, press the Del key during system startup. Refer to the detailed user manual for specific BIOS settings and options.
5.3 Mystic Light Control
The MSI Mystic Light feature allows for customization of the motherboard's RGB lighting. With 16.8 million colors and 29 effects, you can personalize your system's aesthetics. Connect compatible RGB or rainbow LED strips to the addressable headers on the motherboard and use the Mystic Light Sync software to control all enabled products.
6. Maintenance
Proper maintenance ensures the longevity and optimal performance of your motherboard.
6.1 Cooling and Airflow
Ensure adequate airflow within your PC case to prevent overheating. Regularly clean dust from fans, heatsinks (including the M.2 Shield Frozr), and case vents using compressed air. Overheating can lead to system instability and reduced component lifespan.
6.2 Software and Driver Updates
Keep your motherboard's BIOS/UEFI firmware and device drivers updated. Visit the official MSI website for the latest versions. Updates can improve system stability, performance, and introduce new features.
7. Troubleshooting
This section provides general guidance for common issues. For complex problems, refer to the comprehensive user manual or contact MSI support.
- System Fails to Boot: Check all power connections (24-pin ATX, 8-pin CPU, PCIe power for GPU). Ensure CPU, RAM, and graphics card are correctly seated.
- No Display Output: Verify that your monitor is connected to the graphics card (or motherboard if using integrated graphics) and is powered on. Reseat the graphics card and RAM modules.
- System Instability/Crashes: Ensure all drivers are up-to-date. Check component temperatures. Test memory modules individually.
- Peripheral Not Detected: Try connecting the peripheral to a different USB port. Ensure necessary drivers are installed.
8. Specifications
Below are the key technical specifications for the MSI MPG Z390 Gaming PRO Carbon Motherboard:
| Feature | Specification |
|---|---|
| Brand | MSI |
| Model Name | MPG Z390 GAMING PRO CARBON |
| CPU Socket | LGA 1151 |
| Compatible Processors | 8th/9th Generation Intel Core, Pentium Gold, Celeron Processors |
| Chipset Type | Intel Z390 |
| RAM Memory Technology | DDR4 |
| Memory Speed | Up to 4400(OC) MHz |
| M.2 Slots | 2x Turbo M.2 (Intel Optane Memory Ready, M.2 Shield Frozr) |
| USB Ports | Turbo USB 3.1 Gen2, USB 2.0 |
| Video Output | HDMI, DisplayPort |
| Audio | Audio Boost 4 with Nahimic 3 |
| Multi-GPU Support | SLI, CFX |
| Form Factor | ATX |
| Operating System Support | Windows 10 64-bit |
| Dimensions (LxWxH) | 12 x 9.6 x 1.2 inches |
| Item Weight | 3.3 pounds |
9. Warranty and Support
For warranty information, please refer to the warranty card included with your product or visit the official MSI website. For technical assistance, driver downloads, or further support, please visit the MSI support page or contact their customer service department.
Related documentsMPG Z390 GAMING PRO CARBON


Ask a question about this manual
Ask about setup, troubleshooting, compatibility, parts, safety, or missing instructions. Manuals+ will review the question and use this page’s manual context to help answer it.