
1. Introduction
This manual provides detailed instructions for the installation, operation, and maintenance of your upHere 5V 3-Pack 120mm ARGB PWM Case Fans. These fans are designed to provide efficient cooling and customizable lighting for your computer system. Please read this manual thoroughly before installation and use to ensure proper functionality and safety.

Image 1.1: A single upHere 120mm ARGB PWM case fan, showcasing its vibrant addressable RGB lighting.
2. Package Contents
Verify that all items listed below are present in your package:
- 3 x upHere 120mm ARGB PWM Case Fans
- 1 x ARGB & PWM Control Hub
- 12 x Mounting Screws
- 3 x Cable Ties

Image 2.1: Contents of the upHere 3-pack fan kit, showing the fans, mounting screws, and cable ties.
3. Product Features
- 5V ARGB SYNC: Advanced ARGB lighting system supports 5V 3-pin ARGB motherboard synchronization, allowing for multiple RGB modes and customizable colorful effects.
- Optimized Cooling Performance: Designed with balanced airflow and air pressure for compatibility with various PC cases and coolers.
- Unique Blade Design: The fan blades are configured to generate powerful air pressure, while scientific air channel design in the frame reduces noise from airflow turbulence.
- PWM Control: The Pulse Width Modulation (PWM) function enables the motherboard to precisely control fan speed, ensuring necessary cooling while minimizing noise levels.


4. Setup and Installation
Before beginning installation, ensure your computer is powered off and unplugged from the wall outlet. Take appropriate anti-static precautions.
4.1 Component Identification: Control Hub
Familiarize yourself with the control hub's ports:
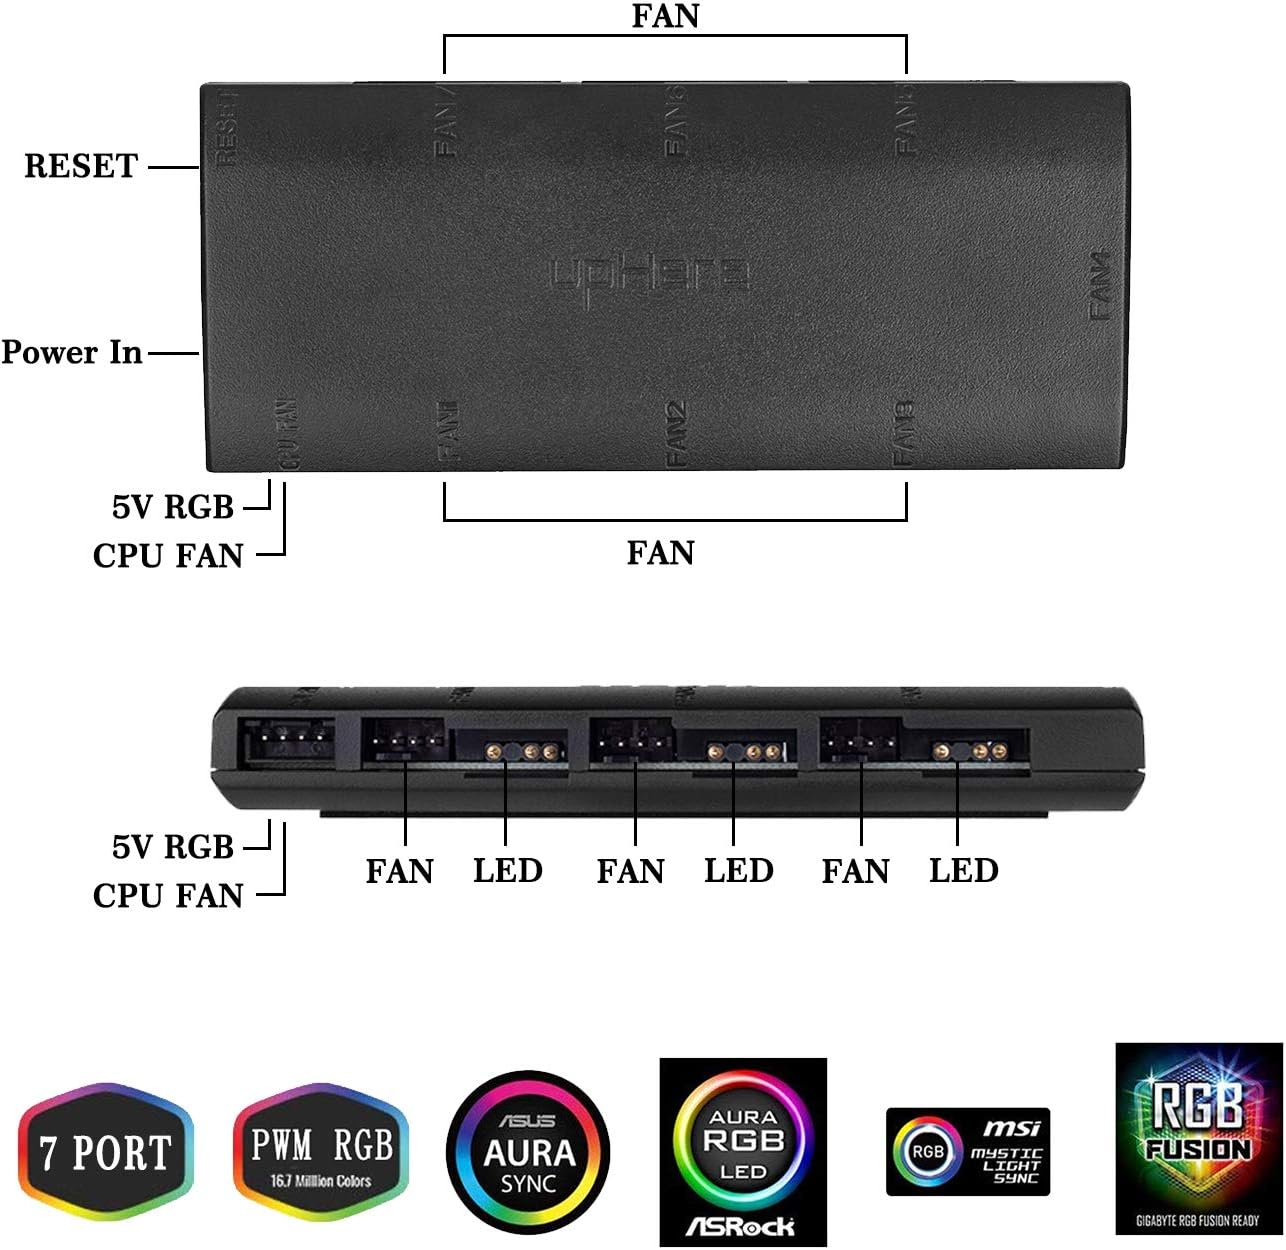
Image 4.1: Diagram of the upHere control hub, showing connections for fans, 5V RGB, CPU Fan, Reset switch, and Power In.
4.2 Installation Steps
- Mount the Fans: Securely attach the 120mm fans to your PC case or radiator using the provided mounting screws. Ensure the fan's airflow direction is appropriate for your cooling setup (typically intake or exhaust).
- Connect Fans to Control Hub: Connect each fan's 4-pin PWM cable and 3-pin ARGB cable to the corresponding ports on the control hub. The hub has dedicated ports for FAN and LED connections.
- Connect Control Hub to Power Supply: Connect the SATA power connector from the control hub to an available SATA power cable from your power supply unit (PSU).
- Connect Control Hub to Motherboard (Optional for ARGB Sync):
- Connect the 5V 3-pin ARGB cable from the control hub to a compatible 5V 3-pin ARGB header on your motherboard. Do not connect to a 12V 4-pin RGB header, as this will damage the LEDs.
- Connect the PWM cable from the control hub to a 4-pin PWM fan header on your motherboard (e.g., CPU_FAN or SYS_FAN). This allows the motherboard to control fan speeds.
- Connect Reset Switch (Optional): If you wish to control RGB modes via your case's reset button, connect the case's RESET SW wiring to the designated RESET port on the control hub.

Image 4.2: Comprehensive wiring diagram illustrating connections from fans to the control hub, power supply, and motherboard headers.
Video 4.1: Demonstration of upHere case fans installed in a PC, showcasing various RGB lighting effects and general operation.
5. Operating Instructions
Once installed, the fans will operate based on their connections:
- Fan Speed Control: If the control hub's PWM cable is connected to your motherboard, fan speeds will be automatically regulated by your motherboard's BIOS/UEFI settings or fan control software.
- ARGB Lighting Control:
- If the 5V 3-pin ARGB cable is connected to your motherboard, lighting effects can be controlled via your motherboard's RGB software (e.g., ASUS Aura Sync, MSI Mystic Light Sync, GIGABYTE RGB Fusion, ASRock Polychrome Sync).
- If the reset switch is connected to the control hub, pressing the reset button will cycle through various pre-programmed ARGB lighting modes.

Image 5.1: A set of upHere ARGB fans showcasing a range of vibrant color options.
6. Maintenance
Regular maintenance helps ensure optimal performance and longevity of your fans.
- Cleaning: Periodically clean the fan blades and frame to remove dust buildup. Use compressed air or a soft, dry cloth. Ensure the computer is powered off and unplugged before cleaning.
- Inspection: Check cables for any signs of wear or damage. Ensure all connections remain secure.
7. Troubleshooting
| Issue | Possible Cause | Solution |
|---|---|---|
| Fans not spinning | No power to control hub; loose fan cable; incorrect motherboard connection. | Ensure SATA power is connected to the hub. Check all fan cables are securely plugged into the hub. Verify PWM cable is connected to a functional motherboard fan header. |
| RGB lighting not working | Loose ARGB cable; incorrect ARGB header (12V instead of 5V); software issue; hub not powered. | Check 5V 3-pin ARGB cable connection to both hub and motherboard. Ensure it's connected to a 5V ARGB header, not 12V. Verify hub has power. Restart RGB software or computer. |
| RGB colors are incorrect or stuck | Software conflict; incorrect mode selected. | Ensure only one RGB control software is running. If using motherboard sync, ensure the hub is set to motherboard control (often by holding the hub button). If using the reset button, cycle through modes. |
| Fans are too loud or not changing speed | PWM cable not connected; incorrect BIOS/software settings. | Verify PWM cable is connected to the motherboard. Adjust fan curves in BIOS/UEFI or fan control software. |
8. Specifications
| Specification | Detail |
|---|---|
| Model | T7SYC7-3 |
| Fan Size | 120mm |
| Voltage | 5 Volts (for ARGB) |
| Power Connector Type | 3-Pin (for ARGB), 4-Pin PWM (for fan speed) |
| Cooling Method | Air |
| Noise Level | 30 Decibels (Max) |
| Compatible Devices | Desktop PCs |
| Material | Copper (likely referring to motor components) |
| Number of Items | 3 Fans |
9. Warranty and Support
upHere products are manufactured to high quality standards. This product comes with a 12-month warranty from the date of purchase, covering manufacturing defects.
For technical support, warranty claims, or further assistance, please contact upHere customer service through the retailer's platform or the official upHere website. Please have your product model number (T7SYC7-3) and proof of purchase ready when contacting support.