
Pedrollo JSWm2AX
Pedrollo JSWm2AX Self-Priming Electric Pump User Manual
Model: JSWm2AX | Brand: Pedrollo
1. Introduction
This manual provides essential information for the safe and efficient operation, installation, and maintenance of your Pedrollo JSWm2AX Self-Priming Electric Pump. Please read this manual thoroughly before operating the pump to ensure proper use and to prevent damage or injury.
The Pedrollo JSWm2AX is a single-phase self-priming electric pump designed for pumping clean water and chemically non-aggressive liquids. It is capable of drawing water even in the presence of mixed air, making it suitable for various domestic and irrigation applications.
2. Safety Instructions
Always observe the following safety precautions to reduce the risk of fire, electric shock, or injury.
- Electrical Safety: Ensure the pump is connected to a properly grounded electrical outlet. Do not operate the pump with damaged cords or plugs. Disconnect power before performing any maintenance or installation.
- Installation Location: Install the pump in a well-ventilated, dry area, protected from adverse weather conditions (rain, frost, direct sunlight).
- Liquid Compatibility: This pump is designed for clean water and chemically non-aggressive liquids only. Pumping flammable, corrosive, or abrasive liquids can damage the pump and create hazardous conditions.
- Overheating: Do not run the pump dry. Ensure there is always liquid flowing through the pump to prevent overheating and damage.
- Children and Pets: Keep children and pets away from the pump during operation.
- Professional Installation: For complex installations or if you are unsure, consult a qualified electrician or plumber.
3. Product Overview
The Pedrollo JSWm2AX pump features a robust design for reliable performance.
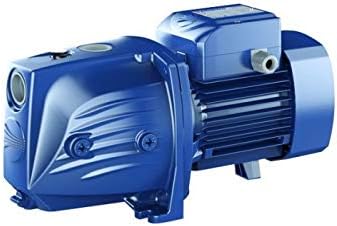
Image 1: Pedrollo JSWm2AX Self-Priming Electric Pump. This image shows the blue-colored pump unit, highlighting its compact design and the motor housing with cooling fins.
Key Components:
- Pump Body: Made of cast iron with cataphoresis treatment for corrosion resistance.
- Impeller: Technopolymer impeller (indicated by 'X' in model code) for efficient water handling.
- Motor: Single-phase electric motor.
- Inlet/Outlet: Threaded fittings for easy connection to plumbing.
4. Setup and Installation
Proper installation is crucial for the pump's performance and longevity.
4.1. Site Selection:
- Choose a location that is dry, well-ventilated, and protected from direct sunlight, rain, and frost.
- Ensure the pump is placed on a stable, level surface to minimize vibration.
- Allow sufficient space around the pump for ventilation and maintenance access.
4.2. Plumbing Connections:
- Connect the suction pipe to the pump's inlet and the discharge pipe to the outlet. Use appropriate threaded fittings and sealants to ensure watertight connections.
- Ensure the suction pipe is as short and straight as possible to minimize head loss.
- Install a foot valve with a strainer at the end of the suction pipe if drawing water from a well or tank to prevent debris from entering the pump and to maintain prime.
- Consider installing a check valve on the discharge side to prevent backflow, especially in pressurized systems.
4.3. Electrical Connection:
- The pump operates on 230V single-phase power. Ensure your electrical supply matches these requirements.
- Connect the pump to a dedicated, properly grounded electrical circuit protected by a residual current device (RCD) or ground fault circuit interrupter (GFCI).
- If the pump does not come with a pre-wired plug, have a qualified electrician perform the wiring.
5. Operating Instructions
5.1. Priming the Pump:
Before the first use, or if the pump has run dry, it must be primed:
- Ensure all plumbing connections are secure.
- Locate the priming plug on the top of the pump body.
- Remove the priming plug and slowly fill the pump body with clean water until it overflows.
- Replace the priming plug securely.
- Open any discharge valves to allow air to escape from the system.
5.2. Starting the Pump:
- Once primed, connect the pump to the power supply.
- Turn on the power. The pump should start drawing water.
- Monitor the pump for the first few minutes to ensure stable operation and no leaks.
5.3. Stopping the Pump:
Simply disconnect the pump from the power supply or turn off the dedicated switch.
6. Maintenance
Regular maintenance ensures the longevity and optimal performance of your pump.
- Regular Inspection: Periodically check the pump for any signs of leaks, unusual noises, or vibrations.
- Clean Strainer/Foot Valve: If using a foot valve with a strainer, regularly clean it to prevent blockages and maintain efficient water flow.
- Winterization: In areas subject to freezing temperatures, drain the pump completely to prevent damage from ice expansion. Disconnect pipes and remove drain plugs if available. Store the pump in a warm, dry place.
- Motor Ventilation: Ensure the motor's cooling fins are free from dust and debris to prevent overheating.
7. Troubleshooting
This section addresses common issues you might encounter. For problems not listed here, contact customer support.
| Problem | Possible Cause | Solution |
|---|---|---|
| Pump runs but no water is delivered. |
|
|
| Pump runs but delivers low pressure/flow. |
|
|
| Pump does not start. |
|
|
8. Specifications
| Attribute | Value |
|---|---|
| Model | JSWm2AX (ART.46JSNP7A15A1) |
| Manufacturer | ELETTROPOMPE PEDROLLO |
| Reference Number | 028905 |
| Power (Nominal) | 1.5 HP (1.1 kW) |
| Voltage | 230 V |
| Phase | Single-phase |
| Material | Cast Iron (Pump Body) |
| Impeller Material | Technopolymer |
| Item Weight | 15 kg (33.07 lbs) |
| Power Source | Electric Cable |
9. Warranty and Support
Information regarding spare parts availability is currently unavailable. For warranty claims, technical support, or service inquiries, please contact your authorized Pedrollo dealer or the point of purchase.
When contacting support, please have your pump's model number (JSWm2AX) and reference number (028905) ready.
Related documentsJSWm2AX


Ask a question about this manual
Ask about setup, troubleshooting, compatibility, parts, safety, or missing instructions. Manuals+ will review the question and use this page’s manual context to help answer it.