
Introduction
This manual provides comprehensive instructions for the installation, operation, and maintenance of your Medeco 11C601-T-26-DL-P Single Deadbolt. Please read these instructions carefully before beginning installation or use to ensure proper function and security.
Safety Information
- Always wear appropriate safety gear, such as safety glasses, during installation.
- Use the correct tools for each step to prevent damage to the lock or injury.
- Ensure the door and frame are structurally sound before installing the deadbolt.
- Keep keys in a secure location and do not leave them unattended.
- Do not attempt to modify the lock components, as this may compromise security and void the warranty.
Package Contents
Verify that all components are present before beginning installation:
- 1 x Medeco Single Deadbolt Assembly (Exterior Cylinder, Interior Thumb Turn, Bolt Mechanism)
- 2 x Keys
- 1 x Strike Plate
- 1 x Mounting Hardware (Screws)
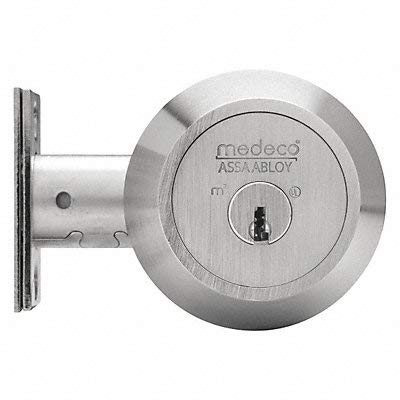
Image of the Medeco single deadbolt, showing the exterior cylinder and interior thumb turn components in a satin chrome finish.
Setup and Installation
This deadbolt is designed for doors with a thickness of 1-3/4" to 2" and a backset of 2-3/8".
- Prepare the Door: If installing on a new door, drill a 2-1/8 inch diameter hole for the deadbolt body and a 1 inch diameter hole for the latch bolt. Ensure the backset (distance from door edge to center of the deadbolt hole) is 2-3/8 inches.
- Install the Bolt Mechanism: Insert the deadbolt latch mechanism into the 1-inch hole on the edge of the door. Ensure the bolt is oriented correctly with the bevel facing the door frame. Secure it with the provided screws. The faceplate dimensions are 1-1/8 inches by 2-1/4 inches.
- Install the Exterior Cylinder: Insert the exterior cylinder into the larger 2-1/8 inch hole from the outside of the door. Ensure the tailpiece (the small bar extending from the cylinder) passes through the slot in the bolt mechanism.
- Install the Interior Thumb Turn: Place the interior thumb turn assembly onto the door from the inside, aligning its components with the tailpiece and mounting posts from the exterior cylinder.
- Secure the Assemblies: Fasten the interior and exterior assemblies together using the provided mounting screws. Tighten screws evenly until the deadbolt is snug against the door, but do not overtighten.
- Install the Strike Plate: On the door frame, mortise (chisel out) an area for the strike plate. The strike plate dimensions are 1-1/8 inches by 2-1/4 inches with round corners. Ensure the bolt can fully extend into the strike plate opening (1-inch throw length) without obstruction. Secure the strike plate with screws.
- Test Operation: Close the door and test the deadbolt with a key from the outside and the thumb turn from the inside. The bolt should extend and retract smoothly without binding.
Operating Instructions
- To Lock from Exterior: Insert the key into the exterior cylinder and turn it to extend the deadbolt. Remove the key.
- To Unlock from Exterior: Insert the key into the exterior cylinder and turn it to retract the deadbolt. Remove the key.
- To Lock from Interior: Rotate the thumb turn on the interior side of the door to extend the deadbolt.
- To Unlock from Interior: Rotate the thumb turn on the interior side of the door to retract the deadbolt.
Maintenance
- Cleaning: Clean the exterior of the deadbolt with a soft, damp cloth. Avoid abrasive cleaners or solvents, which can damage the finish.
- Lubrication: Periodically apply a small amount of graphite-based lubricant (do not use oil-based lubricants) into the keyway to ensure smooth operation.
- Inspection: Regularly check all mounting screws for tightness. Ensure the deadbolt operates smoothly without excessive force.
Troubleshooting
| Problem | Possible Cause | Solution |
|---|---|---|
| Key turns but bolt does not move. | Tailpiece not properly engaged with bolt mechanism or thumb turn. | Recheck installation steps, ensuring tailpiece is correctly aligned. |
| Bolt binds or is difficult to extend/retract. | Misalignment of deadbolt with strike plate, or screws overtightened. | Adjust strike plate position or loosen mounting screws slightly. Ensure door frame is not warped. Lubricate keyway. |
| Key is difficult to insert or remove. | Debris in keyway or lack of lubrication. | Clean keyway with compressed air and apply graphite lubricant. Do not force the key. |
Specifications
| Brand | Medeco |
| Model Number | 11C601-T-26-DL-P |
| Lock Type | Single Cylinder Deadbolt, Key Lock |
| Material | Brass/Stainless Steel (internal components), Chrome (finish) |
| Finish | Satin Chrome |
| Backset | 2-3/8 inches |
| Door Thickness | 1-3/4 inches to 2 inches |
| Strike Dimensions | 1-1/8 inches x 2-1/4 inches (Round Corner) |
| Faceplate Dimensions | 1-1/8 inches x 2-1/4 inches |
| Bolt Throw Length | 1 inch |
| Pins | 5 |
| Keyway Type | Schlage C |
| Security Type | Heavy-Duty |
| Lockset Grade | 1 (ANSI A156.36) |
| Standards | ANSI A156.36, UL Listed |
| Included Components | Deadbolt Assembly, 2 Keys, Mounting Hardware |
| Recommended Use | Security for Heavy Duty Doors |
| Location Type | Commercial, Industrial, Institutional, Residential |
Warranty Information
Medeco products are manufactured to high standards. For specific warranty details, please refer to the official Medeco website or contact their customer service directly. Keep your purchase receipt as proof of purchase.
Support
If you require further assistance or have questions not covered in this manual, please contact Medeco customer service. Visit the official Medeco website for contact information and additional resources.
Medeco Official Website: www.medeco.com


