1. Important Safety Instructions
Please read all instructions carefully before using the GASTROBACK Mini Oven Design Bake & Grill. Retain this manual for future reference.
- Always ensure the appliance is placed on a stable, heat-resistant surface.
- Do not touch hot surfaces. Use oven mitts or gloves when handling hot items.
- Ensure adequate ventilation around the oven during operation.
- Do not immerse the appliance, cord, or plug in water or other liquids.
- Close supervision is necessary when any appliance is used by or near children.
- Unplug from outlet when not in use and before cleaning. Allow to cool before putting on or taking off parts.
- Do not operate any appliance with a damaged cord or plug, or after the appliance malfunctions or has been damaged in any manner.
- Do not use attachments not recommended by the appliance manufacturer.
- Do not place on or near a hot gas or electric burner, or in a heated oven.
- Extreme caution must be used when moving an appliance containing hot oil or other hot liquids.
- To disconnect, turn any control to "off", then remove plug from wall outlet.
- Do not use the appliance for other than intended household use.
- The exterior of the oven features a Cool Touch housing, but internal components and accessories will become very hot.
- This appliance is equipped with electronic child safety features.
2. Product Components
Familiarize yourself with the parts of your GASTROBACK Mini Oven.

Figure 2.1: Front view of the GASTROBACK Mini Oven, showcasing the digital control panel and oven door.

Figure 2.2: Included accessories: rotisserie spit, grill rack, pizza stone, and baking tray.
- Main Unit: The oven housing with integrated heating elements and control panel.
- Oven Door: Glass door for viewing food during cooking.
- Control Panel: Backlit touch display for program selection, temperature, and time settings.
- Baking Tray: For baking and roasting.
- Grill Rack: For grilling and placing dishes.
- Pizza Stone: 30 cm diameter, for crispy pizzas.
- Rotisserie Spit: For roasting whole chickens or kebabs.
- Rotisserie Handle: For safe insertion and removal of the rotisserie spit.
- Crumb Tray: Located at the bottom, removable for easy cleaning.
3. Setup and First Use
- Unpacking: Carefully remove all packaging materials and accessories. Check for any damage.
- Placement: Place the oven on a flat, stable, and heat-resistant surface. Ensure there is sufficient space (at least 10 cm) around the oven for proper ventilation. Do not place it near flammable materials.
- Cleaning: Before first use, wipe the interior and accessories with a damp cloth. Wash the baking tray, grill rack, pizza stone, and rotisserie spit in warm soapy water, then rinse and dry thoroughly.
- Initial Burn-in:
- Plug the oven into a grounded electrical outlet.
- Set the oven to 230°C (450°F) using the "Custom" function.
- Operate the empty oven for approximately 10-15 minutes to burn off any manufacturing residues. A slight odor or smoke is normal during this process. Ensure the area is well-ventilated.
- After 10-15 minutes, turn off the oven and unplug it. Allow it to cool completely.
- Your GASTROBACK Mini Oven is now ready for use.
4. Operating Instructions
4.1 Control Panel Overview
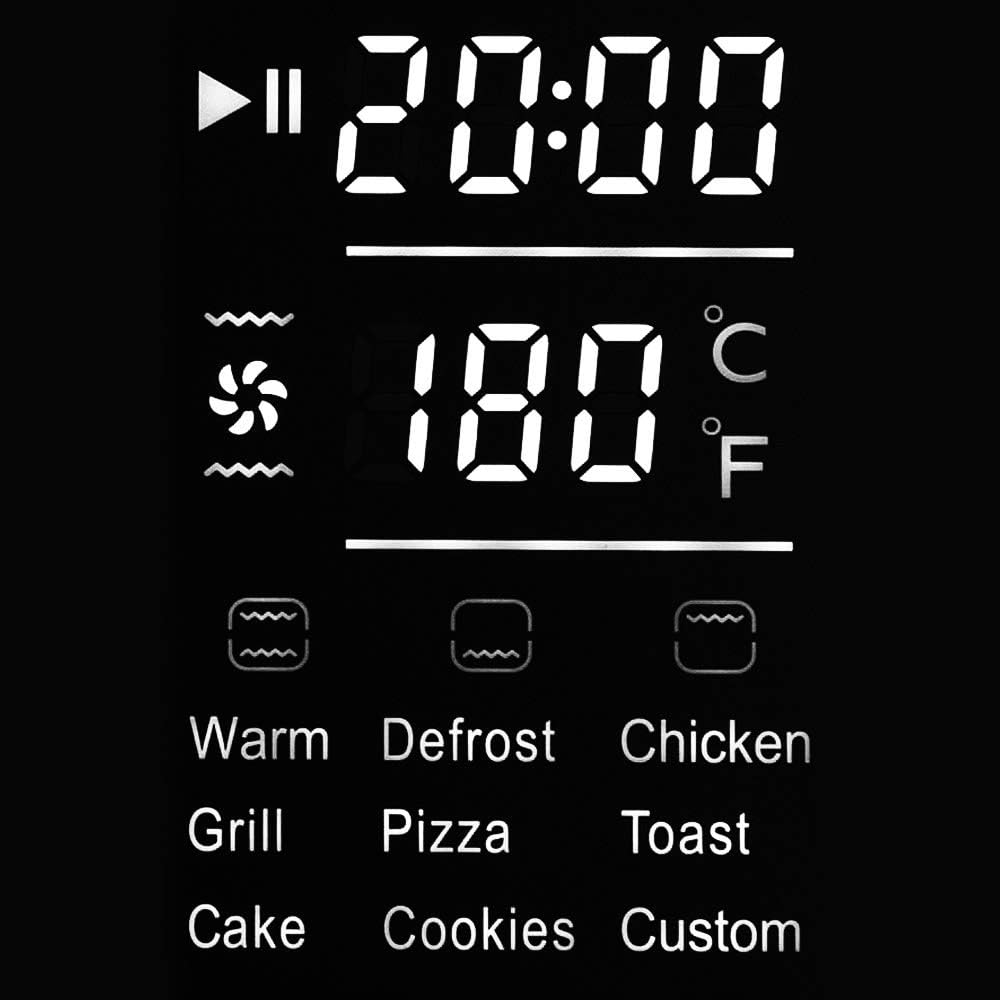
Figure 4.1: Detailed view of the backlit touch display, showing program icons, temperature, and time settings.
The control panel features a backlit touch display for easy operation. It displays the selected program, function, cooking time, and temperature.
- Power Button: Turns the oven on/off.
- Program Selection: Icons for various pre-set programs (Warm, Defrost, Chicken, Grill, Pizza, Toast, Cake, Cookies, Custom).
- Function Icons: Indicate heating elements (top, bottom, convection) and rotisserie.
- Temperature Adjustment: Up/Down arrows to set temperature (30°C to 230°C).
- Time Adjustment: Up/Down arrows to set cooking time.
- Start/Pause Button: Initiates or pauses cooking.
4.2 Pre-set Programs
The oven offers 9 pre-set programs for common cooking tasks:
- Warm: For keeping food warm.
- Defrost: For thawing frozen items.
- Chicken: Optimized for rotisserie chicken.
- Grill: For grilling meats and vegetables.
- Pizza: Ideal for baking pizzas, especially with the pizza stone.
- Toast: For toasting bread.
- Cake: For baking cakes and pastries.
- Cookies: For baking cookies.
- Custom: Allows manual setting of temperature, time, and heating functions.
4.3 Manual Operation (Custom Program)
- Press the Power button to turn on the oven.
- Select the "Custom" program icon.
- Use the temperature adjustment arrows to set the desired temperature between 30°C and 230°C.
- Use the time adjustment arrows to set the desired cooking duration.
- Select the desired heating function(s):
- Top Heat: For browning and crisping the top.
- Bottom Heat: For baking bases and gentle cooking.
- Top & Bottom Heat: Standard baking and roasting.
- Convection (Hot Air): For even cooking and faster results, ideal for multiple racks.
- Rotisserie: Activates the rotisserie motor for even roasting.
- Press the Start button to begin cooking.
- The display will show the remaining cooking time and current temperature.
- To pause cooking, press the Start/Pause button again. Press it once more to resume.
- When cooking is complete, the oven will beep and turn off the heating elements.
- Carefully remove food using oven mitts.
4.4 Using the Rotisserie Function

Figure 4.2: A whole chicken being roasted on the rotisserie spit inside the oven.
- Prepare the food (e.g., a whole chicken) and secure it onto the rotisserie spit using the forks. Ensure it is balanced.
- Insert the pointed end of the rotisserie spit into the drive socket on the right side of the oven interior.
- Rest the square end of the spit onto the support bracket on the left side.
- Close the oven door.
- Select the "Chicken" pre-set program or the "Custom" program and activate the rotisserie function along with desired heating elements (e.g., Top & Bottom Heat with Convection).
- Set temperature and time as required.
- Press Start. The rotisserie spit will begin to rotate.
- Once cooking is complete, use the rotisserie handle (Figure 2.3) to safely remove the hot spit from the oven.

Figure 4.3: The rotisserie handle and a separate rack lifter tool for safe handling of hot accessories.
4.5 Using the Pizza Stone

Figure 4.4: A pizza cooking on the included pizza stone, positioned on the grill rack.
- Place the pizza stone on the grill rack.
- Insert the grill rack with the pizza stone into the desired rack position in the oven.
- Preheat the oven with the pizza stone inside for at least 10-15 minutes at the desired pizza baking temperature (e.g., 200-220°C).
- Carefully slide the pizza onto the hot pizza stone.
- Select the "Pizza" pre-set program or "Custom" with Top & Bottom Heat.
- Bake until the crust is golden brown and cheese is melted.
- Use oven mitts and a pizza peel or spatula to remove the pizza.
5. Maintenance and Cleaning
Regular cleaning ensures optimal performance and extends the life of your oven.
- Always unplug the oven from the power outlet and allow it to cool completely before cleaning.
- Exterior: Wipe the exterior surfaces with a soft, damp cloth. Do not use abrasive cleaners or scouring pads.
- Interior: The oven interior has a non-stick coating. Wipe with a damp cloth and mild detergent. For stubborn stains, a non-abrasive oven cleaner designed for non-stick surfaces can be used, following the product instructions. Ensure all cleaner residue is removed.
- Accessories: The baking tray, grill rack, rotisserie spit, and pizza stone can be washed in warm soapy water. Rinse thoroughly and dry completely before storing or reusing. The pizza stone should not be washed with soap if possible, as it can absorb odors; simply scrape off residue and wipe with a damp cloth.
- Crumb Tray: Pull out the crumb tray from the bottom of the oven. Empty crumbs and wash with warm soapy water. Rinse and dry thoroughly before reinserting.
- Do not immerse the main unit in water or any other liquid.
6. Troubleshooting
Refer to this section for common issues and their solutions.
| Problem | Possible Cause | Solution |
|---|---|---|
| Oven does not turn on. | Not plugged in; power outage; faulty outlet. | Ensure the oven is securely plugged into a working electrical outlet. Check your circuit breaker. |
| Food not cooking evenly. | Incorrect temperature/time; overcrowding; improper rack position. | Adjust temperature and time. Avoid overcrowding the oven. Use the convection function for more even heat distribution. Try different rack positions. |
| Excessive smoke during cooking. | Food residue or grease buildup; fatty foods. | Clean the oven interior and accessories thoroughly. Use the baking tray to catch drips from fatty foods. Ensure proper ventilation. |
| Rotisserie spit not rotating. | Spit not correctly inserted; rotisserie function not selected; food too heavy/unbalanced. | Ensure the spit is correctly seated in both the drive socket and support bracket. Verify the rotisserie function is activated. Ensure food is balanced and not exceeding weight limits. |
| Display not responding to touch. | Temporary software glitch; dirty screen. | Unplug the oven for a few minutes, then plug it back in. Clean the touch screen with a soft, dry cloth. |
If the problem persists after attempting these solutions, please contact GASTROBACK customer support.
7. Product Specifications
- Model: GASTROBACK Mini Oven Design Bake & Grill, Model 42814
- Capacity: 26 Liters
- Power: 1500 Watts
- Voltage: 220-240V~, 50/60Hz (Standard European voltage, adjust if needed for other regions)
- Temperature Range: 30°C - 230°C
- Functions: Top Heat, Bottom Heat, Top & Bottom Heat, Convection (Hot Air), Rotisserie
- Control Type: Electronic Touch Display
- Material: Stainless Steel housing, non-stick interior
- Weight: 8.2 Kilograms
- Included Accessories: Baking tray, grill rack, 30cm pizza stone, rotisserie spit, rotisserie handle.
- Safety Features: Cool Touch housing, Electronic Child Safety.
8. Warranty and Customer Support
GASTROBACK products are manufactured with high-quality materials and undergo strict quality control. This product is covered by a manufacturer's warranty against defects in materials and workmanship from the date of purchase.
- Warranty Period: Please refer to your purchase documentation or the official GASTROBACK website for specific warranty terms and duration in your region.
- Warranty Claims: In the event of a defect, please contact the retailer where you purchased the product or GASTROBACK customer service directly. Proof of purchase is required for all warranty claims.
- Exclusions: The warranty does not cover damage resulting from improper use, normal wear and tear, unauthorized repairs, or failure to follow the instructions in this manual.
Customer Support:
For further assistance, technical support, or spare parts, please visit the official GASTROBACK website or contact their customer service department:
Website: www.gastroback.de (or relevant regional website)
Contact Information: Refer to the "Contact" section on the GASTROBACK website for phone numbers and email addresses specific to your country.


