
1. Introduction
Thank you for choosing the Road Far SNDWAY SW-E80 Digital Laser Distance Meter. This device is designed for precise distance measurement, offering functions for calculating area, volume, and indirect measurements using the Pythagorean theorem. Its compact, handheld design and user-friendly interface make it ideal for various professional and DIY applications. Please read this manual thoroughly before using the device to ensure safe and optimal operation.
2. Safety Information
This device uses a Class II laser. Please observe the following safety precautions:
- Do not stare directly into the laser beam.
- Do not aim the laser beam at people or animals.
- Do not use optical tools (e.g., binoculars, telescopes) to view the laser beam.
- Keep the device out of reach of children.
- Do not attempt to modify or disassemble the device.
- Use only specified batteries.
- Avoid using the device in explosive environments or near flammable materials.
Failure to follow these safety instructions may result in injury or damage to the device.
3. Package Contents
Verify that all items are present in your package:
- 1 x SNDWAY SW-E80 Laser Distance Meter (80m)
- 1 x Portable Pouch
- 1 x Hanging Rope
- 1 x User Manual
- 1 x Retail Box
- Note: 2x AAA 1.5V batteries are not included.
4. Product Overview
Familiarize yourself with the components of your laser distance meter.
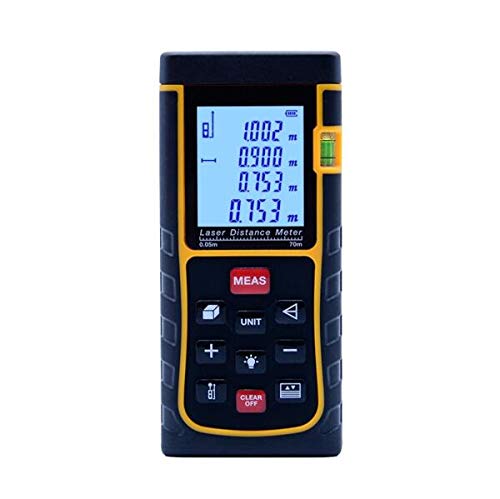
Figure 1: Front view of the SNDWAY SW-E80 Laser Distance Meter, highlighting the multi-line LCD display and various function buttons.

Figure 2: Side view of the device, illustrating the built-in air bubble level for horizontal alignment.
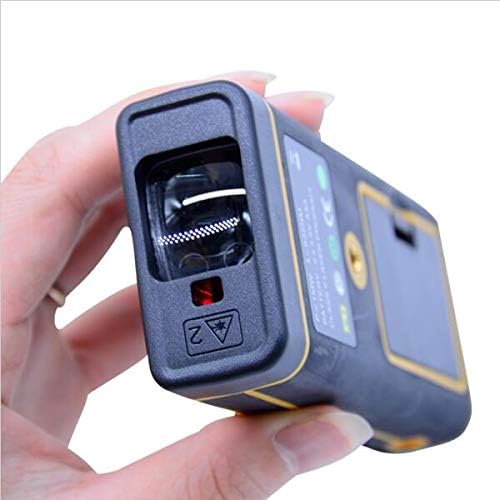
Figure 3: Detail of the laser emitter and receiver lenses located at the top of the device.

Figure 4: Rear view with the battery compartment open, indicating where to insert two AAA batteries.
Key Features:
- Instant measurement of distance, area, and volume.
- Wide measuring range: 0 to 80 meters.
- High accuracy: ± 2 mm.
- Indirect measurement by Pythagorean Theorem.
- Single/Continuous measurement.
- Max/Min distance tracking.
- Easy addition/subtraction of measurements.
- Selectable units: meters (m), inches (in), and feet (ft).
- Data storage/recall function (up to 99 data sets).
- Data hold/clear function.
- Integrated air bubble level.
- Large LCD with backlight and multi-line display (4 lines).
- Automatic correction and error report technology.
- Buzzer indication.
- Battery status indicator.
- IP54 dust and splash protection.
- Automatic and manual power off function.
5. Setup
5.1 Battery Installation
- Open the battery compartment cover located at the rear of the device (refer to Figure 4).
- Insert two 1.5V AAA batteries, ensuring correct polarity (+/-).
- Close the battery compartment cover securely.
Note: Remove batteries if the device will not be used for an extended period to prevent leakage.
6. Operating Instructions
6.1 Power On/Off
- To power on: Press the MEAS button. The laser will activate.
- To power off: Press and hold the CLEAR/OFF button for a few seconds. The device also features automatic power-off after 3 minutes of inactivity (laser off after 30 seconds).
6.2 Unit Selection
Press the UNIT button repeatedly to cycle through measurement units: meters (m), inches (in), and feet (ft).
6.3 Measurement Reference Point
The device can measure from its front or rear edge. Press the reference point button (often indicated by an icon with an arrow pointing from the front or rear) to switch between these modes. The current reference point is usually displayed on the screen.
6.4 Single Distance Measurement
- Point the laser at the target.
- Press the MEAS button once. The measured distance will be displayed.
6.5 Continuous Measurement (Tracking)
- Press and hold the MEAS button for a few seconds, or press it twice quickly (depending on model, refer to on-screen icons).
- Move the device. The display will continuously update the distance, showing maximum and minimum values.
- Press MEAS again to stop continuous measurement.
6.6 Area Measurement
- Press the FUNCTION button (often indicated by a square icon) until the area measurement icon appears.
- Measure the first side (length) by pressing MEAS.
- Measure the second side (width) by pressing MEAS again.
- The device will automatically calculate and display the area.
6.7 Volume Measurement
- Press the FUNCTION button until the volume measurement icon (cube) appears.
- Measure length, width, and height sequentially by pressing MEAS after each measurement.
- The device will automatically calculate and display the volume.
6.8 Pythagorean Measurement (Indirect Measurement)
This function allows indirect measurement of height or distance when direct measurement is obstructed.
- Press the FUNCTION button until the Pythagorean icon appears (e.g., a triangle). There might be different Pythagorean modes (e.g., two-point or three-point).
- Follow the on-screen prompts to measure the required sides (hypotenuse, base) by pressing MEAS for each.
- The device will calculate and display the unknown side.
6.9 Addition and Subtraction
After a measurement, press the + or - button to add or subtract subsequent measurements from the current total.
6.10 Data Storage and Recall
- To store data: After a measurement, press the SAVE button (or similar icon). The device can store up to 99 data sets.
- To recall data: Press the HISTORY or MEM button (or similar icon) to browse through stored measurements.
- To clear data: While viewing stored data, press CLEAR/OFF to delete the current entry or clear all data (refer to specific on-screen prompts).
7. Maintenance
- Cleaning: Wipe the device with a soft, damp cloth. Do not use abrasive cleaners or solvents. Clean the laser lens carefully with a soft cloth, similar to cleaning camera lenses.
- Storage: Store the device in its portable pouch in a cool, dry place, away from direct sunlight and extreme temperatures. Remove batteries if storing for extended periods.
- Calibration: The device is factory calibrated. If you suspect accuracy issues, consult the troubleshooting section or contact support.
8. Troubleshooting
| Problem | Possible Cause | Solution |
|---|---|---|
| Device does not power on | Low or dead batteries; incorrect battery polarity. | Replace batteries; ensure correct polarity. |
| Inaccurate measurements | Unstable measurement surface; laser obstructed; extreme environmental conditions; incorrect reference point. | Ensure stable surface; clear laser path; measure in suitable conditions; verify reference point setting. |
| "Error" message on display | Measurement out of range; strong light interference; laser not hitting target. | Ensure target is within range (0-80m); avoid strong light; ensure laser hits a reflective surface. |
| Laser not visible | Bright ambient light; laser auto-off activated. | Use in lower light conditions; press MEAS to reactivate laser. |
If problems persist, please contact customer support.
9. Specifications
| Parameter | Value |
|---|---|
| Measuring Range | 0 - 80 m |
| Accuracy | ± 2 mm |
| Laser Class | Class II |
| Laser Wavelength | 635 nm |
| Max Laser Output | <1 mW |
| Dust & Splash Proof | IP54 |
| Automatic Laser Off | 30 seconds |
| Automatic Power Off | 3 minutes |
| Operating Temperature | 0 – 40 °C (32 – 104 °F) |
| Storage Temperature | -10 – 60 °C (14 – 140 °F) |
| Battery Type | 2 x 1.5V AAA (not included) |
| Dimensions | 118 x 54 x 28 mm |
| Material | Plastic |
10. Warranty and Support
This product comes with a standard manufacturer's warranty. For specific warranty terms and conditions, please refer to the documentation provided at the time of purchase or contact your retailer.
For technical support, troubleshooting assistance, or inquiries about your device, please contact Road Far customer service through their official website or the contact information provided with your purchase.