
1. Introduction
Thank you for choosing the Portta HDMI 4x1 Quad Multi-Viewer Switch. This device allows you to display up to four HDMI input sources on a single HDMI display, offering various viewing modes and seamless switching capabilities. Please read this manual thoroughly before operation to ensure proper use and to maximize the product's performance.
Package Contents:
- 1x Portta HDMI 4x1 Quad Multi-Viewer
- 1x IR Remote Control
- 1x DC Power Adapter
- 1x User Manual

Figure 1.1: Package Contents
2. Safety Information
- Do not expose this unit to water, moisture, or excessive humidity.
- Do not install in areas with poor ventilation.
- Do not place heavy objects on the unit.
- Do not disassemble or attempt to repair the unit yourself.
- Use only the provided power adapter.
- Keep the unit away from heat sources and direct sunlight.
3. Product Overview
Front Panel

Figure 3.1: Front Panel Layout
- ON/OFF: Power switch for the unit.
- Power LED Indicator: Illuminates when the unit is powered on.
- Input LED Indicators (1-4): Indicate which HDMI input is currently active.
- IR: Infrared receiver for the remote control.
- SERVICE: USB port for factory firmware upgrades only.
- Function Buttons (Mode 1, Mode 2, Mode 3, Audio, 720P/1080P): Used to select viewing modes, audio output, and resolution.
Rear Panel

Figure 3.2: Rear Panel Layout
- HDMI Input (INPUT1-4): Connect your HDMI source devices (e.g., PC, game console, Blu-ray player).
- HDMI Output (OUTPUT): Connect to your HDMI display (e.g., TV, monitor, projector).
- STEREO Output: 3.5mm audio jack for connecting to external speakers or an audio system.
- DC 5V Input: Connect the provided 5V DC power adapter.
4. Setup and Connection
Follow these steps to connect your Portta HDMI 4x1 Quad Multi-Viewer Switch:
- Connect up to four HDMI source devices (e.g., security camera, PC, PS4, Xbox, Nintendo Switch, Blu-Ray player, Roku, Chromecast) to the HDMI INPUT ports (1-4) on the rear panel of the Multi-Viewer using HDMI cables.
- Connect an HDMI display (e.g., HDTV, projector, monitor) to the HDMI OUTPUT port on the rear panel using an HDMI cable.
- If desired, connect external speakers or an audio system to the STEREO output port using a 3.5mm audio cable.
- Connect the provided DC 5V power adapter to the DC 5V Input port on the Multi-Viewer, then plug the adapter into a power outlet.
- Turn on the Multi-Viewer using the ON/OFF switch on the front panel.
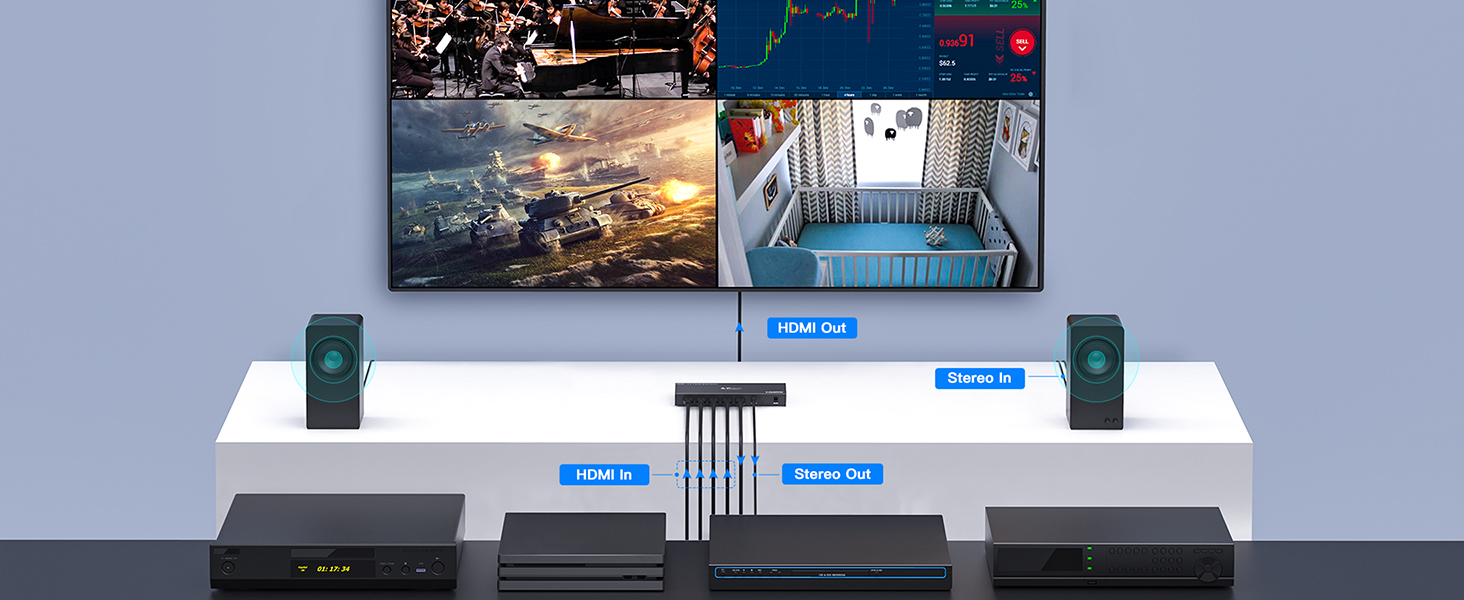
Figure 4.1: Connection Diagram
5. Operating Instructions
Power On/Off
Press the ON/OFF button on the front panel or the power button on the IR remote control to turn the unit on or off.
Input Selection
To select an HDMI input source, press the corresponding input number button (1, 2, 3, or 4) on the IR remote control. In full screen mode, you can also cycle through inputs using the front panel buttons.
Viewing Modes
The Multi-Viewer supports five distinct viewing modes. Use the 'Mode' buttons on the front panel or the dedicated mode buttons on the remote control to switch between them:
- Full Screen Mode: Displays a single HDMI input source across the entire screen.
- Dual Screen Mode: Displays two HDMI input sources side-by-side.
- Four Screen Mode: Displays all four HDMI input sources simultaneously in a grid layout.
- 'T' Type Screen Mode: Displays one large source with three smaller sources arranged around it.
- 'H' Type Screen Mode: Displays one large source with three smaller sources in a different arrangement.

Figure 5.1: Five Display Modes
Seamless Switching
In full screen mode, the Multi-Viewer supports seamless switching between the four HDMI input sources. This eliminates delays typically associated with switching, providing a smooth transition without black screens.

Figure 5.2: Seamless Switching in Action
Screen Looping (Full Screen Mode Only)
The device supports automatic cycling through inputs in full screen mode at intervals of 1, 3, 5, or 7 seconds. This feature is useful for monitoring multiple sources sequentially.

Figure 5.3: Screen Looping Intervals
Audio Extraction
The Multi-Viewer can extract audio from the selected HDMI input source and output it via the 3.5mm STEREO jack. Use the 'Audio' button on the front panel or remote to manage audio output.
Resolution Support
The device supports high-definition resolutions up to 1080p. It also features scaler functions for 720p/1080p, ensuring compatibility with various displays.

Figure 5.4: 1080p Resolution Support
6. Specifications
| Model Number | N3S41QS-E |
| Brand | Portta |
| Input Ports | 4 x HDMI |
| Output Ports | 1 x HDMI, 1 x Stereo Audio (3.5mm) |
| HDMI Version | Compatible with HDMI 1.3 |
| HDCP Version | Compatible with HDCP 1.3 |
| Supported Resolutions | Up to 1080p (1920x1080) |
| Scaler Function | 720p / 1080p up/down scaling |
| Viewing Modes | 5 modes: Full Screen, Dual Screen, Four Screen, 'T' Type, 'H' Type |
| Switching | Seamless switching in full screen mode |
| Power Supply | DC 5V |
| Color | Black |
7. Troubleshooting
If you encounter issues, please refer to the following common problems and solutions:
- No Picture:
- Ensure all HDMI cables are securely connected.
- Verify the power adapter is correctly connected and the unit is powered on.
- Check if the input source is active and outputting a signal.
- Try a different HDMI cable or input port.
- Ensure your display is set to the correct HDMI input.
- No Audio:
- Check the audio settings on your source device and display.
- Ensure external speakers are connected correctly to the STEREO output and are powered on.
- Verify the 'Audio' function button on the Multi-Viewer is correctly configured.
- Image Distortion or Flickering:
- Ensure HDMI cables are of good quality and not excessively long.
- Try reducing the resolution of the input source if possible.
- Restart the Multi-Viewer and connected devices.
- Remote Control Not Working:
- Ensure there are no obstructions between the remote and the IR receiver.
- Check and replace the battery in the remote control.
- Ensure you are within the effective range and angle of the IR receiver.
8. Maintenance
- Clean the unit with a soft, dry cloth. Do not use liquid or aerosol cleaners.
- Store the unit in a cool, dry place away from direct sunlight and extreme temperatures.
- Ensure proper ventilation around the unit to prevent overheating.
9. Warranty and Support
The Portta HDMI 4x1 Quad Multi-Viewer Switch comes with a 2-year hassle-free warranty and lifetime technical support.
If you have any questions, require assistance, or experience issues with your product, please do not hesitate to contact Portta customer service. Our friendly support team is available to help you.
For support, please visit the official Portta website or refer to the contact information provided with your product packaging.