
ChickenGuard Premium
ChickenGuard Premium Automatic Chicken Coop Door Opener with Self-Locking Door Kit
Instruction Manual - Model: Premium (ASIN: B07GL4S3Q4)
1. Introduction
Thank you for choosing the ChickenGuard Premium Automatic Chicken Coop Door Opener with Self-Locking Door Kit. This device is designed to provide convenience and security for your poultry by automatically opening and closing your coop door using either a timer or a light sensor. The integrated self-locking mechanism offers enhanced protection against predators. This manual provides detailed instructions for installation, operation, maintenance, and troubleshooting to ensure optimal performance of your unit.

A complete view of the ChickenGuard Automatic Chicken Coop Door Opener unit mounted above the self-locking door kit, ready for installation.
2. Safety Information
- Keep the unit and its components out of reach of children and pets.
- Use only the specified 4x AA alkaline batteries. Do not use 9V batteries as the unit is not designed for them.
- Ensure all connections are secure and the silicone seal is properly installed to prevent water ingress.
- Avoid using power drivers for screws to prevent cracking the plastic housing.
- Do not attempt to modify or disassemble the internal components beyond what is described in this manual.
3. Package Contents
Please check that all the following items are included in your package:
- ChickenGuard Automatic Door Opener Unit
- Self-Locking Door Kit (door panel and side rails)
- Silicone Seal
- Mounting Screws
- 4 x AA Alkaline Batteries
- Battery Holder
- Warranty Card
- Instruction Manual

The ChickenGuard control unit is displayed alongside the components of the self-locking door kit, including the door panel and side rails.
4. Setup
Follow these steps to install and prepare your ChickenGuard unit:
- Install the Silicone Seal: Locate the groove inside the unit's casing. Carefully press the provided silicone seal into this groove. This is crucial for waterproofing. Trim any excess seal with scissors.
- Insert Batteries: Place the 4x AA alkaline batteries into the battery holder. Connect the battery holder to the unit. Important: Do not use 9V batteries.
- Connect the Motor: The motor has a red wire and a black wire. Ensure the red wire from the motor connects to the red terminal on the unit's front panel, and the black wire connects to the black terminal. Incorrect orientation will cause the door to operate in reverse (e.g., open when set to close).
- Mount the Unit: Position the ChickenGuard unit on the exterior of your chicken coop, above where the door kit will be installed. Use the provided screws to secure it. Avoid using power drills to prevent overtightening and cracking the plastic.
- Install the Self-Locking Door Kit: Mount the self-locking door kit below the ChickenGuard unit, ensuring the door can move freely within its rails. Connect the cord from the ChickenGuard unit to the top of the door panel.
Setup Demonstration Video:
This video provides a step-by-step guide on how to set up your ChickenGuard Automatic Chicken Coop Door Opener, including installing the silicone seal, batteries, connecting the motor, and mounting the unit.
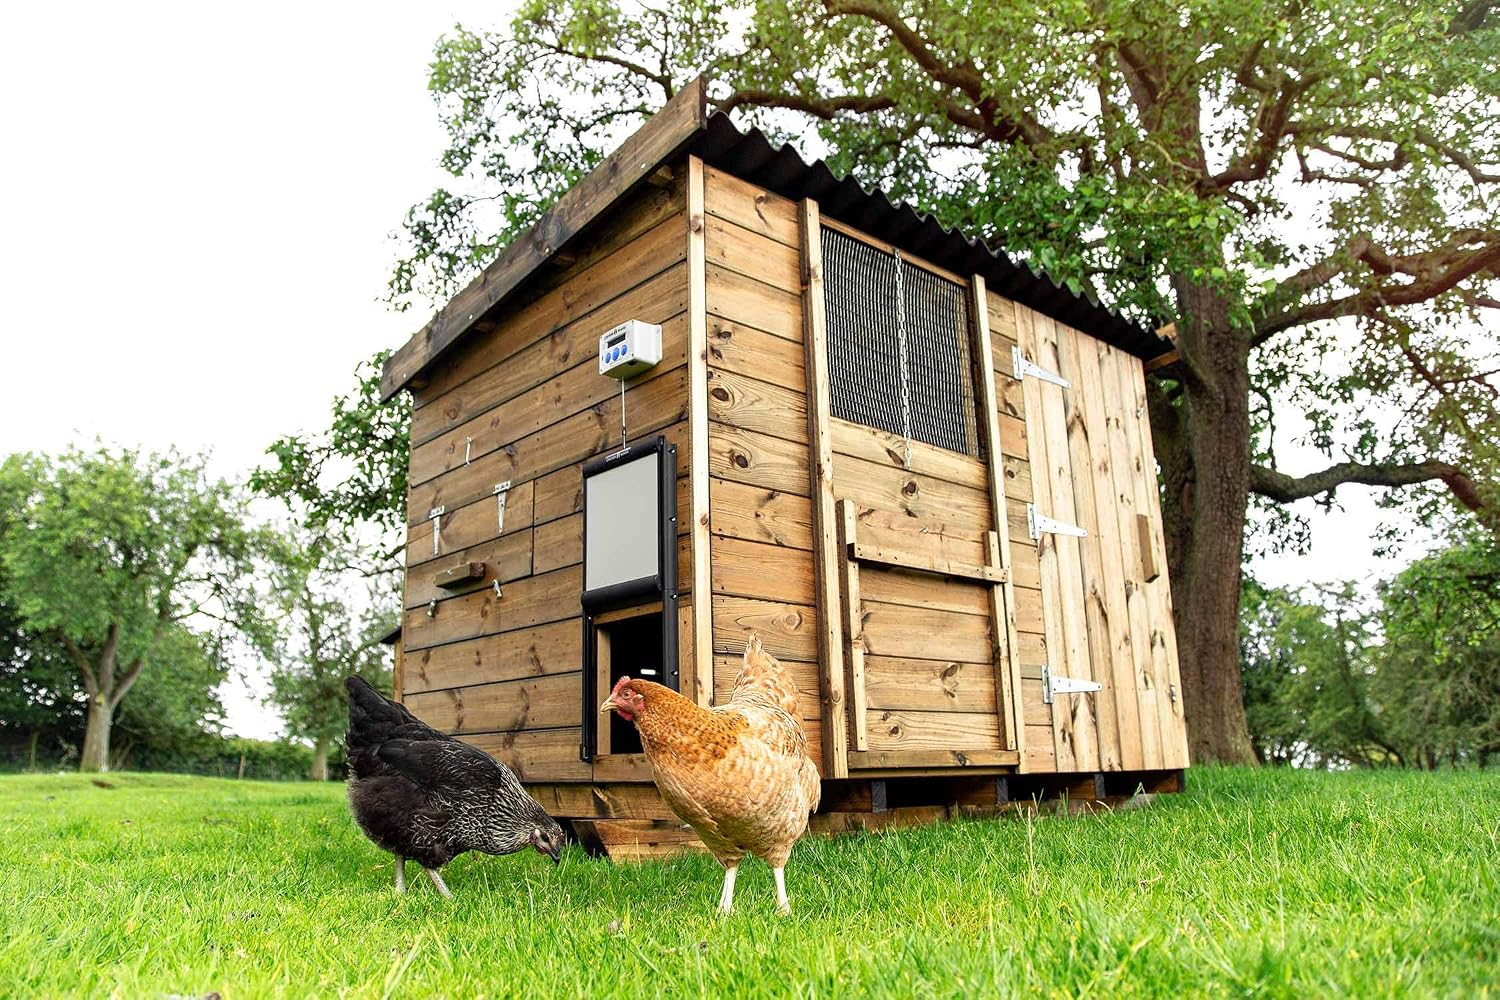
The ChickenGuard unit and self-locking door kit are shown installed on a wooden chicken coop, demonstrating its integration into a typical poultry habitat.
5. Operating Instructions
The ChickenGuard unit features an integrated LCD screen and three control buttons for easy operation.
- Wake Up the Unit: If the screen is off, press the middle (power) button to activate the display. The unit will go to sleep after about 10-15 seconds of inactivity.
- Access Setup Wizard: Press the middle button again to enter the menu. The first option displayed will be "Setup Wizard".
- Set the Current Time: Within the "Setup Wizard", select "Set the Time". Use the up/down arrow buttons to adjust the hours and minutes, then press the middle button to confirm each setting.
- Manual Door Control: You can manually open or close the door at any time by pressing the up or down arrow buttons.
6. Door Calibration
Accurate door calibration is essential for proper function and predator protection.
- Set Fully Open Position: From the "Setup Wizard" menu, select "Door Calibration". The unit will prompt you to set the fully open position. Use the up/down arrow buttons to move the door to its desired fully open height. Press the middle button to confirm this position.
- Set Fully Closed Position: The unit will then prompt you to set the fully closed position. Use the up/down arrow buttons to move the door down. For the self-locking door kit, continue holding the down button until the self-locking wings fully extend at the bottom. Release the button once the wings are out. Press the middle button to confirm this position.
- The door will then automatically open fully to confirm calibration.

Detailed view of the self-locking wings that extend to secure the door when fully closed, preventing predators from lifting it.
7. Open and Close Settings
You can configure how your door opens and closes using the following settings:
- Sensor Mode: The door will open/close based on ambient light levels detected by the integrated light sensor.
- Timer Mode: The door will open/close at a specific time you set.
- LUX+ Mode (Combination): This mode uses the light sensor as the primary method. However, if the light conditions do not trigger the door by a certain time, the timer will override and operate the door. This is particularly useful for ensuring the door closes even on very dark or overcast days, or opens if it's still dark past the set time.
To adjust these settings:
- From the main menu, navigate to "Open Settings" or "Close Settings".
- Use the up/down arrow buttons to cycle through "Sensor", "Timer", or "LUX+".
- If you select "Timer" or "LUX+", you will be prompted to set the desired open/close time using the up/down arrows for hours and minutes. Confirm each with the middle button.
- Once confirmed, the settings will be saved.
8. Maintenance
- Battery Replacement: The unit runs on 4x AA alkaline batteries. A low battery warning will be displayed on the LCD screen. Replace all four batteries simultaneously when indicated. Battery life can vary based on usage and environmental conditions.
- Cleaning: Periodically clean the exterior of the unit and the door rails to ensure smooth operation. Use a soft, damp cloth. Avoid abrasive cleaners or solvents.
- Cord Inspection: Regularly check the lifting cord for any signs of wear or fraying. Replace if necessary. The cord has a breaking strain of 25kg (50lbs).
9. Troubleshooting
- Door Not Operating:
- Check battery level. Replace if low.
- Ensure motor wires are correctly connected (red to red, black to black).
- Verify door calibration is complete and accurate.
- Check for any obstructions in the door's path or rails.
- Door Operating in Reverse: This indicates the motor wires are connected with incorrect polarity. Reconnect red to red and black to black.
- Clock Running Slow/Inaccurate Time: The internal clock may drift over time. Periodically check and reset the time in the "Setup Wizard" menu.
- Water Inside Unit: Ensure the silicone seal is correctly and completely installed in the groove around the unit's casing.
- Door Not Locking Properly: Re-calibrate the fully closed position, ensuring you hold the down button until the self-locking wings fully extend.
10. Specifications
- Product Dimensions (Unit): 14 x 13 x 4 inches
- Item Weight: 4.19 pounds
- Power Source: 4 AA batteries (included)
- Material: Plastic (unit), Durable recycled plastic and aluminum (door kit)
- Door Lifting Capacity: 1kg (2.2lb)
- Cord Breaking Strain: 25kg (50lbs)
- Door Kit Size: 10" x 12" (door panel), 23.5" (runners length)
- Features: Timer and Light Sensor modes, LUX+ combination mode, Predator Resistant Self-Locking Mechanism, Fully featured LCD screen, Low battery warning, Door closed indicator light.
11. Warranty and Support
The ChickenGuard Premium Automatic Chicken Coop Door Opener comes with a 3-Year Manufacturer Warranty. Please refer to your warranty card included in the package for full terms and conditions.
For technical support, troubleshooting assistance, or warranty claims, please contact ChickenGuard customer service. Contact details can typically be found on the product packaging, warranty card, or the official ChickenGuard website.

A page from the instruction manual indicating the availability of instructions in various languages, including English, French, German, and more.
Ask a question about this manual
Ask about setup, troubleshooting, compatibility, parts, safety, or missing instructions. Manuals+ will review the question and use this page’s manual context to help answer it.