1. Introduction
This manual provides instructions for the installation, operation, and maintenance of your GAMEMAX G561 FRGB Black ATX Mid Tower Gaming Case. The G561 is designed to accommodate ATX, Micro ATX, and Mini-ITX motherboards, featuring an acrylic front panel, an acrylic side window, and integrated FRGB fans for system cooling.
Please read this manual thoroughly before beginning installation to ensure proper setup and to prevent damage to the product or other components.
2. Safety Information
- Always disconnect the power supply from the wall outlet before installing or removing any components.
- Wear an anti-static wrist strap to prevent electrostatic discharge (ESD) damage to sensitive components.
- Handle all components with care. Avoid touching circuit boards or connector pins directly.
- The case features rolled edges to minimize the risk of injury during installation. Exercise caution when working inside the case.
- Keep the case and components away from moisture, dust, and extreme temperatures.
3. Product Overview
The GAMEMAX G561 case features a transparent acrylic front panel and a clear acrylic side window, allowing visibility of internal components and the integrated FRGB fans. The I/O ports are located on the top panel for convenient access.

Figure 3.1: Front-side view of the GAMEMAX G561 case with illuminated FRGB fans.
3.1 Front Panel and I/O Ports
The front panel includes three fixed-color FRGB fans. The top panel provides essential connectivity and control options.

Figure 3.2: Top I/O Panel layout.
- Reset Button: For system reset.
- USB 3.0 Port: High-speed data transfer.
- USB 2.0 Ports (x2): Standard data transfer.
- Microphone Jack: Audio input.
- Headphone Jack: Audio output.
- Fan Control Key: Toggles fan speed and FRGB lighting (Off, Low speed/no LEDs, High speed/LEDs on).
3.2 Internal Layout and Component Support
The G561 case offers ample space for various components, including support for CPU coolers up to 160mm and VGA cards up to 360mm.

Figure 3.3: Internal dimensions for CPU cooler (160mm) and VGA card (360mm).
Drive bays are located behind the motherboard tray and at the bottom of the case for efficient cable management and airflow.

Figure 3.4: Drive bay locations for 2x 2.5" SSDs and 2x 3.5" HDDs.
4. Setup and Installation
4.1 Preparing the Case
- Place the case on a stable, flat surface.
- Remove the side panel by unscrewing the thumbscrews at the rear and sliding the panel backward.
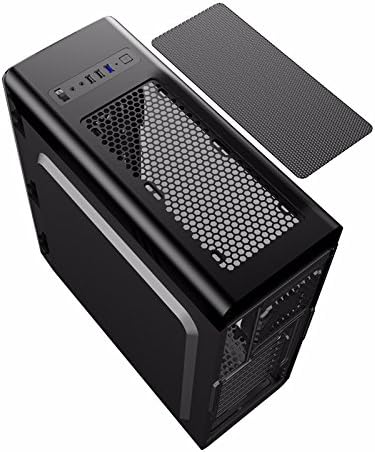
Figure 4.1: Side panel removal.
4.2 Motherboard Installation
- Install the I/O shield provided with your motherboard into the opening at the rear of the case.
- Align the motherboard with the standoffs inside the case. Ensure the standoffs match your motherboard's form factor (ATX, Micro ATX, or Mini-ITX).
- Secure the motherboard with the appropriate screws.
4.3 Drive Installation (SSD/HDD)
- For 2.5" SSDs: Mount SSDs to the designated trays behind the motherboard tray using screws. Note that some mounts may use a combination of screws and retention clips.
- For 3.5" HDDs: Slide HDDs into the drive cages located at the bottom of the case. Secure them with screws or tool-less clips if available.
4.4 Power Supply Installation
- Position the power supply unit (PSU) in the dedicated compartment at the bottom rear of the case.
- Secure the PSU to the case using screws from the rear.
4.5 Graphics Card and Expansion Card Installation
- Remove the necessary PCI-E slot covers from the rear of the case.
- Insert the graphics card or other expansion cards into the appropriate PCI-E slots on the motherboard.
- Secure the cards with screws.
4.6 Cable Management
Utilize the cutouts and tie-down points behind the motherboard tray to route and secure cables. This improves airflow and maintains a clean internal appearance.
4.7 Fan and Radiator Installation
The case comes with four pre-installed FRGB fans (three front, one rear). The front panel supports a 240mm radiator for liquid cooling solutions.
- If installing an additional radiator, ensure it is compatible with the designated mounting points.
- Secure the radiator and any additional fans using the provided screws.
5. Operating Instructions
5.1 Powering On/Off
Press the power button on the top I/O panel to turn your system on or off. A short press typically powers on, while a longer press (usually 4-5 seconds) forces a shutdown.
5.2 Fan and Lighting Control
Use the 'Fan Control Key' on the top I/O panel to adjust the speed of the pre-installed FRGB fans and their lighting:
- Off: Fans and FRGB lighting are turned off.
- Low: Fans operate at a lower speed; FRGB lighting is off.
- High: Fans operate at a higher speed; FRGB lighting is active.
6. Maintenance
6.1 Cleaning the Case
Regular cleaning helps maintain optimal airflow and component longevity.
- Exterior: Use a soft, damp cloth to wipe down the exterior surfaces. Avoid abrasive cleaners.
- Dust Filters: The top panel features a magnetic dust filter. Periodically remove and clean it with water or a soft brush. Ensure it is completely dry before reattaching.
- Interior: Use compressed air to remove dust from internal components and fans. Hold fan blades gently to prevent over-spinning during cleaning.

Figure 6.1: Top magnetic dust filter.
7. Troubleshooting
- System not powering on: Check all power connections, including the 24-pin ATX power, 8-pin CPU power, and front panel power switch headers. Ensure the power supply is switched on.
- Fans not spinning/LEDs not lighting up: Verify that the fan control key is set to 'High'. Check fan power connections to the motherboard or fan controller.
- USB ports not working: Ensure the USB headers from the case are correctly connected to the motherboard.
- Audio jacks not working: Confirm the front panel audio header is securely connected to the motherboard's audio pins.
8. Specifications
| Feature | Specification |
|---|---|
| Brand | GAMEMAX |
| Model Number | casegamemax (G561) |
| Case Type | Mid Tower |
| Motherboard Compatibility | ATX, Micro ATX, Mini-ITX |
| Product Dimensions | 44 x 20.5 x 47 cm |
| Item Weight | 5.3 Kilograms |
| Colour | Black |
| Material | Acrylic |
| Cooling Method | Air |
| Included Fans | 4x Fixed Color FRGB Fans (3 front, 1 rear) |
| Front Radiator Support | Up to 240mm |
| Max CPU Cooler Height | 160mm |
| Max VGA Card Length | 360mm |
| Drive Bays | 2x 2.5" SSD, 2x 3.5" HDD |
| Total USB Ports | 3 (1x USB 3.0, 2x USB 2.0) |
| Recommended Uses | Gaming |
9. Warranty and Support
For warranty information and technical support, please refer to the official GAMEMAX website or contact your local retailer. Keep your proof of purchase for warranty claims.


