
Important Safeguards
When using electrical appliances, basic safety precautions should always be followed to reduce the risk of fire, electric shock, and injury to persons. Please read all instructions carefully before operating the Homeleader K32-031 Yogurt Maker.
- Do not immerse the main unit, cord, or plug in water or other liquids.
- Close supervision is necessary when any appliance is used by or near children.
- Unplug from outlet when not in use and before cleaning. Allow to cool before putting on or taking off parts.
- Do not operate any appliance with a damaged cord or plug, or after the appliance malfunctions or has been damaged in any manner.
- Do not use outdoors.
- Do not let the cord hang over the edge of a table or counter, or touch hot surfaces.
- Do not place on or near a hot gas or electric burner, or in a heated oven.
- Always attach the plug to the appliance first, then plug the cord into the wall outlet. To disconnect, turn any control to 'off', then remove the plug from the wall outlet.
- Do not use the appliance for other than intended use.
Product Overview
The Homeleader K32-031 is an automatic digital yogurt maker designed for home use. It features a stainless steel body, a digital display for precise temperature and time control, and comes with eight individual BPA-free glass jars, each with a capacity of 6 oz (approximately 180 ml).

Image: The Homeleader K32-031 Yogurt Maker, showcasing its stainless steel base, eight glass jars with white lids, and a clear top cover. Several finished yogurts with fruit toppings are visible in the background.
The unit's compact design allows for easy storage and efficient yogurt production. The digital control panel provides intuitive operation for setting fermentation parameters.
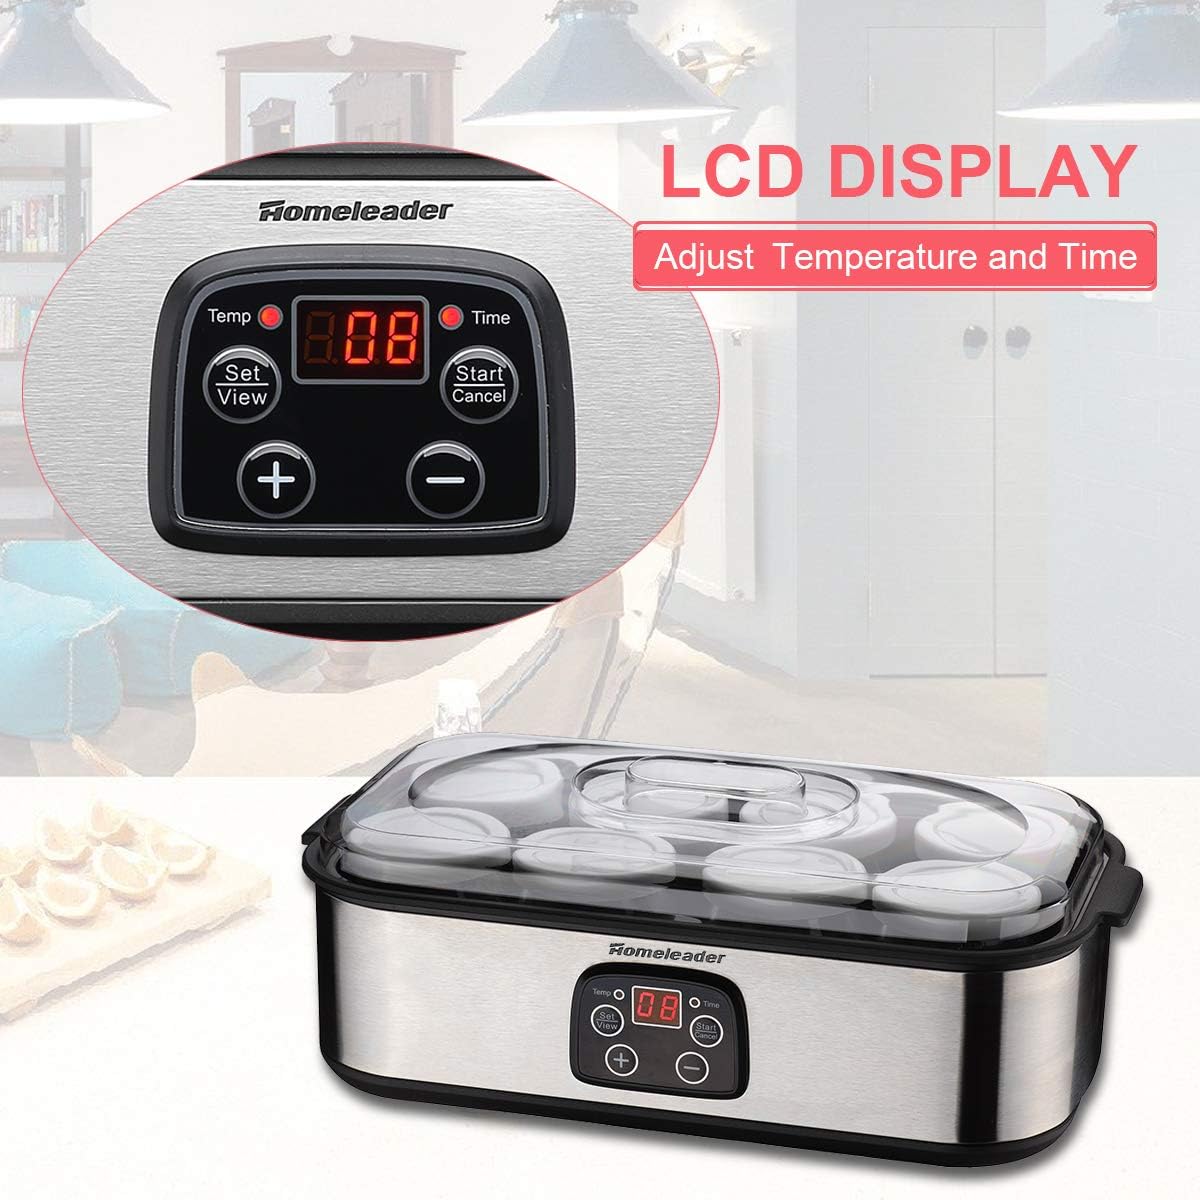
Image: A detailed view of the yogurt maker's control panel, featuring an LCD display for temperature and time, along with 'Set/View', '+', '-', and 'Start/Cancel' buttons.
Setup
- Unpack: Carefully remove all components from the packaging. Retain packaging for future storage or transport.
- Clean: Before first use, wash the glass jars and their lids thoroughly with warm, soapy water. Rinse well and dry completely. Wipe the main unit with a damp cloth. Do not immerse the main unit in water.
- Placement: Place the yogurt maker on a stable, flat, heat-resistant surface, away from direct sunlight or heat sources. Ensure adequate ventilation around the unit.
Operating Instructions
Follow these steps to make homemade yogurt using your Homeleader K32-031 Yogurt Maker.

Image: A visual guide showing three steps: 1. Adding yogurt starter and milk to glass jars. 2. Placing the jars into the yogurt maker. 3. Setting temperature and time on the machine's display.
- Prepare Ingredients: Combine your desired yogurt starter (e.g., a small amount of plain yogurt with live cultures or a powdered starter) with milk in a clean bowl. Stir well to ensure the starter is evenly distributed.
- Fill Jars: Pour the milk and starter mixture into the eight clean glass jars. Do not overfill; leave a small space at the top. Place the lids loosely on the jars or leave them off during fermentation, depending on your recipe.
- Place Jars in Unit: Carefully place the filled glass jars into the yogurt maker's base. Ensure they are seated properly.
- Cover and Connect Power: Place the transparent top cover onto the yogurt maker. Plug the power cord into a standard electrical outlet.
- Set Temperature and Time:
- Press the 'Set/View' button to toggle between temperature and time settings.
- Use the '+' and '-' buttons to adjust the desired fermentation temperature (typically between 104°F to 115°F / 40°C to 46°C) and fermentation time (usually 6 to 12 hours, depending on starter and desired tartness).
- The digital display will show the selected settings.
- Start Fermentation: Press the 'Start/Cancel' button to begin the fermentation process. The unit will maintain a constant temperature throughout the set time.
- Monitor Progress: The display will count down the remaining time. Avoid opening the lid frequently during fermentation, as this can disrupt the process.
- Completion: Once the timer reaches zero, the unit will automatically turn off or beep to indicate completion. Unplug the unit from the power outlet.
- Cool and Chill: Carefully remove the jars from the yogurt maker. Place the lids securely on the jars and refrigerate for at least 4 hours before serving. This stops the fermentation process and thickens the yogurt.
Note: This manual provides instructions for operating the yogurt maker. Specific yogurt recipes, including milk types, starter cultures, and desired fermentation times, may vary. Consult reliable recipe sources for detailed yogurt-making guidance.
Cleaning and Maintenance
Proper cleaning ensures the longevity and hygiene of your yogurt maker.
- Unplug: Always unplug the yogurt maker from the power outlet and allow it to cool completely before cleaning.
- Clean Jars and Lids: Wash the glass jars and their lids with warm, soapy water. They are typically dishwasher safe, but hand washing is recommended for best care. Rinse thoroughly and dry completely before storage or next use.
- Clean Main Unit: Wipe the exterior of the main unit with a soft, damp cloth. For stubborn stains, use a mild detergent. Do not use abrasive cleaners or scouring pads, as these can damage the stainless steel finish.
- Do Not Immerse: Never immerse the main unit, power cord, or plug in water or any other liquid.
- Storage: Ensure all parts are dry before storing the yogurt maker. Store in a cool, dry place.

Image: Several glass yogurt jars, similar to those provided with the Homeleader K32-031, are shown stored in a refrigerator, illustrating easy storage and freshness.
Troubleshooting
If you encounter issues with your yogurt maker, refer to the following common problems and solutions:
| Problem | Possible Cause | Solution |
|---|---|---|
| Yogurt is too thin or not setting. |
|
|
| Yogurt is too tart or separated. | Over-fermentation. | Reduce fermentation time for future batches. |
| Unit does not turn on. |
|
|
Specifications
- Model: K32-031
- Brand: Homeleader
- Jar Capacity: 8 x 6 oz (approx. 180 ml) BPA-free glass jars
- Control: Digital time and temperature control
- Material: Stainless steel base
- Dimensions: Approximately 39.37 x 17.02 x 22.1 cm (15.5 x 6.7 x 8.7 inches)
- Weight: Approximately 2.61 kg (5.75 lbs)

Image: A diagram illustrating the approximate dimensions of the Homeleader K32-031 Yogurt Maker: 12.6 inches (length), 7.5 inches (width), and 5.5 inches (height).
Warranty and Support
For warranty information or technical support, please refer to the warranty card included with your product or contact Homeleader customer service. Keep your purchase receipt as proof of purchase.
Customer Service: Please visit the official Homeleader website or refer to the contact information provided in your product packaging for assistance.