1. Introduction
Thank you for choosing the PETWANT PF-105 Automatic 5-Meal Pet Feeder. This device is designed to assist you in managing your pet's feeding schedule by automatically dispensing up to five pre-portioned meals at scheduled times. It features a voice recording function to call your pet to eat and an easy-to-clean design. Please read this manual thoroughly before use to ensure proper operation and maintenance.
2. Important Safety Instructions
- Read all instructions before using the appliance.
- Do not immerse the main unit in water or other liquids.
- This appliance is intended for indoor use only.
- Keep out of reach of children and pets when not in use to prevent damage or injury.
- Use only the provided AC-DC adapter (DC 5V/1A) or 4 x Size C batteries.
- Do not attempt to disassemble or repair the unit yourself. Contact customer support if service is required.
- Ensure the feeder is placed on a stable, level surface.
- Only suitable for dry and semi-wet pet food. Do not use with wet food, canned food, or water.
- Regularly clean the feeding bowls to maintain hygiene.
3. Product Overview
Familiarize yourself with the components of your PETWANT PF-105 feeder.

Figure 1: Top-down view of the PETWANT PF-105 Automatic Pet Feeder. This image shows the overall design of the feeder, including the central rotating lid, the exposed food compartment, and the control panel with an LCD screen and buttons.
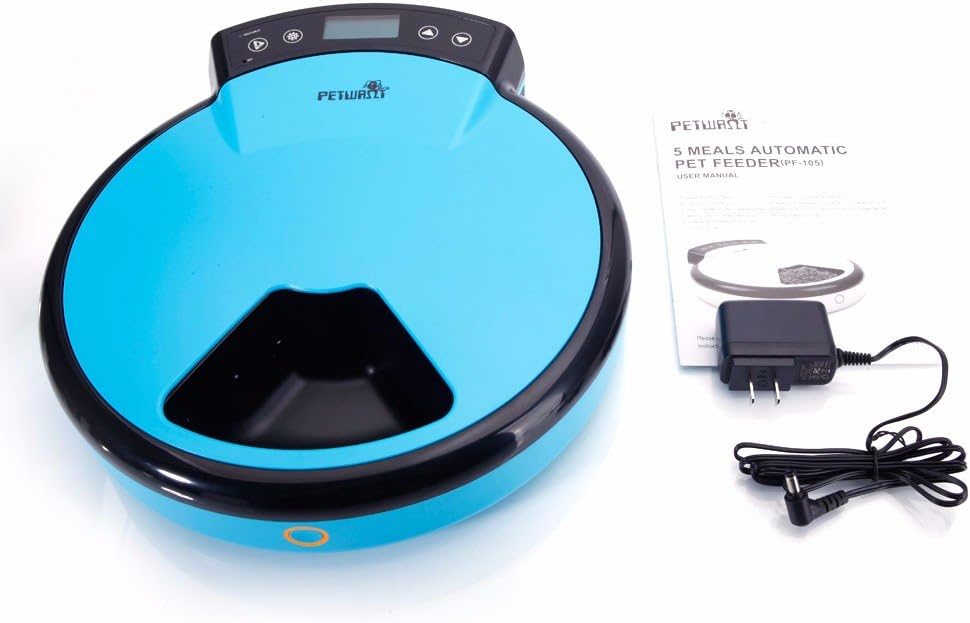
Figure 2: PETWANT PF-105 Automatic Pet Feeder with included accessories. This image displays the feeder alongside its user manual and the US standard power adapter, illustrating what comes in the package.
Components:
- Main Unit: Houses the motor, control panel, and battery compartment.
- Rotating Lid: Covers the food compartments and rotates to expose meals.
- Food Compartments (x5): Individual sections for storing pet food. Each holds 240ml.
- Control Panel: Includes LCD screen, setting buttons, and voice recording buttons.
- Power Adapter: For connecting to a wall outlet.
- Battery Compartment: Located on the underside, for 4 x Size C batteries (not included).

Figure 3: Detailed view of the control panel. This close-up shows the LCD screen displaying "00:00" and "MEAL:", along with the control buttons for setting time, programming meals, and recording voice messages.

Figure 4: Underside of the feeder. This image highlights the battery compartment, which requires 4 C-size batteries, and the power switch, along with non-slip feet.
4. Setup
4.1 Unpacking
- Carefully remove all components from the packaging.
- Verify that all listed components are present: Main Unit, Power Adapter, User Manual.
- Remove any protective films or packaging materials.
4.2 Power Supply
The feeder can be powered by either the included AC-DC adapter or 4 x Size C batteries (not included).
- Using the AC-DC Adapter:
- Plug the adapter into the DC 5V/1A port on the side of the feeder.
- Plug the other end of the adapter into a standard US wall outlet.
- Using Batteries:
- Turn the feeder upside down.
- Open the battery compartment cover (refer to Figure 4).
- Insert 4 new Size C batteries, ensuring correct polarity (+/-).
- Replace the battery compartment cover securely.
Note: Batteries provide backup power in case of power outage or for portable use. It is recommended to use both for reliable operation.
4.3 Filling Food Compartments
- Ensure the feeder is powered on.
- Press the "REC/PLAY" button (often represented by a play icon) to manually rotate the lid and expose an empty compartment. Repeat until all compartments are accessible.
- Fill each of the five compartments with your pet's dry or semi-wet food. Each compartment has a capacity of 240ml.
- Do not overfill the compartments, as this may obstruct the rotating lid.
- Once filled, the lid will automatically cover the compartments.
5. Operating Instructions
5.1 Setting the Current Time
- Press and hold the "SET" button (often represented by a gear icon) for 3 seconds until the hour digits on the LCD screen start flashing.
- Use the "UP" (▲) and "DOWN" (▼) buttons to adjust the hour.
- Press "SET" again to move to the minute digits. Adjust minutes using the "UP" and "DOWN" buttons.
- Press "SET" one more time to confirm and exit time setting mode.
5.2 Programming Meal Times
The feeder allows you to set up to 4 meal times over a 4-day period. Each meal corresponds to one of the five compartments.
- Press the "SET" button once. The "MEAL" indicator will flash, and "1" will appear, indicating Meal 1 setting.
- Use the "UP" and "DOWN" buttons to set the desired hour for Meal 1.
- Press "SET" to move to minutes, then adjust with "UP" and "DOWN".
- Press "SET" again to confirm Meal 1 and move to Meal 2.
- Repeat steps 2-4 for Meal 2, Meal 3, and Meal 4.
- After setting Meal 4, press "SET" to exit programming mode.
Note: If you only need to set fewer than 4 meals, simply press "SET" repeatedly to skip the remaining meal settings until you exit the programming mode. The feeder will rotate to the next compartment at each set meal time.
5.3 Recording a Voice Message
You can record an 8-second voice message that will play three times at each scheduled meal time to call your pet.
- Press and hold the "REC/PLAY" button (often represented by a microphone icon) until you hear a beep.
- Speak clearly into the microphone (located near the control panel) for up to 8 seconds.
- Release the "REC/PLAY" button when finished. You will hear a double beep indicating the recording is saved.
- To play back the recorded message, briefly press the "REC/PLAY" button.
5.4 Manual Feeding
To manually dispense a meal, briefly press the "REC/PLAY" button (often represented by a play icon). The lid will rotate to the next available compartment.
6. Maintenance and Cleaning
Regular cleaning ensures hygiene and extends the life of your feeder. The ABS feeding bowls are designed for easy cleaning.
- Disconnect Power: Before cleaning, ensure the feeder is turned off and unplugged from the wall outlet. If using batteries, remove them.
- Remove Food: Empty any remaining food from the compartments.
- Clean Bowls: The rotating lid and individual compartments can be removed for cleaning. Wash them with warm, soapy water. Rinse thoroughly and dry completely before reassembling.
- Clean Main Unit: Wipe the main unit (non-removable parts) with a damp cloth. Do not immerse the main unit in water.
- Reassemble: Ensure all parts are dry before reassembling and reconnecting power.
Care Instructions: Hand Wash Only for removable parts.
7. Troubleshooting
| Problem | Possible Cause | Solution |
|---|---|---|
| Feeder does not turn on. | No power, batteries drained, or adapter not connected. | Check power adapter connection. Replace batteries if using battery power. Ensure the power switch on the underside is ON. |
| Lid does not rotate. | Food obstruction, low power, or mechanism jam. | Check for food blocking the lid's rotation. Ensure sufficient power. Clean the feeder thoroughly. |
| Meal times are incorrect. | Time not set correctly or meal schedule misconfigured. | Re-set the current time and re-program the meal schedule as per section 5.1 and 5.2. |
| Voice message not playing. | No message recorded or low volume. | Re-record the voice message (section 5.3). Ensure the volume is audible. |
8. Specifications
| Feature | Detail |
|---|---|
| Model | PF-105 |
| Material | ABS |
| Dimensions (L x W x H) | (13.19 x 12.01 x 3.15) inches / (33.5 x 30.5 x 8) cm |
| Weight | 2.92 pounds / 1325 grams |
| Color | White |
| Capacity | 5 compartments, 240ml each |
| Power Supply | 4 x Size C Batteries (not included) or AC-DC Adapter DC 5V/1A |
| Food Category | Suitable for Dry & Semi-wet Food |
| Special Feature | Voice Recording |
| Target Species | Cat, Dog |
| Care Instructions | Hand Wash Only (removable parts) |
9. Warranty and Support
For warranty information or technical support, please refer to the contact details provided with your purchase documentation or visit the official PETWANT website. Keep your purchase receipt as proof of purchase.


