
Introduction
This manual provides essential instructions for the safe and efficient operation, installation, and maintenance of your Intex SX1500 Krystal Clear Sand Filter Pump. Please read this manual thoroughly before installation and use, and keep it for future reference.

Figure 1: Intex SX1500 Krystal Clear Sand Filter Pump overview.
Important Safety Information
Always follow basic safety precautions when installing and using this electrical product. Failure to follow these instructions can result in serious injury or death.
- Read all instructions before using the product.
- Connect only to a grounded receptacle protected by a Ground-Fault Circuit Interrupter (GFCI).
- Do not bury the electrical cord.
- Keep children away from the pump and pool area.
- Never operate the pump when the pool is occupied.
- Ensure all connections are secure and leak-free before operation.
Package Contents
Verify that all components are present and undamaged. If any parts are missing or damaged, do not attempt to assemble or operate the pump. Contact Intex customer service for assistance.

Figure 2: Retail packaging of the Intex SX1500 Sand Filter Pump.
- Sand Filter Pump Unit (Motor, Tank, 6-Way Valve)
- Hoses and Clamps
- Pressure Gauge
- Instruction Manual
- Base Platform
Setup and Installation
Proper setup is crucial for the performance and longevity of your sand filter pump. Ensure the pump is placed on a firm, level surface, at least 2 feet (0.6 meters) away from the pool.
1. Assembling the Base and Tank
- Place the pump motor onto the base platform.
- Secure the filter tank to the base, ensuring it is stable.
2. Adding Filter Media (Sand)
The Intex SX1500 requires approximately 12 kg (26.5 lbs) of #20 silica sand (0.45-0.85 mm) or Intex Glass Filter Media. Do not use gravel or coarse sand.
- Remove the 6-way valve from the tank.
- Cover the standpipe opening inside the tank to prevent sand from entering.
- Carefully pour the filter sand into the tank.
- Fill the tank with water until it covers the sand. This helps cushion the laterals.
- Remove the standpipe cover and reattach the 6-way valve, ensuring a tight seal.

Figure 3: The sand filter tank where filter media is added.
3. Connecting Hoses to the Pool
Ensure your pool has the correct size connections (38mm / 1.5 inches) for the pump hoses. Adapters may be required for smaller pool connections.
- Connect one hose from the pool's return fitting (water going back to the pool) to the "RETURN" port on the 6-way valve.
- Connect another hose from the pool's suction fitting (water coming from the pool) to the "PUMP" port on the pump motor.
- Connect a short hose from the "TANK" port on the 6-way valve to the pump motor's outlet.
- Connect a backwash hose to the "WASTE" port on the 6-way valve, directing it to an appropriate drainage area.
- Secure all hose connections with clamps.
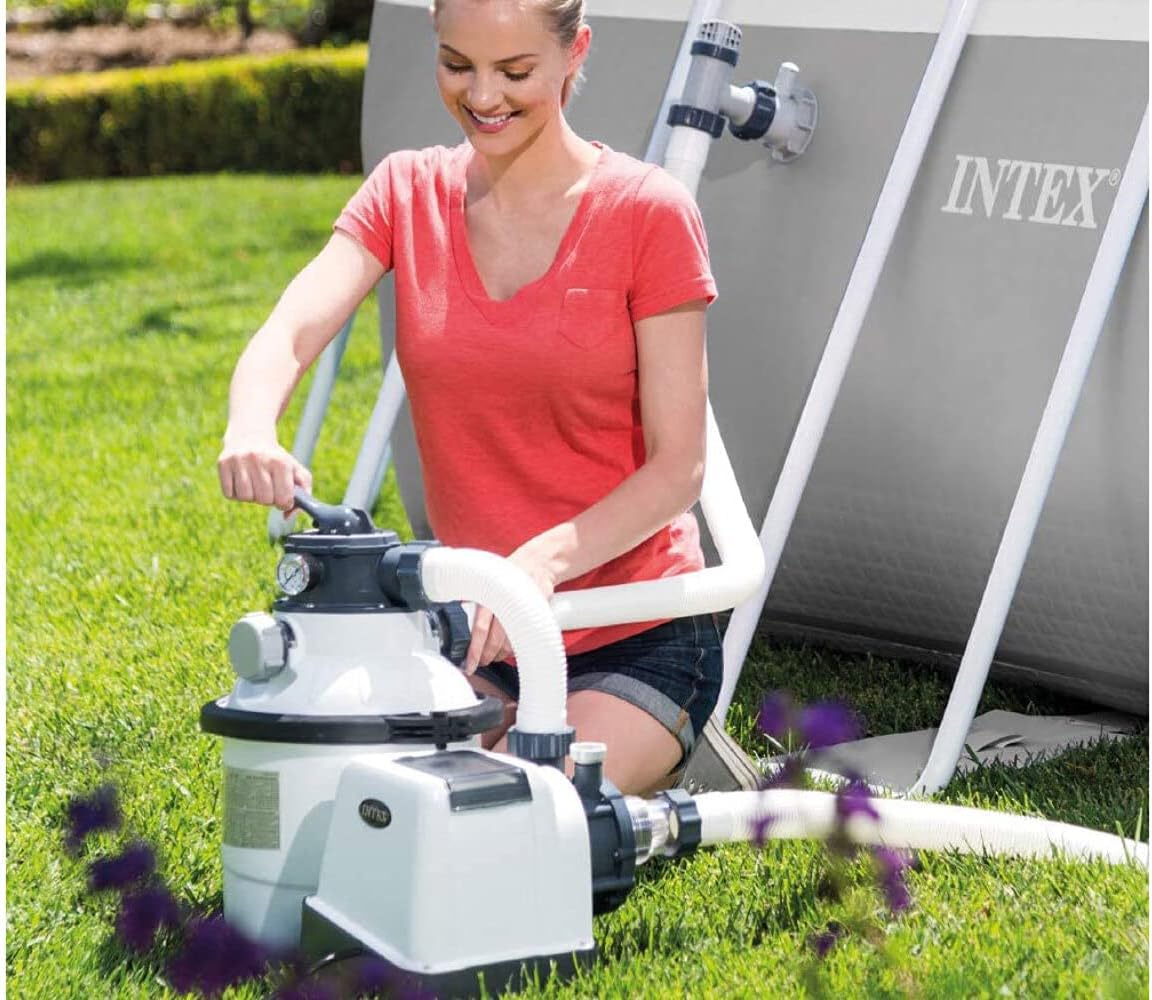
Figure 4: Connecting the sand filter pump to a pool.
4. Priming the Pump
Before starting, ensure the pump is primed to prevent airlocks and damage.
- Ensure the pool water level is above the suction and return fittings.
- Open the air release valve on the top of the pump.
- Allow water to fill the pump and hoses until a steady stream of water flows from the air release valve.
- Close the air release valve.
Operating Instructions
The 6-way valve controls the pump's functions. Always turn off the pump before changing the valve position to prevent damage.
6-Way Valve Functions

Figure 5: The 6-way multi-port valve.
- FILTER: Normal filtering operation. Water flows through the sand, is cleaned, and returned to the pool.
- BACKWASH: Reverses water flow to clean the sand bed. Water is pumped through the bottom of the tank, up through the sand, and out the waste port.
- RINSE: Used after backwashing to settle the sand bed and flush any remaining debris to waste.
- RECIRCULATE: Bypasses the filter media, circulating water directly back to the pool. Useful for chemical distribution without filtering.
- DRAIN: Drains water directly from the pool out the waste port, bypassing the filter.
- CLOSED: Shuts off all flow to the filter and pool. Do not operate the pump in this position.
Starting the Pump
- Ensure the 6-way valve is set to FILTER.
- Plug the pump into a grounded GFCI outlet.
- Press the power button to start the pump.
- Observe the pressure gauge. Normal operating pressure will be indicated.

Figure 6: Pressure gauge indicating system pressure.
Using the Built-in Timer
The integrated timer allows for automatic operation cycles.

Figure 7: Control panel with integrated timer.
- Press the TIMER button to set the desired operating hours.
- The display will show the set duration.
- The pump will automatically start and stop according to the programmed cycle.
- Use the LOCK/UNLOCK button to prevent accidental changes to settings.
Maintenance
Regular maintenance ensures optimal performance and extends the life of your sand filter pump.
Backwashing and Rinsing
Backwash when the pressure gauge reads 5-10 PSI (0.34-0.68 bar) above the initial clean pressure, or when water flow decreases significantly.
- Turn off the pump.
- Set the 6-way valve to BACKWASH.
- Turn on the pump and backwash until the water in the sight glass (if present) runs clear (approx. 2-3 minutes).
- Turn off the pump.
- Set the 6-way valve to RINSE.
- Turn on the pump and rinse for 30-60 seconds.
- Turn off the pump.
- Set the 6-way valve back to FILTER.
- Turn on the pump to resume normal operation.
Cleaning the Strainer Basket
The strainer basket prevents large debris from reaching the pump impeller.

Figure 8: The pump's strainer basket for debris collection.
- Turn off the pump and unplug it.
- Close the plunger valves on the pool to stop water flow.
- Unscrew the strainer cover and remove the basket.
- Empty and rinse the basket.
- Replace the basket and secure the cover.
- Open the plunger valves and restart the pump.
Sand Replacement
Filter sand typically needs replacement every 3-5 years, or when filtering efficiency significantly declines despite regular backwashing.
- Turn off and unplug the pump.
- Drain the water from the filter tank.
- Remove the 6-way valve and carefully scoop out the old sand.
- Clean the tank interior.
- Add new filter sand as per setup instructions.
Winterization
Before freezing temperatures, prepare the pump for winter storage.
- Turn off and unplug the pump.
- Disconnect all hoses from the pump and pool.
- Drain all water from the pump, tank, and hoses.
- Remove the pressure gauge and drain plugs.
- Store the pump and components in a dry, frost-free area.
Troubleshooting
| Problem | Possible Cause | Solution |
|---|---|---|
| Pump not starting | No power; GFCI tripped; Motor overheated. | Check power connection; Reset GFCI; Allow motor to cool. |
| Low water flow | Clogged strainer basket; Dirty sand; Air in system; Closed valves. | Clean basket; Backwash/rinse sand; Prime pump; Open valves. |
| Cloudy pool water | Insufficient filtration time; Dirty sand; Incorrect chemical balance. | Increase filtration time; Backwash/rinse; Test and adjust pool chemicals. |
| Water leaking from pump/valve | Loose connections; Damaged O-rings/gaskets. | Tighten connections; Inspect and replace O-rings/gaskets. |
Specifications
| Feature | Detail |
|---|---|
| Model Number | SX1500 |
| Brand | Intex |
| Material | Plastic |
| Water Flow Rate | 4500 Liters/hour (4.5 m³/h) |
| System Flow Rate | 4000 Liters/hour (4.0 m³/h) |
| Voltage | 220-240V |
| Item Weight | 10.4 Kilograms |
| Recommended Pool Size | Intex Ultra XTR Frame 4.88m & Ultra XTR Frame Rectangular 5.49 x 2.74m |
| Hose Connections | 38mm (1.5 inches) |

Figure 9: Approximate dimensions of the Intex SX1500 Sand Filter Pump.
Warranty and Support
For detailed warranty information, please refer to the warranty card included with your product or visit the official Intex website. For technical support, spare parts, or service inquiries, contact Intex customer service directly. Keep your purchase receipt as proof of purchase.
Official Intex Website: www.intexcorp.com


