1. Introduction
This manual provides essential information for the safe and effective use of your new RDSJ ABL-D1 4624864 Lithium-Ion Replacement Battery. Please read these instructions carefully before installation and operation to ensure optimal performance and longevity of your iRobot Roomba vacuum cleaner.
2. Product Specifications

The image displays the key parameters of the ABL-D1 battery, including its model, type, voltage, and capacity, ensuring users can verify compatibility and performance details at a glance.
| Feature | Detail |
|---|---|
| Model | ABL-D1 |
| Battery Type | Li-ion |
| Voltage | 14.4V |
| Capacity | 1800mAh / 26Wh |
| Compatible P/N | ABL-D1, 4INR19/65, 4624864, ABL-D2, 4INR19/66 |
| Manufacturer | RDSJ |
| Item Weight | 9.9 ounces |
| Package Dimensions | 4.25 x 3.15 x 2.48 inches |

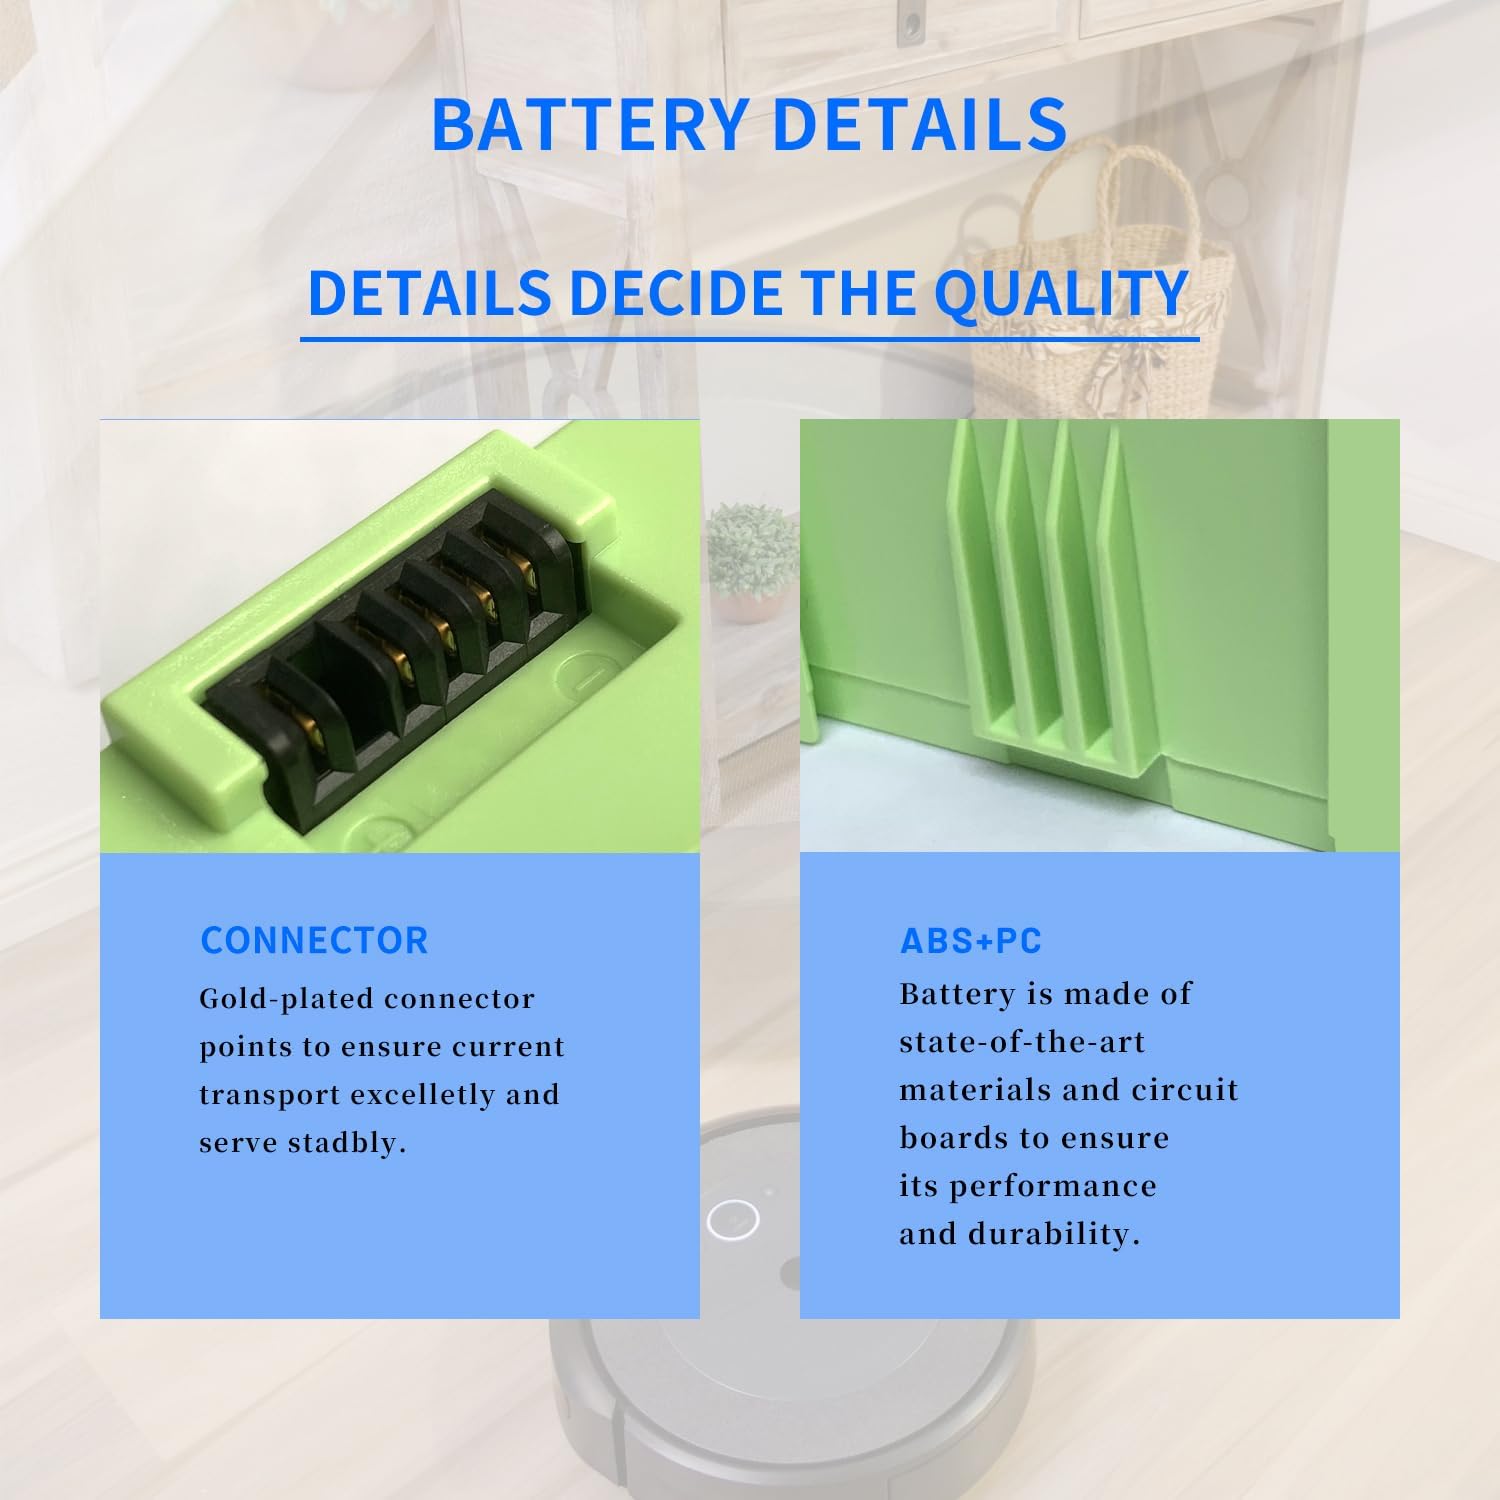
This image highlights the internal construction details of the battery, specifically the gold-plated connector points designed for excellent current transport and stable performance, and the durable ABS+PC material used for the casing, ensuring product quality and longevity.
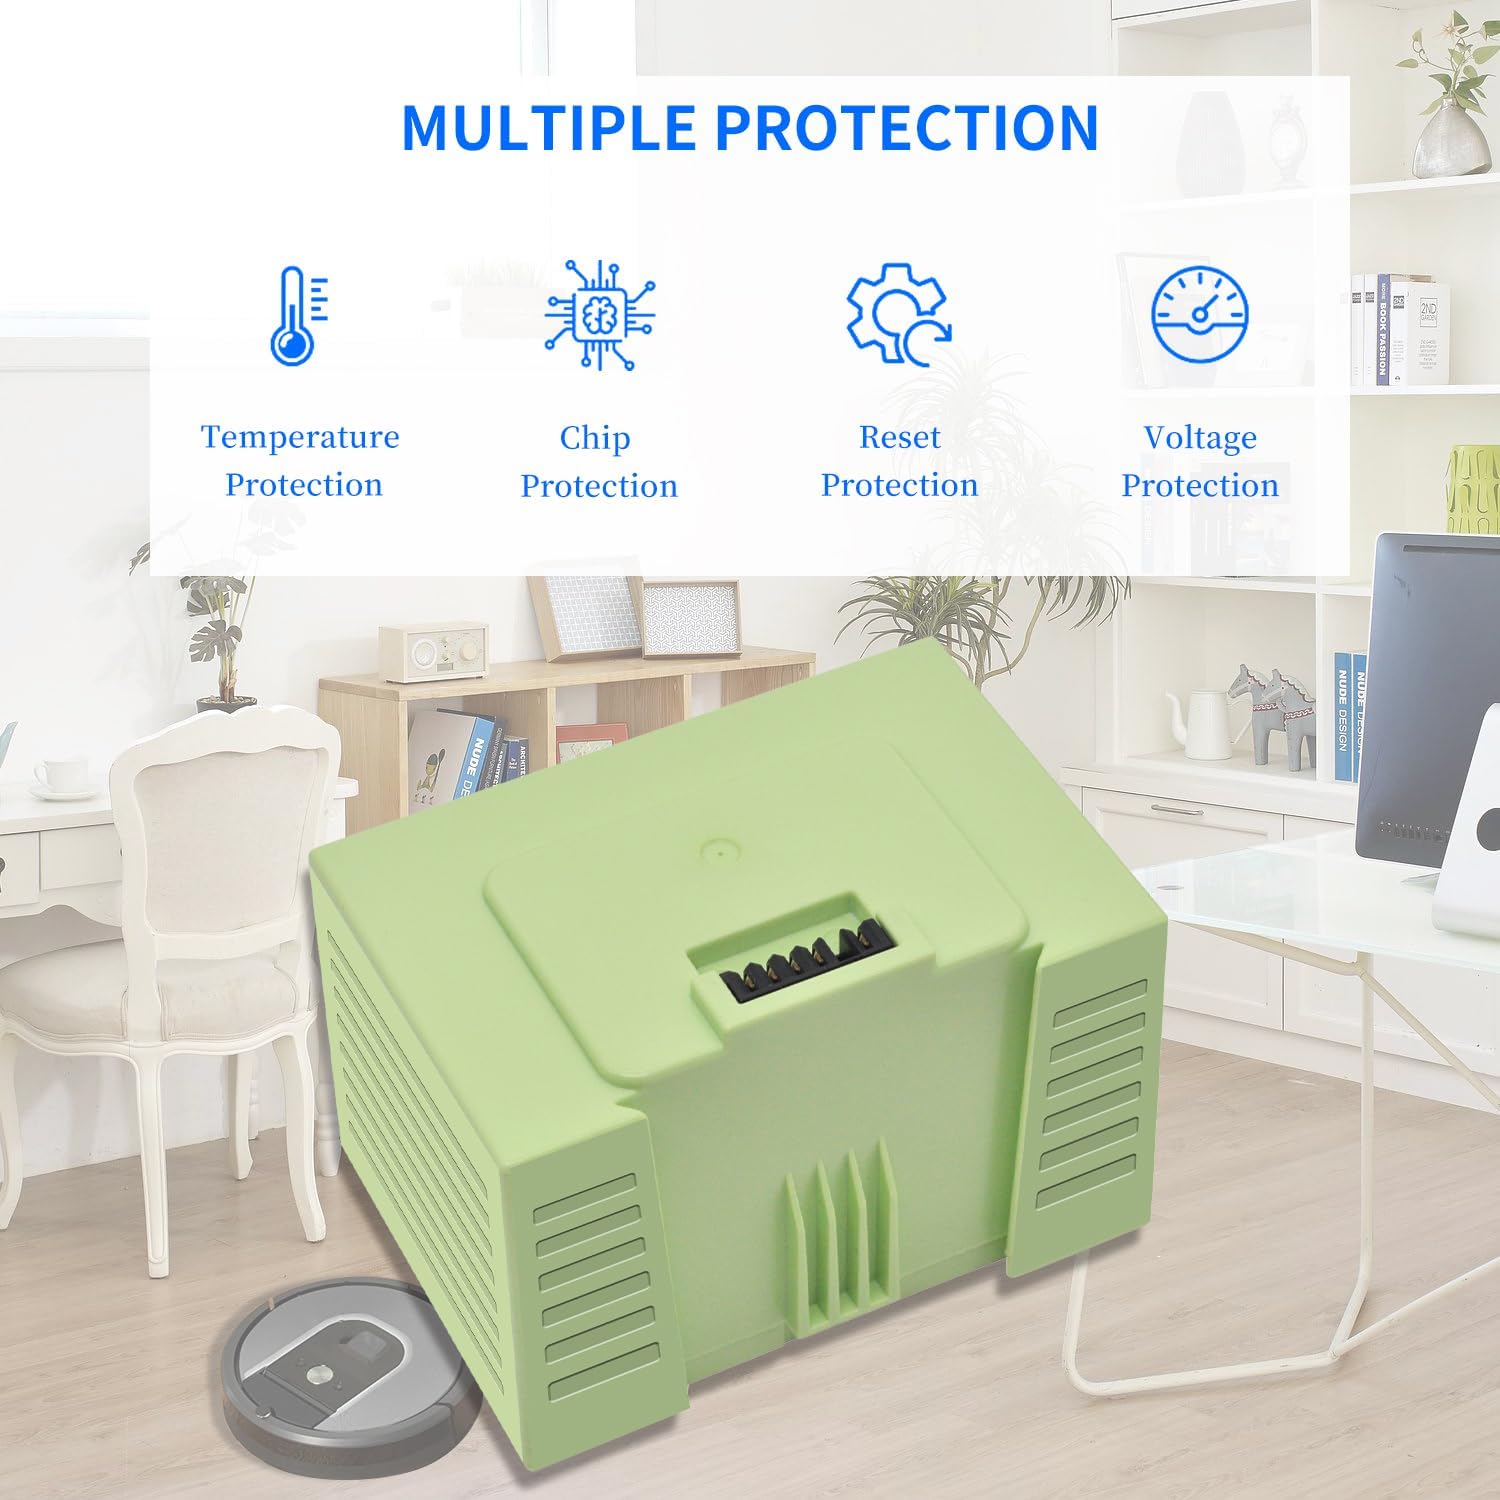
The image illustrates the multiple protection features integrated into the battery, including temperature protection, chip protection, reset protection, and voltage protection, all designed to enhance safety and extend the battery's lifespan.
3. Compatible iRobot Roomba Models
The RDSJ ABL-D1 replacement battery is compatible with a wide range of iRobot Roomba vacuum cleaner models. Please verify your model number against the list below:
This visual guide displays the ABL-D1 battery next to several iRobot Roomba models, including the i3, i4, i7, i8, e5, e6, and j7 series, to help users quickly identify if their vacuum cleaner is compatible with this replacement battery.
- i3 Series: i3, i3+, i3 Plus, 3150, 3158, 3550, 3556, 3558, i3150, i3152, i3154, i3156, i3158, i3550, i3552, i3554, i356, i3558
- i4 Series: i4, i4+, i4 Plus, 4150, 4550, 4552, i4150
- i6 Series: i6
- i7 Series: i7, i7+, i7 Plus, 7150, 7156, 7158, 7550, 7558, i7150, i7156, i7158, i7550, i755020, i7556, i7558
- i8 Series: i8, i8+, i8 Plus, 8550, i8550
- e5 Series: e5, 5150, e5150, e515020, e5152, e5154, e5158, e515840
- e6 Series: e6, 6198, e6198, e619820
- j7 Series: J7, J7+, J7 Plus, 7550, J7550, J755020, 7150, J7150, J715020
4. Important Safety Warnings
Failure to follow these safety instructions may result in fire, electric shock, or other injury or damage.
- Fire Hazard: May explode if disposed of in fire.
- Injury/Burns: To prevent injury or burns, do not allow metal objects to contact battery terminals.
- Compatibility: Use only with iRobot products at room temperature 50-104°F (10-40°C).
- Do not disassemble, crush, puncture, or short external contacts.
5. Setup and Installation
Replacing the battery in your iRobot Roomba is a straightforward process. Follow these steps carefully:
- Prepare the Robot: Place your Roomba upside down on a clean, soft surface (like a towel) to prevent scratches.
- Remove Waste Container: Locate and remove the dust bin/waste container from your Roomba.
- Remove Side Brush: Use a Phillips head screwdriver to remove the screw holding the side brush in place. Carefully remove the side brush.
- Remove Bottom Cover Screws: Locate the screws on the bottom cover of the Roomba. There are typically 5-6 screws. Unscrew them all.
- Lift Bottom Cover: Gently lift and remove the entire bottom cover of the Roomba.
- Remove Old Battery: The battery compartment will now be visible. The old battery is usually secured by a latch or simply slides out. Press any retaining latches and slide the old battery out.
- Install New Battery: Take your new RDSJ ABL-D1 battery. Align the connectors and slide the new battery into the compartment until it clicks securely into place.
- Reassemble: Place the bottom cover back onto the Roomba, ensuring all tabs and screw holes align. Secure it with the screws you removed earlier.
- Reattach Side Brush: Reinstall the side brush and secure it with its screw.
- Replace Waste Container: Insert the dust bin/waste container back into its slot.
For visual guidance, please refer to the installation videos below:
Video: Battery Replacement for iRobot Roomba i7
This video demonstrates the step-by-step process of replacing the battery in an iRobot Roomba i7 model, including removing the bottom cover, detaching the old battery, and installing the new one. It provides clear visual instructions for a successful battery swap.
Video: iRobot Roomba E5 E6 i7 Battery BAL-D1
This video illustrates the battery replacement procedure for iRobot Roomba E5, E6, and i7 series. It covers the necessary steps to access the battery compartment and install a new BAL-D1 battery, ensuring proper fit and function.
6. Operating Instructions
After successfully installing the new battery, your iRobot Roomba is ready for operation. Ensure the robot is fully charged before its first cleaning cycle.
- Place the Roomba on its charging base.
- Allow the battery to charge completely. For first use, it is recommended to discharge the battery to 5% (not to 0%) and then charge to 95%, repeating this cycle 3-4 times to optimize battery performance.
- Once charged, press the 'CLEAN' button on your Roomba or use the iRobot HOME app to start a cleaning cycle.

The image shows an iRobot Roomba vacuum cleaner actively cleaning a hard floor, demonstrating its operational state after a successful battery installation. This illustrates the robot's functionality in a typical home environment.
7. Battery Maintenance
Proper maintenance can extend the life of your ABL-D1 battery and ensure consistent performance:
- Initial Conditioning: For the first use, discharge the battery to approximately 5% (avoiding complete discharge to 0%) and then charge it fully to 95%. Repeat this cycle 3-4 times. This helps to calibrate the battery and optimize its capacity.
- Regular Charging: Always return your Roomba to its charging station after each cleaning cycle to keep the battery topped up.
- Storage: If storing the Roomba for an extended period, ensure the battery is fully charged and store it in a cool, dry place. Periodically charge the battery every few months to prevent deep discharge.
- Cycle Life: The battery is designed for up to 500 recharge cycles. Actual operation time may vary depending on usage patterns and device power requirements.
8. Troubleshooting
If you encounter any issues after replacing your battery, consider the following common solutions:
- Robot Not Powering On: Ensure the battery is correctly seated in its compartment and all screws on the bottom cover are tightened. Verify the charging contacts on both the robot and the charging base are clean.
- Short Run Time: Perform the initial conditioning cycles (discharge to 5%, charge to 95%, 3-4 times) as described in the Maintenance section. Ensure the Roomba's brushes and wheels are free of debris, as excessive resistance can drain the battery faster.
- Charging Issues: Check that the charging base is plugged in and receiving power. Clean the charging contacts on the robot and base with a dry cloth. If the issue persists, try resetting the Roomba (refer to your Roomba's original user manual for specific reset instructions).
9. Warranty and Support
For warranty information or technical support regarding your RDSJ ABL-D1 replacement battery, please refer to the product packaging or contact the manufacturer directly. Keep your purchase receipt as proof of purchase.


