1. Introduction
The Audibax Orlando 162 Plus is a professional PAR light designed for various lighting applications. It features 54 x 3W RGB 3-in-1 LEDs, offering a wide range of color mixing capabilities. This device supports DMX control, automatic programs, sound-activated modes, and master/slave operation, making it suitable for stage lighting, events, and architectural illumination. This manual provides essential information for safe operation, setup, and maintenance.
2. Safety Information
- Electrical Safety: Always connect the device to a grounded power outlet. Ensure the voltage matches the device's requirements (AC90-240V, 50/60Hz). Disconnect power before cleaning or servicing.
- Placement: Install the fixture in a well-ventilated area, away from heat sources and flammable materials. Ensure stable mounting to prevent accidental falls.
- Handling: Avoid direct eye exposure to the light source. Do not operate the device if the power cord is damaged. Do not attempt to repair the device yourself; refer servicing to qualified personnel.
- Environment: This device is intended for indoor use only. Protect it from moisture and extreme temperatures.
3. Package Contents
Verify that all items are present upon unpacking:
- Audibax Orlando 162 Plus PAR Light
- Mounting Bracket
- Power Cable
- User Manual
4. Product Overview
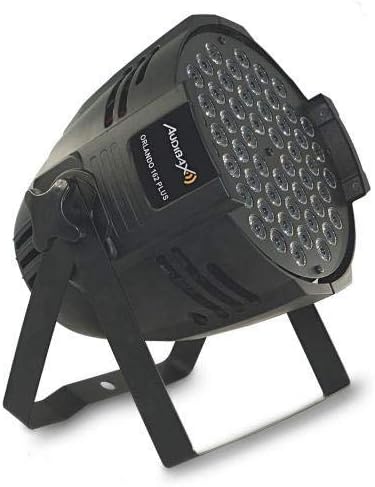
The Audibax Orlando 162 Plus features a robust aluminum housing and an adjustable mounting bracket for versatile positioning.

Figure 4.1: Front view of the Audibax Orlando 162 Plus PAR light, showcasing the 54 RGB LEDs illuminated in green.

Figure 4.2: Side view of the PAR light, illustrating the adjustable mounting bracket for flexible installation.
Control Panel and Connections
The rear panel provides access to the control interface and input/output connections.

Figure 4.3: Rear view of the PAR light, detailing the DMX IN/OUT ports, power input, digital display, and control buttons (MENU, UP, DOWN, ENTER).
- Digital Display: Shows current mode and parameter settings.
- MENU Button: Navigates through the main menu options.
- UP/DOWN Buttons: Adjust parameter values or navigate menu items.
- ENTER Button: Confirms selections.
- DMX IN/OUT: 3-pin XLR connectors for DMX signal connection.
- POWER IN: IEC power input for connecting the power cable.
5. Setup
5.1 Mounting
- Attach the mounting bracket securely to the fixture using the provided screws.
- Mount the fixture to a truss, ceiling, or stand using appropriate clamps and safety cables (not included). Ensure the mounting surface can support the weight of the fixture.
- Adjust the angle of the fixture using the bracket's locking knobs.
5.2 Power Connection
- Connect the supplied power cable to the POWER IN socket on the rear of the fixture.
- Plug the other end of the power cable into a suitable grounded power outlet.
5.3 DMX Connection (Optional)
For DMX control, connect a DMX controller to the DMX IN port of the first fixture. Use DMX OUT to connect to the DMX IN of the next fixture in a daisy chain configuration.
- Use standard 3-pin XLR DMX cables.
- Ensure the DMX chain is terminated with a 120-ohm resistor at the last fixture for optimal signal integrity.
6. Operating Instructions
Use the MENU, UP, DOWN, and ENTER buttons on the rear panel to navigate and select operating modes and parameters.
6.1 Menu Navigation
- Press MENU to cycle through the main menu options (e.g., DMX Address, Auto Mode, Sound Mode, Master/Slave).
- Use UP and DOWN to adjust values or select sub-options within a menu.
- Press ENTER to confirm your selection or save changes.
6.2 Operating Modes
The Orlando 162 Plus offers several operational modes:
- DMX Mode: Allows external control via a DMX controller. Set the DMX address using the menu. Refer to the DMX channel chart (not provided in this manual, typically found in a separate DMX protocol sheet) for specific control functions.
- Auto Mode: The fixture runs through pre-programmed light shows automatically. Various auto programs may be available; use UP/DOWN to select.
- Sound-Activated Mode: The light patterns and changes respond to ambient sound detected by the built-in microphone. Adjust sensitivity if available.
- Master/Slave Mode: Connect multiple Orlando 162 Plus fixtures. Set one unit as 'Master' and others as 'Slave'. The slave units will synchronize their operation with the master unit.
- Static Color Mode: Select a fixed color. The 3-in-1 RGB LEDs allow for a wide spectrum of colors.
- Strobe Function: Activates a flashing light effect. This can often be adjusted for speed.
6.3 Color Examples


7. Maintenance
- Cleaning: Regularly clean the lens and housing with a soft, lint-free cloth. Do not use abrasive cleaners or solvents. Ensure the device is powered off and unplugged before cleaning.
- Inspection: Periodically check power cables, DMX cables, and mounting hardware for any signs of wear or damage. Replace damaged components immediately.
- Storage: When not in use, store the fixture in a dry, dust-free environment.
8. Troubleshooting
| Problem | Possible Cause | Solution |
|---|---|---|
| Fixture does not power on. | No power supply; faulty cable. | Check power cable connection; verify power outlet; try a different cable. |
| No light output. | Incorrect mode selected; DMX signal issue. | Ensure fixture is in an active mode (Auto, Sound, DMX with active signal); check DMX connections and address. |
| DMX control not working. | Incorrect DMX address; faulty DMX cable; no DMX terminator. | Verify DMX address matches controller; check DMX cable integrity; ensure DMX terminator is used on the last fixture. |
| Lights flicker or behave erratically. | Unstable power supply; DMX signal interference. | Ensure stable power source; check DMX cable quality and connections; use a DMX terminator. |
9. Specifications
| Feature | Specification |
|---|---|
| Model Number | 10132061 |
| Light Source | 54 x 3W RGB 3-in-1 LEDs |
| Power Consumption | 162 Watts |
| Input Voltage | AC90-240V, 50/60Hz |
| Control Modes | DMX, Auto, Sound-Activated, Master/Slave, Static Color, Strobe |
| DMX Channels | Varies by mode (refer to DMX protocol sheet) |
| Material | Aluminum Housing |
| Color | Black |
| Dimensions (Package) | 24.5 x 21.5 x 21.5 cm |
| Weight (Product) | 2.1 kg |
10. Warranty and Support
Audibax products are manufactured to high-quality standards. For warranty information, please refer to the terms and conditions provided at the point of purchase or contact Audibax customer support. For technical assistance or service inquiries, please visit the official Audibax website or contact your local dealer.


