1. Introduction
This manual provides instructions for the setup, operation, and maintenance of the Avaya 1616 IP Telephone (Model 700450190). The Avaya 1616 is designed for users who require a robust and feature-rich communication device, supporting 16 line appearances and a high-quality speakerphone. This guide will help you maximize the functionality of your IP telephone.
2. Setup
Follow these steps to properly set up your Avaya 1616 IP Telephone.
2.1 Unpacking and Component Identification
Carefully remove all components from the packaging. Ensure all parts are present before proceeding with the setup.
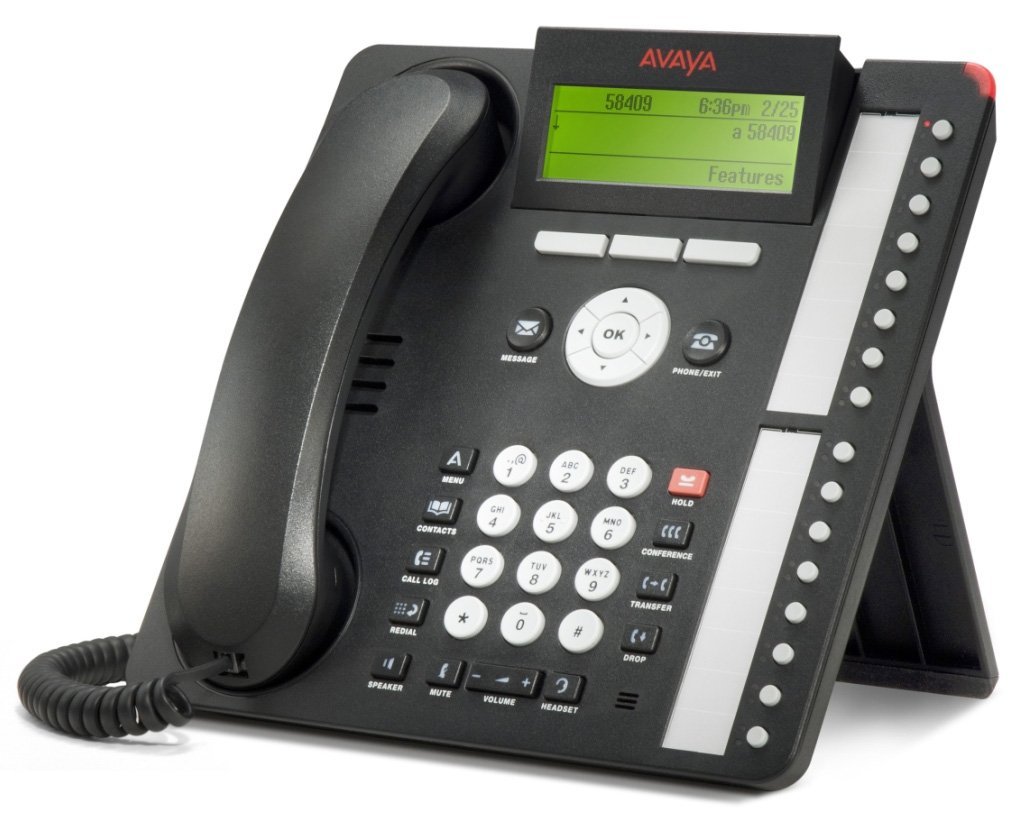
Figure 1: Avaya 1616 IP Telephone components. This image displays the main telephone unit, the handset, the coiled handset cord, an Ethernet cable, and the desk stand. The main unit features a display screen, a numeric keypad, and various function buttons. The desk stand is designed to elevate the phone for easier viewing and operation.
- Telephone Base Unit: The main body of the phone with keypad, display, and function buttons.
- Handset: The receiver for voice communication.
- Handset Cord: Coiled cord connecting the handset to the base unit.
- Ethernet Cable: For network connection.
- Desk Stand: For positioning the phone on a desk.
- Power Adapter (Sold Separately): A 5V local power supply may be required if Power over Ethernet (PoE) is not available.
2.2 Physical Connections
- Attach the Desk Stand: Securely attach the desk stand to the bottom of the telephone base unit.
- Connect the Handset: Plug one end of the coiled handset cord into the handset and the other end into the designated handset port on the side or back of the telephone base unit.
- Connect to Network: Insert one end of the Ethernet cable into the "LAN" port on the back of the telephone and the other end into a network switch or router. The phone supports dual Ethernet ports for connection of the phone and a collocated PC with VLAN separation.
- Connect Power:
- Power over Ethernet (PoE): If your network switch supports 802.3af PoE, the phone will receive power through the Ethernet cable. No separate power adapter is needed.
- Local Power Supply: If PoE is not available, connect a 5V local power supply (sold separately) to the power port on the back of the telephone and then to an electrical outlet.
Once connected, the phone will power on and begin its boot sequence. This may take a few moments.
3. Operating Instructions
This section covers the basic operation of your Avaya 1616 IP Telephone.
3.1 Key Features
- 16 Line Appearances/Feature Keys: Programmable buttons with dual LEDs for line status and feature access.
- High-Quality 2-Way Speakerphone: For hands-free communication.
- Caller ID: Displays incoming caller information.
- Multiline Operation: Supports multiple active lines.
- Conference Call Capability: Basic conferencing features.
3.2 Basic Call Functions
- Making a Call:
- Lift the handset or press the Speaker button.
- Dial the desired number using the keypad.
- Press the "Call" or "Dial" softkey, or wait for automatic dialing.
- Answering a Call:
- Lift the handset, or press the Speaker button, or press the flashing line appearance button.
- Ending a Call:
- Replace the handset, or press the Speaker button again if using speakerphone, or press the "End Call" softkey.
- Placing a Call on Hold:
- During an active call, press the "Hold" button. The line appearance LED will flash.
- To retrieve the call, press the flashing line appearance button.
- Transferring a Call:
- During an active call, press the "Transfer" button. The current call is put on hold.
- Dial the number of the party to whom you wish to transfer the call.
- Wait for the party to answer (consulted transfer) or press "Transfer" again to complete the transfer (blind transfer).
- Initiating a Conference Call:
- During an active call, press the "Conference" button. The current call is put on hold.
- Dial the number of the third party.
- Once the third party answers, press the "Conference" button again to join all parties.
4. Maintenance
Proper maintenance ensures the longevity and optimal performance of your Avaya 1616 IP Telephone.
4.1 Cleaning
- Use a soft, slightly damp cloth to clean the exterior surfaces of the phone.
- Avoid using abrasive cleaners, solvents, or strong chemicals, as these can damage the finish and electronic components.
- Do not spray cleaning liquids directly onto the phone. Apply to the cloth first.
- Ensure the phone is disconnected from power before cleaning.
4.2 General Care
- Keep the phone away from excessive heat, direct sunlight, and moisture.
- Avoid dropping the phone or subjecting it to strong impacts.
- Ensure cables are not pinched or strained.
5. Troubleshooting
This section provides solutions to common issues you might encounter with your Avaya 1616 IP Telephone.
| Problem | Possible Cause | Solution |
|---|---|---|
| Phone does not power on. | No power supply or faulty connection. |
|
| No dial tone. | Network connectivity issue or service problem. |
|
| Cannot make or receive calls. | Network configuration, service issue, or phone registration problem. |
|
| Poor audio quality. | Network congestion, faulty cable, or handset issue. |
|
If the problem persists after attempting these solutions, please contact your IT department or Avaya support for further assistance.
6. Specifications
Key technical specifications for the Avaya 1616 IP Telephone (700450190).
| Feature | Detail |
|---|---|
| Model Number | 700450190 |
| Line Appearances | 16 with dual LEDs |
| Speakerphone | High-quality 2-way |
| Mounting Options | Desk or wall mountable (with optional adapter) |
| Ethernet Ports | Dual (for phone and collocated PC w/VLAN separation) |
| Power Source | 802.3af Power over Ethernet (PoE) or optional 5V local power supply |
| Dialer Type | Single Keypad |
| Answering System Type | Digital |
| Compatible Devices | Computers, Telephone Networks, VoIP Services |
| Conference Call Capability | Basic |
| Multiline Operation | Multi-Line Operation |
| Caller ID | Yes |
| Color | Black |
| Product Dimensions | 9.8 x 7.9 x 2.8 inches (approximate) |
| Package Dimensions | 16.8 x 10 x 3.3 inches |
| Weight | 2.9 Pounds (Package Weight) |
7. Warranty Information
This Avaya 1616 IP Telephone (700450190) is typically offered with a 90-day limited warranty. This warranty covers defects in materials and workmanship under normal use. For specific terms and conditions, please refer to the warranty documentation provided at the time of purchase or contact your vendor.
Note: As a renewed product, warranty terms may vary from new products. Always confirm warranty details with your supplier.
8. Support
For technical assistance, further troubleshooting, or inquiries regarding your Avaya 1616 IP Telephone, please contact your system administrator or the vendor from whom you purchased the device. Avaya's official support channels can also provide resources and documentation for their products.
For general information about Avaya products, you may visit the official Avaya website.


