
1. Introduction
This manual provides essential instructions for the safe and efficient operation of your Schauer 36 Volt 20 Amp Golf Cart Battery Charger. This fully automatic charger is designed to charge 36-volt lead-acid batteries, including flooded (wet cell) and AGM (sealed) types, commonly found in golf carts. It operates on standard household power (117VAC 60 Hz) and is also compatible with 240 Volts 50 or 60 Hz power sources. Please read this manual thoroughly before initial use to ensure proper setup and to maximize the lifespan of your charger and batteries.

Front view of the Schauer 36 Volt Golf Cart Battery Charger, showing the control panel, power switch, and output cable with crowfoot connector.
2. Safety Information
Always observe the following safety precautions to prevent injury or damage to the charger or battery:
- Read all instructions: Before using the charger, read all instructions and cautionary markings on the charger, the battery, and the product using the battery.
- Ventilation: Ensure adequate ventilation when charging flooded lead-acid batteries, as they can produce explosive gases.
- Avoid sparks and flames: Do not smoke or allow a spark or flame in the vicinity of the battery or engine.
- Eye and skin protection: Wear eye protection and protective clothing when working with batteries. Avoid touching eyes while working near batteries.
- Electrical shock hazard: Do not expose the charger to rain or wet conditions. Never operate the charger if it has received a sharp blow, been dropped, or otherwise damaged.
- Disconnect power: Always disconnect the AC power from the outlet before connecting or disconnecting the DC output cables to the battery.
- Proper voltage: Use the charger only for 36-volt lead-acid batteries. Do not attempt to charge non-rechargeable batteries.
- Supervision: This appliance is not intended for use by persons (including children) with reduced physical, sensory or mental capabilities, or lack of experience and knowledge, unless they have been given supervision or instruction concerning use of the appliance by a person responsible for their safety.
3. Package Contents
Verify that all items are present in your package:
- Schauer 36 Volt Golf Cart Battery Charger (Model JAC2036cf)
- Crowfoot Connector (pre-attached DC output cable)
- AC Power Cord
- Spare Fuses (typically two)

A detailed view of the Crowfoot connector, which connects the charger to compatible golf cart battery systems.

The standard AC power plug for connecting the charger to a wall outlet.
4. Product Features
The Schauer JAC2036cf charger offers the following key features:
- Automatic 3-Stage Charging: The charger provides a constant current charge to a constant voltage, then transitions to a float standby mode, ensuring optimal battery health and preventing overcharging.
- Battery Type Selection: A front panel switch allows selection between "Flooded" (normal lead-acid batteries with caps) and "AGM" (sealed) battery types.
- Universal AC Input: Operates on standard 117VAC 60 Hz household power and is compatible with 240 Volts 50 or 60 Hz power.
- Intelligent Charge Control: The charger monitors battery impedance to precisely manage the end of the charge cycle for all compatible battery types.
- LED Indicators: Visual indicators for AC power, charging status, and float mode.
- Durable Construction: Housed in a robust aluminum case for durability and efficient heat dissipation.

The charger is designed for fully automatic 3-stage charging, allowing it to remain connected to the battery in a maintenance or float mode.

This intelligent charger monitors battery impedance to optimize the charging cycle for various battery types.
5. Setup
Follow these steps for initial setup:
- Unpack the Charger: Remove the charger and all accessories from the packaging. Inspect for any visible damage.
- Select Battery Type: Locate the battery type selector switch on the front panel. Set it to either "Flooded Batteries" for standard wet-cell batteries or "GEL or AGM" for sealed batteries, matching your golf cart's battery type. Incorrect selection can damage batteries.
- Placement: Place the charger on a stable, dry, and well-ventilated surface, away from direct sunlight or heat sources. Ensure the cooling fan at the rear of the unit is not obstructed.
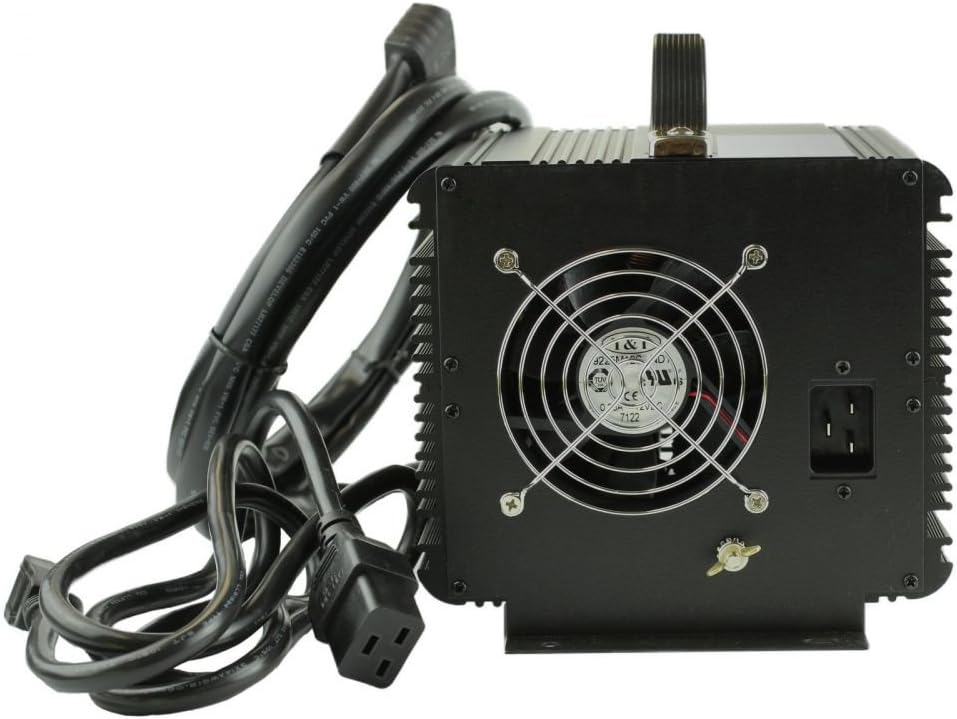
Rear view of the charger, highlighting the cooling fan for heat dissipation and the AC power input port.
6. Operating Instructions
To charge your golf cart batteries:
- Ensure Charger is OFF: Confirm the ON/OFF switch on the charger's front panel is in the "OFF" position.
- Connect to Battery: Plug the Crowfoot connector from the charger's DC output cable securely into the golf cart's charging receptacle.
- Connect to AC Power: Plug the charger's AC power cord into a standard electrical outlet (117VAC or 240VAC, depending on your power source and charger configuration).
- Turn Charger ON: Flip the ON/OFF switch on the charger's front panel to the "ON" position.
- Monitor Charging: Observe the LED indicators on the front panel:
- Red LED: Indicates AC power is connected and the charger is receiving power.
- Yellow LED: Indicates the battery is actively charging.
- Green LED: Indicates the battery is fully charged and the charger is in float (maintenance) mode.
- Charging Completion: Once the Green LED illuminates, the battery is fully charged. The charger can be left connected in float mode to maintain the battery's charge.
- Disconnecting: To disconnect, first flip the ON/OFF switch to "OFF", then unplug the AC power cord from the wall outlet, and finally disconnect the Crowfoot connector from the golf cart.

The charger's front panel, illustrating the LED indicators: Red for AC power, Yellow for charging, and Green for float mode.
7. Maintenance
Regular maintenance ensures optimal performance and longevity of your charger:
- Cleaning: Keep the charger clean and free of dust and debris. Use a dry cloth to wipe the exterior. Do not use solvents or abrasive cleaners.
- Ventilation: Periodically check that the cooling fan and vents are clear of obstructions to ensure proper airflow.
- Cable Inspection: Regularly inspect the AC power cord and DC output cable for any signs of damage, fraying, or exposed wires. Replace if damaged.
- Fuse Replacement: In the event of a power surge or internal fault, the charger may blow an internal fuse. If the charger fails to power on (Red LED off) despite being connected to a live outlet, it may require fuse replacement. This typically involves opening the unit's casing. It is recommended to contact customer support or a qualified technician for fuse replacement to avoid voiding the warranty or causing further damage.
8. Troubleshooting
Refer to this section for common issues and their solutions:
| Problem | Possible Cause | Solution |
|---|---|---|
| Charger does not turn on (No Red LED) | No AC power; Blown internal fuse; Faulty power cord. | Check AC outlet with another device. Inspect power cord for damage. If power is present and cord is good, an internal fuse may be blown (see Maintenance section). |
| Yellow LED does not illuminate (Not charging) | Incorrect battery connection; Battery deeply discharged; Incorrect battery type selected. | Ensure Crowfoot connector is fully seated. Verify battery voltage is not extremely low. Confirm battery type switch matches your battery. |
| Charger gets hot during use | Normal operation; Insufficient ventilation. | It is normal for chargers to generate heat during operation, especially when pushing high amperage. Ensure adequate ventilation around the unit. If overheating persists or is excessive, discontinue use and contact support. |
| Charger never reaches Green LED (Float mode) | Battery unable to hold charge; Incorrect battery type selected; Faulty battery. | Have the battery tested by a professional. Double-check the battery type selector switch. |
9. Specifications
| Model Number | JAC2036cf |
| Input Voltage | 117VAC 60 Hz (also 240 Volts 50/60 Hz compatible) |
| Output Voltage | 36 Volts |
| Output Current | 20 Amps |
| Charge Control | Constant current to constant voltage, then float standby |
| Cyclic Voltage (Flooded) | 2.47 volts/cell |
| Cyclic Voltage (Gel and AGM) | 2.4 volts/cell |
| Battery Types | Flooded (wet cell), AGM (sealed), Deep Cycle, Valve Regulated Lead Acid |
| Connector Type | Crowfoot |
| Product Dimensions | 4.33 x 5.12 x 4.33 inches |
| Item Weight | 11 pounds |
| Case Material | Aluminum |

The charger features a robust aluminum case, providing durability and efficient heat dissipation.
10. Warranty and Support
The Schauer 36 Volt Golf Cart Battery Charger typically comes with a 2-year manufacturer's warranty. This warranty covers defects in materials and workmanship under normal use. For warranty claims, technical support, or service inquiries, please contact Schauer customer service directly. Keep your proof of purchase for warranty validation.
For assistance, please refer to the contact information provided on the official Schauer website or your product packaging.

