Introduction
This manual provides comprehensive instructions for the safe and effective installation, operation, and maintenance of your ONKRON Full Motion TV Wall Mount M7L Black. Please read all instructions carefully before beginning installation and retain this manual for future reference. This mount is designed for 40-75 inch televisions weighing up to 150 lbs, supporting VESA mounting patterns from 100x100mm to 600x400mm.
Important Safety Information
- Weight Capacity: Do not exceed the maximum weight capacity of 150 lbs (68 kg). Exceeding this limit may result in serious injury or property damage.
- TV Size: This mount is suitable for TVs between 40 and 75 inches.
- VESA Compatibility: Ensure your TV's VESA pattern (mounting holes on the back of the TV) is within the range of 100x100mm to 600x400mm.
- Wall Type: This mount is designed for installation on solid concrete, brick walls, or wood wall studs. DO NOT MOUNT ON DRYWALL ALONE.
- Professional Installation: If you are unsure about the installation process or the suitability of your wall, consult a qualified professional installer.
- Tools: Use appropriate tools for installation. Ensure pilot holes are drilled to the correct size to prevent damage to the wall or hardware.
- Hardware: Use only the provided hardware or suitable replacements that meet strength and size requirements. Do not overtighten screws.
- Children and Pets: Keep children and pets away from the installation area. Ensure the TV is securely mounted to prevent accidental falls.
Package Contents
Verify that all components are present and undamaged before beginning installation. If any parts are missing or defective, contact ONKRON customer service.

Image: A detailed diagram illustrating all parts and hardware included in the ONKRON M7L TV wall mount package, such as the wall plate, TV brackets, various screws, washers, spacers, Allen wrenches, and a spirit level.
Specifications
| Feature | Specification |
|---|---|
| Model Number | M7L |
| TV Screen Size Compatibility | 40 - 75 inches |
| Maximum Weight Capacity | 150 lbs (68 kg) |
| VESA Mounting Patterns | 100x100mm to 600x400mm |
| Wall Distance (Extension) | 4.4 inches to 28 inches |
| Tilt Angle | -5° to +15° |
| Swivel Angle | Up to 180° (depending on TV size) |
| Material | Alloy Steel |
| Product Dimensions | 27.99 x 23.62 x 15.75 inches |
| Item Weight | 19.8 pounds |
Setup and Installation
1. Check VESA Compatibility
Before installation, confirm that your television's VESA mounting pattern matches the mount's capabilities. The VESA pattern refers to the four holes on the back of your TV, measured horizontally and vertically in millimeters. This mount supports VESA patterns from 100x100mm to 600x400mm.

Image: A visual guide demonstrating different VESA mounting configurations (e.g., 100x100, 200x200, 400x400, 600x400) and how the mount's brackets can be adjusted to fit.
2. Determine Wall Type
The stability of your TV mount depends on the wall structure. This mount is suitable for:
- Wood Stud Walls: Locate the center of the wood studs using a stud finder.
- Solid Concrete Walls: Ensure the concrete is solid and free of cracks.
- Brick Walls: Ensure the brick is solid and in good condition.
WARNING: Do not install this mount on drywall alone. Drywall cannot support the weight of the mount and television, leading to potential failure and injury.

Image: An illustration showing the three types of walls suitable for mounting: solid concrete, brick walls, and wood wall studs, with a clear warning against mounting on drywall without studs.
3. Mounting the Wall Plate
- Mark Pilot Holes: Use the provided mounting template to mark the desired location for the pilot holes on your wall. Ensure the template is level.
- Drill Pilot Holes: Drill pilot holes according to the recommended drill bit size for your wall type.
- Attach Wall Plate: Secure the wall plate to the wall using the appropriate lag bolts and washers. Ensure it is firmly attached and level.

Image: A visual guide demonstrating the process of marking and drilling pilot holes, then securing the wall plate to the wall using a drill and the provided hardware.
4. Attaching TV Brackets
- Select Screws: Choose the correct diameter and length of screws that fit your TV's VESA holes. Use the provided spacers if necessary to ensure proper clearance.
- Attach Brackets: Secure the vertical TV brackets to the back of your television. Ensure they are centered and tightened securely.
5. Hanging the TV
- Lift TV: With assistance, carefully lift the television and hook the TV brackets onto the wall plate.
- Secure TV: Engage the safety locking mechanisms on the TV brackets to prevent the TV from accidentally dislodging from the wall plate.
Video: An official ONKRON promotional video demonstrating the installation process and key features of the M7L TV wall mount, including its extension, swivel, and tilt capabilities. This video provides a visual guide to the setup.
Operating the Mount
The ONKRON M7L mount offers full motion capabilities for optimal viewing from various positions.
1. Extension and Retraction
Gently pull or push the television to extend or retract the mount arm. The arm allows for a distance from the wall ranging from 4.4 inches to 28 inches, providing flexibility for viewing and accessing cables.

Image: A television mounted on the ONKRON M7L, shown extended from the wall, highlighting the ability to freely position the screen and adjust its distance from the wall.
2. Swivel Adjustment
The mount allows the TV to swivel up to 180 degrees horizontally, depending on the size of your television. This enables you to adjust the viewing angle to suit different seating arrangements or room layouts.

Image: A television mounted on the ONKRON M7L, swiveled to an angle, illustrating the wide range of horizontal movement for optimal viewing from various points in a room.
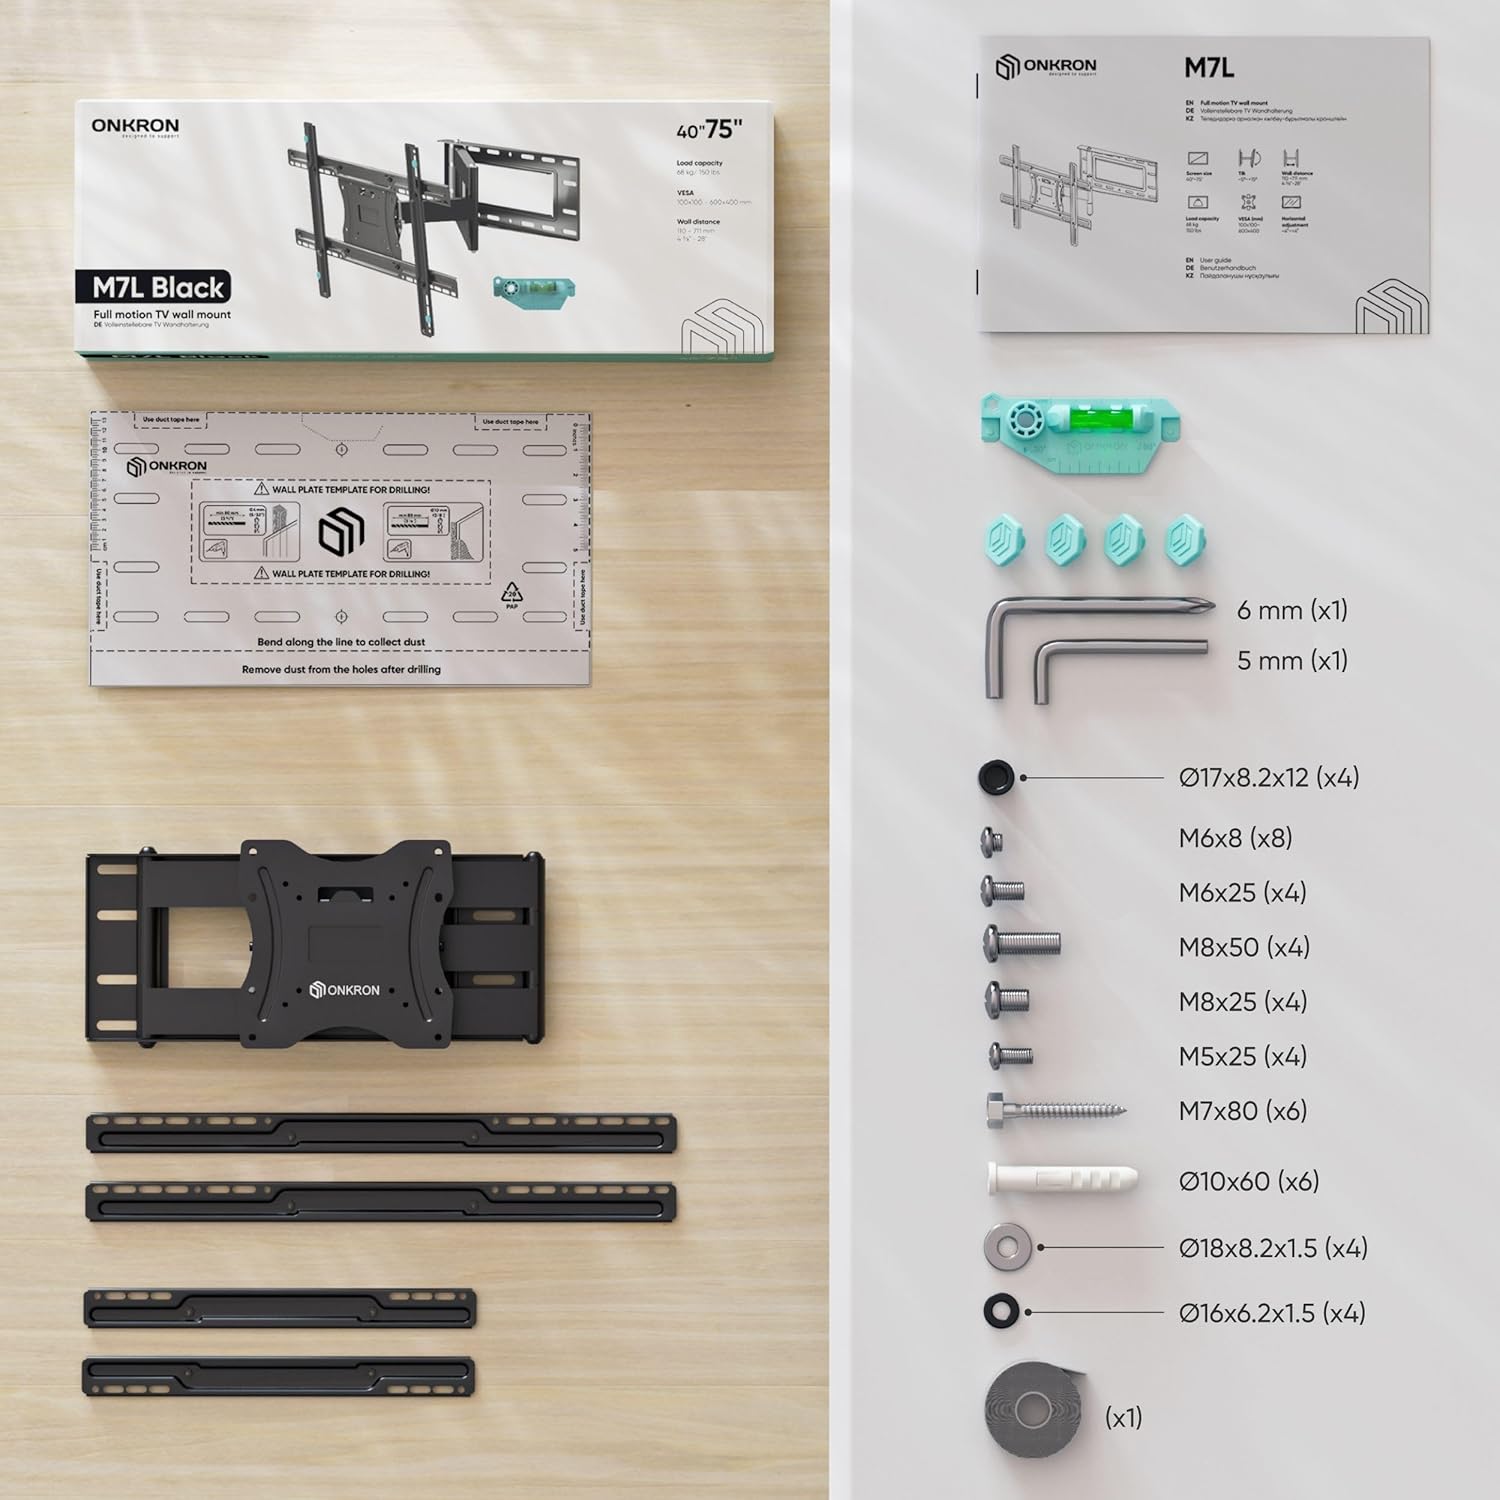
Image: A chart providing specific swivel angles for the M7L mount, indicating how the maximum swivel range decreases with larger TV screen sizes (e.g., up to 90° for <55" TVs, 55° for 75" TVs).
3. Tilt Adjustment
You can tilt your TV from -5 degrees (downward) to +15 degrees (upward) to reduce glare and achieve a comfortable viewing angle. The tilt mechanism can be adjusted without additional tools.

Image: A person demonstrating the tilt adjustment feature of the ONKRON M7L mount, showing the TV being tilted upwards and downwards within its specified range.
4. Horizontal Alignment
After installation, the TV can be horizontally aligned to ensure it is perfectly level. This feature allows for minor adjustments to correct any slight misalignment during the mounting process.

Image: An illustration depicting the horizontal adjustment capability of the ONKRON M7L mount, showing how the TV can be shifted left or right on the wall plate for perfect centering.
Maintenance
To ensure the longevity and safe operation of your ONKRON TV wall mount, follow these maintenance guidelines:
- Regular Inspection: Periodically check all screws and connections to ensure they remain tight and secure. Over time, vibrations or frequent adjustments may cause fasteners to loosen.
- Cleaning: Wipe the mount with a soft, dry cloth to remove dust. Avoid using abrasive cleaners or solvents, as these can damage the finish.
- Lubrication: The articulating joints are designed for smooth movement. If movement becomes stiff, a small amount of silicone-based lubricant can be applied to the pivot points, avoiding contact with electrical components.
- Cable Management: Ensure cables are routed neatly and are not pinched or under tension when adjusting the TV position.
Troubleshooting
If you encounter issues with your ONKRON M7L TV wall mount, refer to the following common problems and solutions:
- Problem: TV is not level after installation.
Solution: Use the horizontal adjustment feature to fine-tune the TV's position on the wall plate. Ensure the wall plate itself was installed level using a spirit level. - Problem: Difficulty moving the TV (stiff joints).
Solution: Check for any obstructions or pinched cables. Apply a small amount of silicone-based lubricant to the articulating joints if necessary. Ensure the TV's weight is within the specified limit. - Problem: Screws or lag bolts broke during installation.
Solution: This often indicates overtightening or incorrect pilot hole size. Always use the recommended drill bit size and avoid excessive force. If a bolt breaks, it may require professional assistance to remove and repair the wall. Ensure you are using the correct screws for your TV's VESA holes and not overtightening them. - Problem: TV feels unstable or wobbly.
Solution: Immediately remove the TV from the mount. Re-check all wall plate fasteners and TV bracket connections. Ensure the wall type is appropriate and that the mount is securely anchored to studs or solid masonry. Verify that the safety locking mechanisms are fully engaged. - Problem: Cables are too short or get tangled when moving the TV.
Solution: Ensure you have cables of sufficient length to accommodate the full extension and swivel range of the mount. Use the integrated cable management features (if any) or cable ties to keep cables organized and prevent snagging.
Warranty and Customer Support
ONKRON products undergo multi-stage quality control to ensure reliability and durability. Your ONKRON M7L TV wall mount is backed by our commitment to quality.
For any questions, concerns, or assistance with your product, please contact ONKRON customer service. Our experts are available to provide support and answer any inquiries you may have regarding installation, operation, or troubleshooting.
Please refer to the product packaging or the official ONKRON website for specific warranty details and contact information.


