1. Introduction
This manual provides detailed instructions for the installation, operation, and maintenance of your Goldmaster PVR-72600 FTA HDMI Digital Satellite Receiver. Please read this manual thoroughly before using the device to ensure proper functionality and to prevent damage.
2. Safety Information
- Ensure the power supply voltage matches the requirements specified on the device.
- Do not expose the receiver to rain or moisture to prevent fire or electric shock.
- Do not open the casing. Refer all servicing to qualified personnel.
- Place the receiver in a well-ventilated area to prevent overheating.
- Disconnect the power cord during lightning storms or when unused for long periods.
3. Package Contents
Verify that all items are present in the package:
- Goldmaster PVR-72600 Digital Satellite Receiver
- Remote Control (with batteries)
- Power Adapter
- User Manual
- External USB device (if included as an accessory)
4. Product Overview
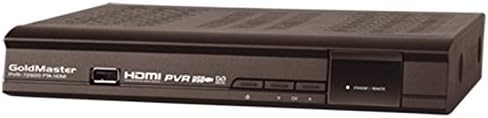
Figure 1: Front view of the Goldmaster PVR-72600 Digital Satellite Receiver. It shows the GoldMaster logo, PVR-72600 FTA HDMI model name, a USB port, HDMI PVR 2500 logo, control buttons, and power/status indicators.
Key Features:
- NXP (Conexant) processor for high performance.
- 32 Mb SDRAM and 2 Mb Flash memory.
- Supports up to 6000 channels.
- USB recording and playback of recorded files.
- Time Shifting functionality.
- HDMI output for high-definition video and audio.
- Flash memory protection against incorrect software updates.
- Robust electronic circuits and stable power supply.
- Compatible with central satellite systems.
- User-friendly menu interface with multi-language support.
- Includes 4 built-in games.
- Supports subtitles, teletext, and audio language (if broadcast by the provider).
- DiSEqC 1.0, 1.1, 1.2, and USALS (DiSEqC 1.3) compatible.
- True color On-Screen Display (OSD).
- Electronic Program Guide (EPG) for channel information.
- Advanced lock systems for System, Setup, Settings, and Channel Editing.
- Advanced PID editing, Channel List editing, Favorite List editing, Satellite/TP editing.
- Easy satellite installation interface with signal level indicator.
- Supports various aspect ratios (4:3 and 16:9).
- Memory protection during power outages.
- Save function for system settings (backup and restore).
- Multi-language broadcast reception (if supported by satellite and channel).
- TS format video recording and playback.
- MP3 file playback and JPEG slideshow feature.
- 13-split screen feature (1 live channel viewable).
- Video control feature for adjusting image color settings.
- Automatic DiSEqC detection.
- Wide search function.
5. Setup
5.1. Connections
- Antenna Connection: Connect your satellite dish cable to the "LNB IN" port on the rear panel of the receiver.
- HDMI Connection: Connect an HDMI cable from the receiver's HDMI OUT port to an HDMI input on your TV or monitor.
- USB Device: For recording or media playback, connect an external USB storage device to the USB port on the front panel.
- Power Connection: Connect the power adapter to the receiver and then plug it into a power outlet.
5.2. Initial Setup
Upon first power-on, the receiver will guide you through the initial setup process. Follow the on-screen instructions to select language, time zone, and perform a channel scan.
5.3. Antenna Setup
The receiver features an easy satellite installation interface with a signal level indicator. Navigate to the Antenna Setup menu to configure your satellite dish settings, including DiSEqC and LNB type. The automatic DiSEqC detection feature can help identify your connected DiSEqC settings.
6. Operating Instructions
6.1. Basic Functions
- Channel Selection: Use the CH+/CH- buttons on the remote control to change channels.
- Volume Control: Use the VOL+/VOL- buttons to adjust the volume.
- Menu Navigation: Press the MENU button to access the main menu. Use arrow keys to navigate and OK to confirm.
6.2. Recording and Time Shifting
With a connected external USB device, you can utilize the following features:
- USB Recording: Press the RECORD button on the remote to start recording the current program. Recorded files can be played back from the USB device.
- Time Shifting: This feature allows you to pause live TV and resume watching later. Press the PAUSE button during live broadcast to activate Time Shifting.
6.3. Media Playback
The receiver supports playback of various media types from a connected USB device:
- TS Video Playback: Play videos recorded in TS format.
- MP3 Playback: Listen to MP3 audio files.
- JPEG Slideshow: View JPEG images with a slideshow feature.
6.4. Electronic Program Guide (EPG)
Press the EPG button on your remote to view the Electronic Program Guide, which displays channel information and upcoming program schedules.
6.5. Advanced Features
- Channel Management: Edit channel lists, create favorite lists, and manage satellite/transponder settings.
- Lock Systems: Utilize advanced lock systems to secure access to System, Setup, Settings, and Channel Editing menus.
- Video Control: Adjust image color settings directly from the receiver's menu.
- Games: Access and play the 4 built-in games from the main menu.
- Subtitle, Teletext, Audio Language: Access these features if supported by the broadcast.
7. Maintenance
- Clean the receiver with a soft, dry cloth. Do not use liquid or aerosol cleaners.
- Ensure proper ventilation around the device to prevent dust accumulation and overheating.
- Regularly check for firmware updates on the Goldmaster website to ensure optimal performance and new features.
- Use the save function to back up your system settings to a USB device. This allows you to restore your settings if needed.
8. Troubleshooting
- No Power: Check the power cord connection and the power outlet.
- No Signal: Verify antenna connections. Check satellite dish alignment. Ensure LNB settings are correct in the menu.
- No Picture/Sound: Check HDMI cable connection. Ensure correct input is selected on your TV.
- Remote Control Not Working: Check batteries. Ensure no obstructions between remote and receiver.
- System Freezes: Disconnect power for a few seconds, then reconnect. If issues persist, consider a factory reset (note: this will erase all settings and channels).
9. Specifications
| Brand | GoldMaster |
| Model | PVR-72600 |
| Processor | NXP (Conexant) |
| Memory | 32 Mb SDRAM, 2 Mb Flash |
| Channel Capacity | Up to 6000 channels |
| Connectivity | HDMI, USB |
| Recording | External USB device (PVR, Time Shifting) |
| DiSEqC Support | 1.0, 1.1, 1.2, USALS (1.3) |
| Compatible Devices | Television, Computer Monitor |
| First Available Date | July 27, 2018 |
10. Warranty and Support
Goldmaster products are designed for reliability and performance. For warranty information, please refer to the warranty card included with your product or visit the official Goldmaster website. For technical support, troubleshooting assistance, or service inquiries, please contact Goldmaster customer service.
Online Resources: Visit the GoldMaster Store on Amazon