1. Introduction
The QIACHIP FLC-110V Universal Ceiling Fan and Light Remote Control Kit is designed to convert traditional ceiling fans with lights into remote-controlled units. This kit provides convenient wireless control over fan speeds, light operation, and timing functions. It features advanced semiconductor switch technology for quiet and reliable performance.

Image 1.1: The QIACHIP Universal Ceiling Fan and Light Remote Control Kit, including the remote, receiver, and wire connectors.
2. Product Overview
2.1. Components
- 1x Wireless Remote Control
- 1x Receiver Unit
- 1x Remote Wall Mount Holder
- Wire Nuts (for installation)

Image 2.1: Contents of the product package, showing the remote control, receiver, wall mount, and wire nuts.
2.2. Key Features
- 3-in-1 Functionality: Controls fan speed, light ON/OFF, and timing.
- Fan Speed Control: Three adjustable speeds (High, Medium, Low) and OFF.
- Light Control: Independent ON/OFF for ceiling fan lights (no dimming function).
- Timing Function: Four preset timer options (1H, 2H, 4H, 8H) for automatic fan shutdown.
- New Technology: Utilizes semiconductor switches instead of mechanical relays, reducing switching noise and eliminating switching arcs.
- Mute Function: Allows for silent operation without audible beeps.
- Wide Compatibility: Compatible with most ceiling fan lights from brands like Hunter, Harbor Breeze, Westinghouse, and Honeywell.
3. Safety Information
Please read all instructions carefully before installation and use. Improper installation can lead to electric shock or fire hazards.
- Power Disconnection: Always turn off power at the circuit breaker before installing or servicing the fan and remote kit.
- Qualified Electrician: If you are unsure about wiring, consult a qualified electrician.
- Voltage: This kit is designed for 110V AC systems.
- Motor Compatibility: DO NOT use with DC motors. DO NOT use with ceiling fans that have 3-wire motors.
- Receiver Size: Ensure there is sufficient space within your fan's canopy for the receiver (dimensions: 4.56 x 2.12 x 1.1 inches).
- Capacitor Compatibility: The product uses T4+5 µF capacitors. Optimal compatibility is achieved if your existing fan's running capacitor is also 5 µF. Significant speed variation may occur if the deviation is 3 µF or more.
- No Reverse Function: The receiver does not support a reverse function for the fan.
4. Installation
Follow these steps to install the receiver unit into your ceiling fan. Ensure power is OFF before proceeding.
4.1. Pre-Installation Check
- Verify that the power to the ceiling fan is completely disconnected at the main circuit breaker.
- Measure the available space in your fan's canopy to ensure the receiver (4.56 x 2.12 x 1.1 inches) will fit.
4.2. Wiring Diagram

Image 4.1: Detailed wiring diagram of the receiver unit.

Image 4.2: Simplified wiring diagram for typical installation. Note: Wire colors in older fans may vary.
4.3. Connection Steps
- Identify Wires: Locate the main power wires (Live and Neutral) and the fan/light wires from your ceiling fan.
- Connect Input Power: Connect the receiver's input Live (Black) and Neutral (White) wires to your household's main power Live and Neutral wires, respectively. Use wire nuts to secure connections.
- Connect Fan Wires: Connect the receiver's fan Live (Black) wire to the fan motor's Live wire.
- Connect Light Wires: Connect the receiver's light Live (Blue) wire to the fan light's Live wire.
- Connect Common Neutral: Connect the receiver's output Neutral (White) wire to the common Neutral wire of both the fan motor and the light.
- Position Receiver: Carefully tuck the receiver into the fan canopy, ensuring wires are not pinched.
- Restore Power: Once all connections are secure and the receiver is safely housed, restore power at the circuit breaker.
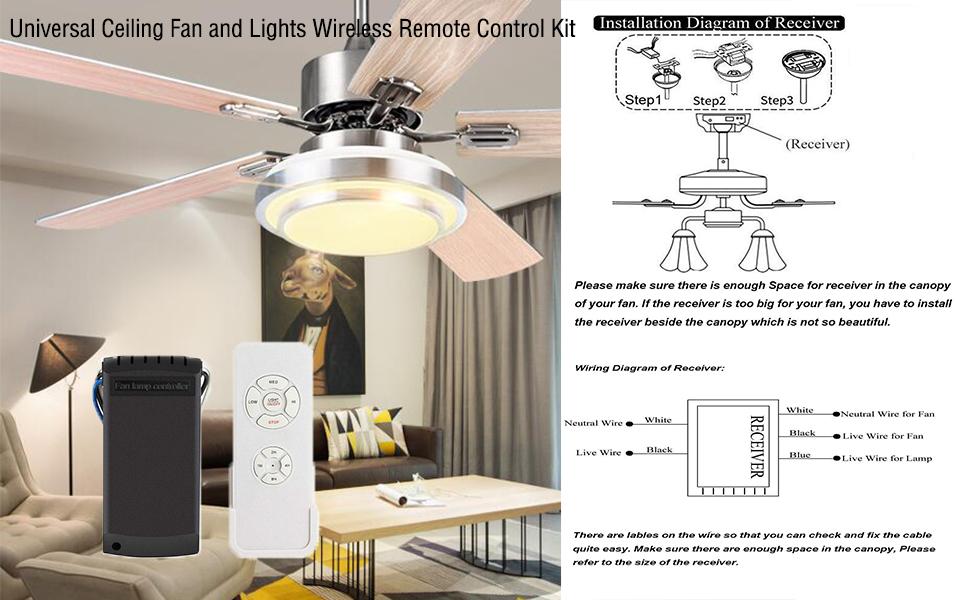
Image 4.3: Illustration of receiver placement within the fan canopy.
5. Pairing Instructions
The remote control and receiver are typically pre-paired from the factory. If re-pairing is necessary or if you need to unpair, follow these steps:
5.1. Pairing the Remote Control
- Ensure power to the fan is OFF.
- Turn the power to the fan ON.
- Within 5 seconds of powering on, simultaneously press and hold the "LIGHT ON/OFF" and "HI" buttons on the remote control.
- The receiver will emit 3 beeps, indicating successful pairing.
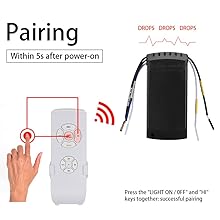
Image 5.1: Remote control pairing process.
5.2. Unpairing the Remote Control
- Ensure power to the fan is OFF.
- Turn the power to the fan ON.
- Within 5 seconds of powering on, simultaneously press and hold the "STOP" and "2H" buttons on the remote control.
- The receiver will emit a long beep, indicating successful unpairing.
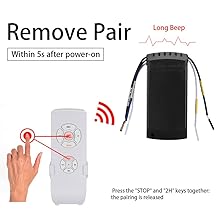
Image 5.2: Remote control unpairing process.
6. Operating Instructions
Familiarize yourself with the remote control buttons for optimal use of your ceiling fan and light kit.

Image 6.1: Remote control key descriptions.
6.1. Fan Control
- HI: Sets fan speed to High.
- MED: Sets fan speed to Medium.
- LOW: Sets fan speed to Low.
- STOP: Turns the fan OFF.
6.2. Light Control
- LIGHT ON/OFF: Toggles the fan light ON or OFF. (Note: This kit does not support dimming.)
6.3. Timing Function
The timing function allows you to set the fan to automatically turn off after a specified duration.
- 1H: Sets the fan to turn off after 1 hour.
- 2H: Sets the fan to turn off after 2 hours.
- 4H: Sets the fan to turn off after 4 hours.
- 8H: Sets the fan to turn off after 8 hours.

Image 6.2: Timing function controls for fan and light.
6.4. Mute Function (Buzzer Control)
The receiver emits a beep sound upon receiving a command. You can turn this buzzer ON or OFF.
- To Turn OFF Buzzer: Within 5 seconds after power-on, long press the "STOP" button. The buzzer will turn off, and the unit will switch to a non-silent state.
- To Turn ON Buzzer: Within 5 seconds after power-on, long press the "STOP" button again. The buzzer will turn on, and the unit will switch to a silent state (meaning it will beep).
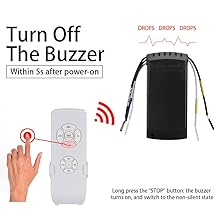
Image 6.3: Turning off the buzzer.

Image 6.4: Turning on the buzzer.
7. Troubleshooting
If you encounter issues with your QIACHIP remote control kit, refer to the following common problems and solutions.
7.1. Fan Operates at Only One Speed
- Existing Controller: If your fan originally had an internal controller that could not adjust speed, then this kit will also be unable to adjust speed. Ensure the original fan setup supported multiple speeds.
- Original Controller Setting: Verify that the original fan's speed setting (if applicable) was not fixed to a single speed.
- Compatibility: There might be a compatibility issue with your specific fan model.
7.2. Remote Controls Multiple Fans Simultaneously
This can occur if multiple receivers are paired to the same remote frequency.
- Unpair Unwanted Fan: First, unpair the remote from the fan you do NOT wish to control. Follow the "Unpairing the Remote Control" steps in Section 5.2 for that specific fan.
- Re-pair Desired Fan: Then, re-pair the remote with the fan you intend to control. Follow the "Pairing the Remote Control" steps in Section 5.1 for the desired fan.
7.3. General Non-Responsiveness
- Battery Check: Ensure the remote control batteries (2x AAA, not included) are correctly installed and not depleted.
- Power Supply: Verify that the ceiling fan has power.
- Wiring: Double-check all wiring connections as per the installation instructions. Ensure connections are secure.
- Re-pairing: Attempt to re-pair the remote control with the receiver as described in Section 5.1.
8. Specifications
| Feature | Specification |
|---|---|
| Model Number | FLC-110V |
| Brand | QIACHIP |
| Voltage | 110 Volts AC |
| Material | ABS |
| Receiver Dimensions (L x W x H) | 4.56 x 2.12 x 1.1 inches (approx. 11.6 x 5.4 x 2.8 cm) |
| Remote Dimensions (L x W) | 5.23 x 1.96 inches (approx. 13.1 x 5 cm) |
| Item Weight | 6.3 ounces (approx. 178g) |
| Power Source | AC |
| Remote Battery Type | 2 AAA batteries (not included) |
| Max Fan Load Power | 300W |
| Max Incandescent Light Load Power | 1000W |
| Max LED/Energy Saving Light Load Power | 200W |
| Capacitor Type | T4+5 µF (starting 4 µF/running 5 µF) |
| Special Features | New Technology (semiconductor switches), Mute Function |

Image 8.1: Dimensions of the remote control and receiver.
Important Note on Capacitors: The kit's running capacitor is 5 µF. If your existing fan's running capacitor is also 5 µF, it offers the most compatible performance. A deviation of 1 µF is nearly perfect. A deviation of 2 µF may result in a 1-2 step speed difference, requiring adjustment of the fan's capacitance. A deviation of 3 µF or more may cause significant speed variations, and purchase is not recommended in such cases.
9. Maintenance
The QIACHIP remote control kit requires minimal maintenance.
- Cleaning: Wipe the remote control with a soft, dry cloth. Do not use abrasive cleaners or solvents.
- Battery Replacement: Replace AAA batteries in the remote control when its performance diminishes.
- Environmental Conditions: Avoid exposing the remote or receiver to extreme temperatures, humidity, or direct sunlight.
10. Warranty and Support
For any issues or questions regarding your QIACHIP Universal Ceiling Fan and Light Remote Control Kit, please refer to your purchase documentation or contact the seller directly for support and warranty information.


